Compute
Elastic Cloud Server
Huawei Cloud Flexus
Bare Metal Server
Auto Scaling
Image Management Service
Dedicated Host
FunctionGraph
Cloud Phone Host
Huawei Cloud EulerOS
Networking
Virtual Private Cloud
Elastic IP
Elastic Load Balance
NAT Gateway
Direct Connect
Virtual Private Network
VPC Endpoint
Cloud Connect
Enterprise Router
Enterprise Switch
Global Accelerator
Management & Governance
Cloud Eye
Identity and Access Management
Cloud Trace Service
Resource Formation Service
Tag Management Service
Log Tank Service
Config
OneAccess
Resource Access Manager
Simple Message Notification
Application Performance Management
Application Operations Management
Organizations
Optimization Advisor
IAM Identity Center
Cloud Operations Center
Resource Governance Center
Migration
Server Migration Service
Object Storage Migration Service
Cloud Data Migration
Migration Center
Cloud Ecosystem
KooGallery
Partner Center
User Support
My Account
Billing Center
Cost Center
Resource Center
Enterprise Management
Service Tickets
HUAWEI CLOUD (International) FAQs
ICP Filing
Support Plans
My Credentials
Customer Operation Capabilities
Partner Support Plans
Professional Services
Analytics
MapReduce Service
Data Lake Insight
CloudTable Service
Cloud Search Service
Data Lake Visualization
Data Ingestion Service
GaussDB(DWS)
DataArts Studio
Data Lake Factory
DataArts Lake Formation
IoT
IoT Device Access
Others
Product Pricing Details
System Permissions
Console Quick Start
Common FAQs
Instructions for Associating with a HUAWEI CLOUD Partner
Message Center
Security & Compliance
Security Technologies and Applications
Web Application Firewall
Host Security Service
Cloud Firewall
SecMaster
Anti-DDoS Service
Data Encryption Workshop
Database Security Service
Cloud Bastion Host
Data Security Center
Cloud Certificate Manager
Edge Security
Managed Threat Detection
Blockchain
Blockchain Service
Web3 Node Engine Service
Media Services
Media Processing Center
Video On Demand
Live
SparkRTC
MetaStudio
Storage
Object Storage Service
Elastic Volume Service
Cloud Backup and Recovery
Storage Disaster Recovery Service
Scalable File Service Turbo
Scalable File Service
Volume Backup Service
Cloud Server Backup Service
Data Express Service
Dedicated Distributed Storage Service
Containers
Cloud Container Engine
SoftWare Repository for Container
Application Service Mesh
Ubiquitous Cloud Native Service
Cloud Container Instance
Databases
Relational Database Service
Document Database Service
Data Admin Service
Data Replication Service
GeminiDB
GaussDB
Distributed Database Middleware
Database and Application Migration UGO
TaurusDB
Middleware
Distributed Cache Service
API Gateway
Distributed Message Service for Kafka
Distributed Message Service for RabbitMQ
Distributed Message Service for RocketMQ
Cloud Service Engine
Multi-Site High Availability Service
EventGrid
Dedicated Cloud
Dedicated Computing Cluster
Business Applications
Workspace
ROMA Connect
Message & SMS
Domain Name Service
Edge Data Center Management
Meeting
AI
Face Recognition Service
Graph Engine Service
Content Moderation
Image Recognition
Optical Character Recognition
ModelArts
ImageSearch
Conversational Bot Service
Speech Interaction Service
Huawei HiLens
Video Intelligent Analysis Service
Developer Tools
SDK Developer Guide
API Request Signing Guide
Terraform
Koo Command Line Interface
Content Delivery & Edge Computing
Content Delivery Network
Intelligent EdgeFabric
CloudPond
Intelligent EdgeCloud
Solutions
SAP Cloud
High Performance Computing
Developer Services
ServiceStage
CodeArts
CodeArts PerfTest
CodeArts Req
CodeArts Pipeline
CodeArts Build
CodeArts Deploy
CodeArts Artifact
CodeArts TestPlan
CodeArts Check
CodeArts Repo
Cloud Application Engine
MacroVerse aPaaS
KooMessage
KooPhone
KooDrive

Step 7: Managing Project Tests

Updated on 2024-11-18 GMT+08:00

CodeArts TestPlan provides a one-stop cloud test platform that integrates DevOps agile test concepts, helping to efficiently manage test activities and ensure high-quality product delivery.

This section describes how Billy manages the test period of a project, including creating and executing test cases and tracking the test progress.

Creating a Sprint Test Plan

After the requirements (stories) to be implemented in sprint 4 are determined (that is, Step 1: Managing Project Plans is complete), the tester can write test cases while the developer codes.

  1. Create a test plan.

    1. Go to the Phoenix Mall project and choose Testing > Testing Plan.
    2. Click Create Plan and configure test plan information.
      1. Basic information: Configure the following information and click Next.
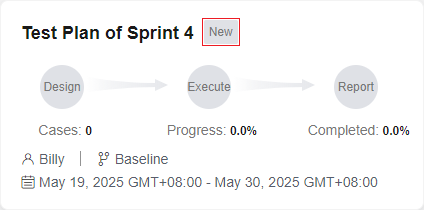
        Table 1 Basic information about a test plan

        Sub-Configuration Item

        Suggestion

        Name

        Enter Sprint4.

        Processor

        Select Billy.

        Plan Period

        Use the same period as Sprint4 created in Req.

        Associated Sprint

        Select Sprint4.

      2. Advanced settings: Select Manual Test. Confirm that the requirements in the list are the same as those of Sprint4 in CodeArts Req, and then click Save and Use.
    3. Return to the Testing Plan page. You can find the newly created test plan Sprint4 in the list. The test plan is in the new state.

  2. Design test cases.

    1. In the test plan Sprint4, click Design.
    2. Expand the Requirements on the left of the page and find the story User can query network of all stores.

      Click and choose Create Test Case.

      Figure 1 Creating a test case
    3. Enter Store Network Query, edit the test steps and expected results by referring to Table 2, and click Save.
      Table 2 Test steps

      Test Step

      Expected Result

      Opening the homepage of Phoenix Mall

      The page is displayed.

      Clicking the Store Network menu

      The Store Network page is displayed. Location filtering is available on the page, and information about recommended stores is displayed at the bottom of the page.

      Selecting City A

      The store information list of city A is displayed.

    4. Create test cases for the other two stories in the same way.
    5. Choose Testing > Testing Plan from the navigation pane to return to the test plan list.

      In the list, the status of the test plan Sprint4 is Designing.

Executing a Test Plan

After developing story code and deploying applications on the test environment (completing Step 6: Deploying an Application (CCE) or Step 6: Deploying an Application (ECS)), the developer can set the story status to Resolved and set the story handler to the tester.

In this case, the tester can execute the test cases corresponding to the story.

This section uses the store network query function as an example to describe how to execute test cases and how to report bugs when test case execution fails.

  1. In the Phoenix Mall project, choose Work from the navigation pane, and click the Sprints tab.

    In sprint 4, find the story User can query network of all stores and change the story status to Testing.

  2. Go to the Testing > Testing Case page and select Sprint4 in the upper part of the page.
  3. In the list, click the case Store Network Query, change the status to Testing, and click Save.
  4. Click the Manual Test tab and click in the Operation column of the row where Store Network Query is located. The Execute window is displayed on the right.
  5. Execute the steps one by one in the test environment.

    • If the operation is successful, go to 6 to continue the operation.
    • If the execution fails, for example, when you perform step 2, the page fails to be redirected and 404 is displayed, go to 7.
      Figure 2 Page display failure

  6. Return to the test case execution window and record the execution result.

    1. In the table, set the actual result of all steps to Successful.
    2. In the upper part of the table, set the test case result to Successful.
    3. Select Set the case status to Completed.
    4. Click Save in the upper right corner of the page.
    Figure 3 Successful test case execution

    The status of the test case automatically changes to Completed. Go to 13 to continue the operation.

  7. Return to the test case execution window and record the execution result.

    1. In the table, set the actual result of step 1 to Successful.
    2. Set the actual result of step 2 to Failed and enter Redirection failure. 404 is displayed on the page.
    3. In the upper part of the table, set the test case result to Failed.
    4. Click Save in the upper right corner of the page.
    Figure 4 Test case execution failed

  8. Click in the upper right corner of the page and choose Create Defect. The defect creation (work item creation) page is displayed.
  9. At the end of the text box in the lower left corner of the page, view the reproduction procedure for automatically filling in the defect.

    Edit defect details by referring to Table 3 and click OK. The work item list page is displayed.

    Table 3 Defect details configuration

    Configuration Item

    Suggestion

    Title

    Enter Store Network 404.

    Assigned To

    Select Chris.

    Sprint

    Select Sprint4.

  10. In the work item list, find bug Store Network 404. Click the name and click the Associated tab. You can find the test case Store Network Query by expanding Associate with Test Case.
  11. Click the ID of an associated case to go to the case details page.

    Click the Bug tab. A bug is displayed, that is, the defect created in 9.

  12. After the developer fixes the defect and verifies it, they set the case result by referring to 6 and set the corresponding defect status to Closed.
  13. Execute other test cases.
  14. When the status of all cases is Completed, choose Testing > Testing Plan to return to the test plan list where the status of Sprint4 is displayed as Completed.

Tracking a Test Plan

  • Viewing the quality report

    Through the quality report, the team can intuitively check the current progress of the test plan, including the requirement coverage rate, defects, case pass rate, and case completion rate.

    On the Testing > Testing Plan page, click Report in the card of Sprint4 to view the quality report.

  • Customizing reports

    In addition to built-in quality reports, the team can customize statistical reports as needed.

    The following describes how to customize a statistical report by taking test case execution statistics as an example.
    1. On the Quality Dashboard page, click in the blank area in the lower part of the page and click Add Report. In the dialog box that is displayed, select Custom Reports.
    2. Edit the report information by referring to Table 4 and click Save.
      Table 4 Report configuration

      Configuration Item

      Suggestion

      Report Title

      Enter Test Case Execution Statistics.

      Data Type

      Select Test Cases.

      Analysis Dimension

      Select Result.

    3. The Quality Dashboard page is displayed. You can find the new report at the bottom of the page.

We use cookies to improve our site and your experience. By continuing to browse our site you accept our cookie policy. Find out more

Feedback

Feedback

Feedback

0/500

Selected Content

Submit selected content with the feedback