Building with Maven, Uploading the Software Package, and Pushing the Image to SWR (Built-in Executors, Code)
Scenario
CodeArts Build allows you to define your build as code using YAML. Your configurations, such as build environments, parameters, commands, and actions, reside in a YAML file (named build.yml in this practice). After creating this file, add it along with the source code to a code repository. The file will be used as a script by the system to run a build, making the process traceable, recoverable, secure, and reliable. In this practice, you build with Maven, upload the resulting software package to the release repo, and push the image to SWR.
These steps depend on the following services:
- SoftWare Repository for Container (SWR): provides repositories to store Docker images uploaded by users. These images can be used in build, deployment, and other scenarios.
- CodeArts Repo: stores your project code.
- CodeArts Artifact: stores your private dependencies.
Requirements
- You have created an organization named codeci_gray in SWR.
- You have permissions for CodeArts Artifact.
- You have permissions for CodeArts Repo.
- You can only use the code hosted in CodeArts Repo for YAML builds.
Procedure
|
Step |
Description |
|---|---|
|
Create a project. |
|
|
Create a CodeArts Repo repository to store code files. |
|
|
Define the entire build process in build.yml. |
|
|
Customize an image by modifying the Dockerfile. |
|
|
Create a build task. |
|
|
View and verify the build results. |
Creating a Project
- Log in to the Huawei Cloud console with your Huawei Cloud account.
- Click
 in the upper left corner and choose from the service list.
 - Click Access Service. The homepage of CodeArts is displayed.
- Click Create Project, and select the Scrum template.
- Set the project name to build-bestpractice, and leave the other parameters as default.
- Click OK to access the project.
Creating a CodeArts Repo Repository
- In the navigation pane, choose .
- On the displayed page, click New Repository. Select Template, and click Next.
- On the template selection page, select the Java Maven Demo template and click Next.
- On the repository creation page, type maven_yml_build in the Repository Name field, and leave the other parameters as default.
- Click OK. The repository details page is displayed.
Creating a build.yml File
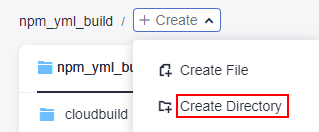
- On the code repository details page, click Create and select Create Directory from the drop-down list, as shown in Figure 1.
- On the Create Directory page, set parameters based on Table 2 and click OK.
Table 2 Creating a directory Parameter
Description
Directory Name
Enter a directory name, for example, .cloudbuild. Use 1 to 100 characters, including letters, digits, slashes (/), underscores (_), hyphens (-), and periods (.).
Commit Message
Describe the files within the directory. Use 1 to 2,000 characters.
- Click the name of the directory created in 2.
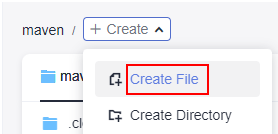
- Click Create and select Create File from the drop-down list, as shown in Figure 2.
- Name the file build.yml and copy the following code to the file:
# The YAML provided is a default template that can be edited as needed. --- version: 2.0 steps: BUILD: - maven: image: cloudbuild@maven3.5.3-jdk8-open # The image path can be customized. inputs: settings: public_repos: - https://mirrors.huawei.com/maven cache: true # Determine whether to enable caching. command: mvn package -Dmaven.test.failure.ignore=true -U -e -X -B - upload_artifact: inputs: path: "**/target/*.?ar" - build_image: inputs: organization: codeci_gray # Organization name image_name: maven_demo # Image name image_tag: 1.0 # Image tag dockerfile_path: ./Dockerfile - Click Submit.
Creating a Dockerfile
- In the root directory, create a file named Dockerfile by following 4. The code in the file is as follows:
FROM swr.regionID.myhuaweicloud.com/codeci/special_base_image:centos7-base-1.0.2
MAINTAINER <devcloud@demo.com>
USER root
RUN mkdir /demo
COPY ./target/server-1.0.jar /demo/app.jar
server-1.0.jar combines the values of artifactId, packaging, and version in the pom.xml file.
- Click Submit.
Creating a Build Task
- In the navigation pane, choose .
- Click Create Task. On the displayed Basic Information page, set parameters according to Table 3.
Table 3 Basic information Parameter
Description
Name
Assign a custom name to the build task, for example, maven_yml_build.
Code Source
Select Repo.
Repository
Select Repo01, the code repository created in Creating a CodeArts Repo Repository.
Default Branch
Keep the default value master.
Description
Enter additional information to describe the build task.
- Click Next. On the displayed page, select Blank Template. Click OK. The Build Actions page is displayed.
- Click the Code tab. Then you can view the imported build script, as shown in Figure 3.
- Click Save and Execute in the upper right corner.
Viewing and Verifying the Build Results
- Checking the uploaded software package
- In the navigation pane, choose .
- On the displayed page, find the folder that shares the same name as the build task (the name you specify when creating the build task), as shown in Figure 4. The software package can be found within this folder.
- Checking the pushed image
- Go to the SWR console.
- In the navigation pane, choose My Images. In the search box, select Organization as the filter field, and type the organization name (codeci_gray is used in this example) you configure when creating a build.yml file.
- In the filtered results, click the image name (maven_demo is used in this example) you configure when creating a build.yml file.
Related Operations
- For Maven build questions, see Maven Build FAQs.
- For image questions, see Image FAQs.
Feedback
Was this page helpful?
Provide feedbackThank you very much for your feedback. We will continue working to improve the documentation.See the reply and handling status in My Cloud VOC.
For any further questions, feel free to contact us through the chatbot.
Chatbot


