Publishing an Application Through PoolBindings
Scenario
After deploying a workload on CCI 2.0, you can use ELB to access the workload pods over the public network. CCI provides PoolBindings that can automatically add the deployed pods to or remove them from the associated backend server group. You can specify the load balancer and listener configurations on the ELB console and configure advanced forwarding policies for load balancing at Layer 7.
Example Description
In this example, the Nginx image is used to create two Deployments. Two Services are created, with one for each Deployment. Two PoolBindings and two backend server groups are required. The pods for running the Deployments can be automatically added to and removed from the backend server groups. A load balancer and a listener are created, with an advanced forwarding policy configured for routing traffic to the pod in a different backend server group.
Procedure
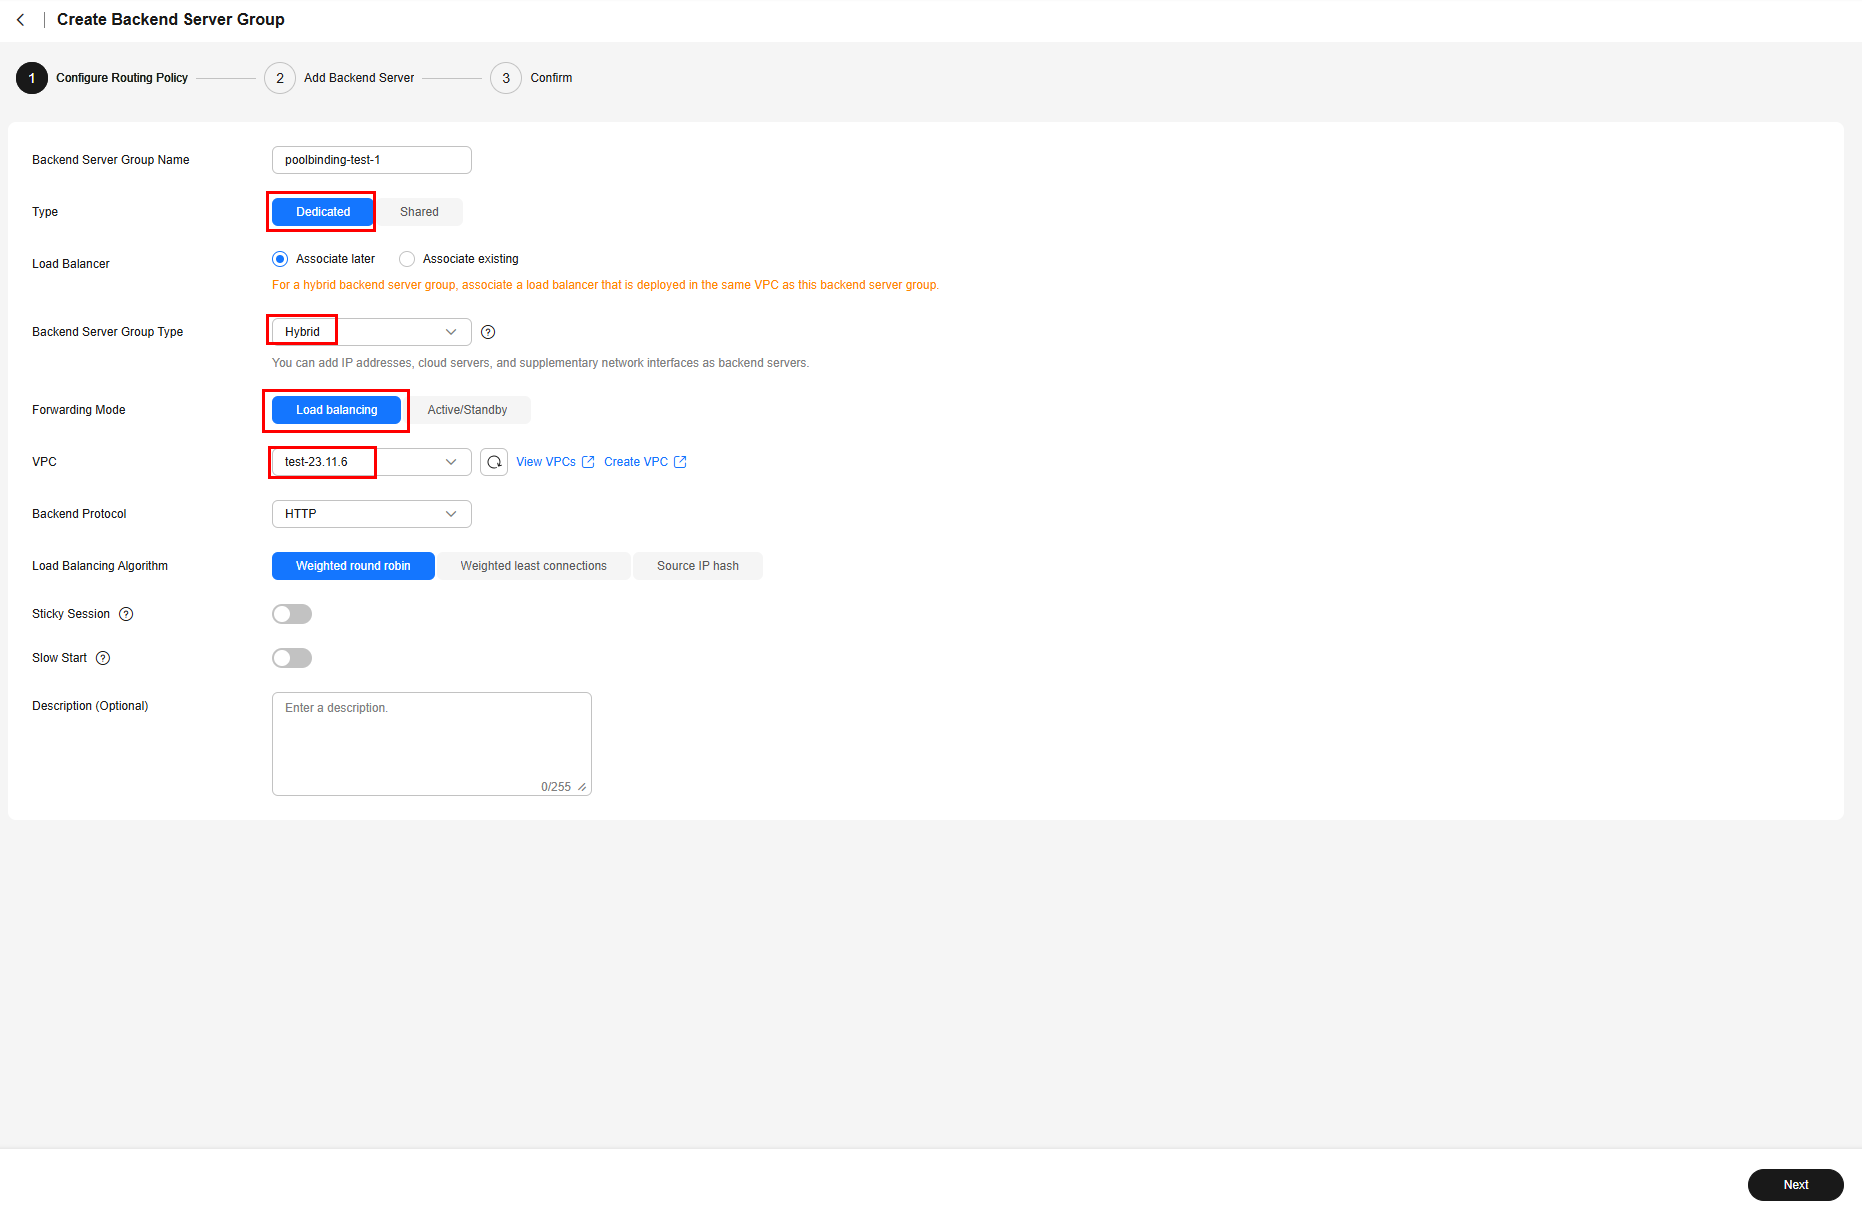
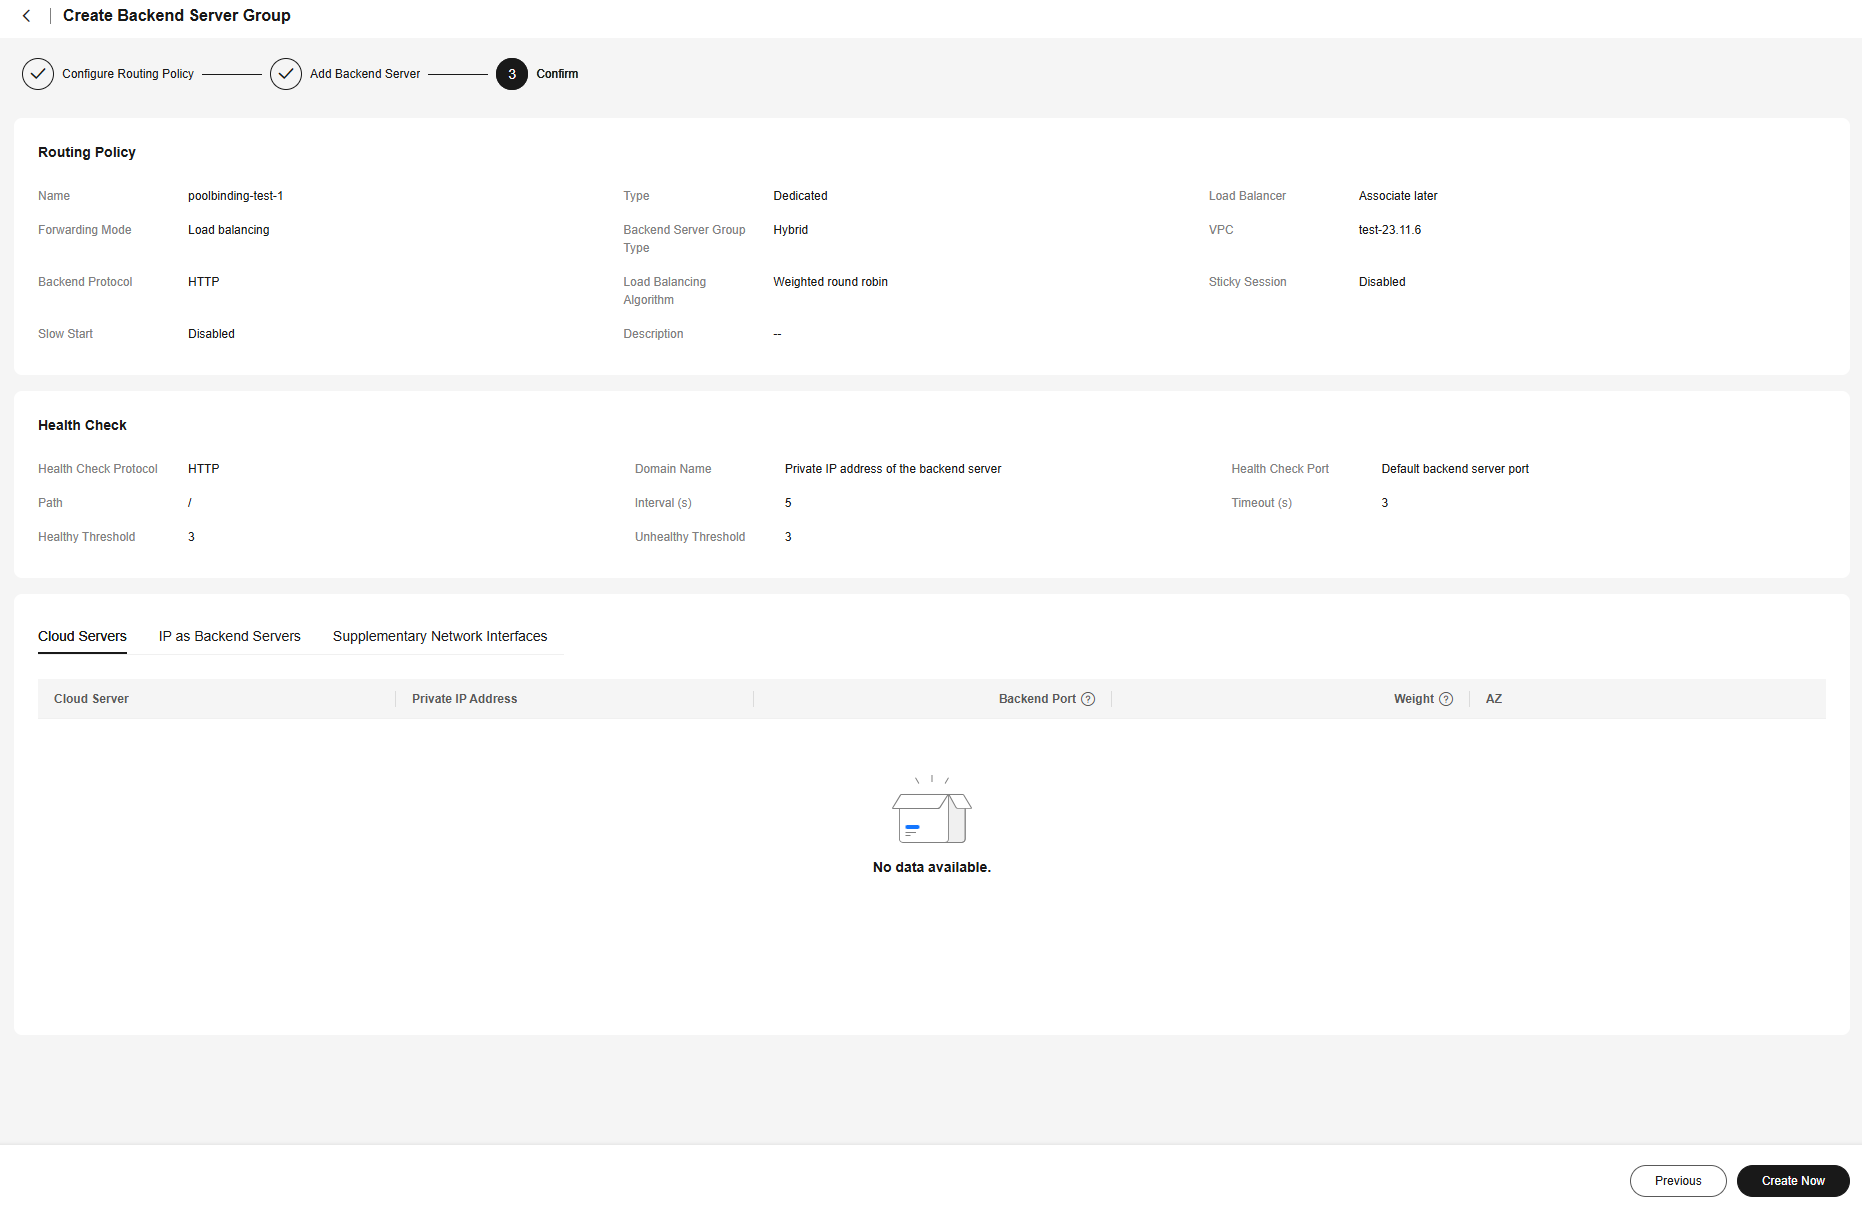
- Log in to the ELB console, choose Backend Server Groups in the navigation pane, and then click Create Backend Server Group. There are two Deployments in this example. Take the following steps to create two backend server groups:
- Configure a routing policy.
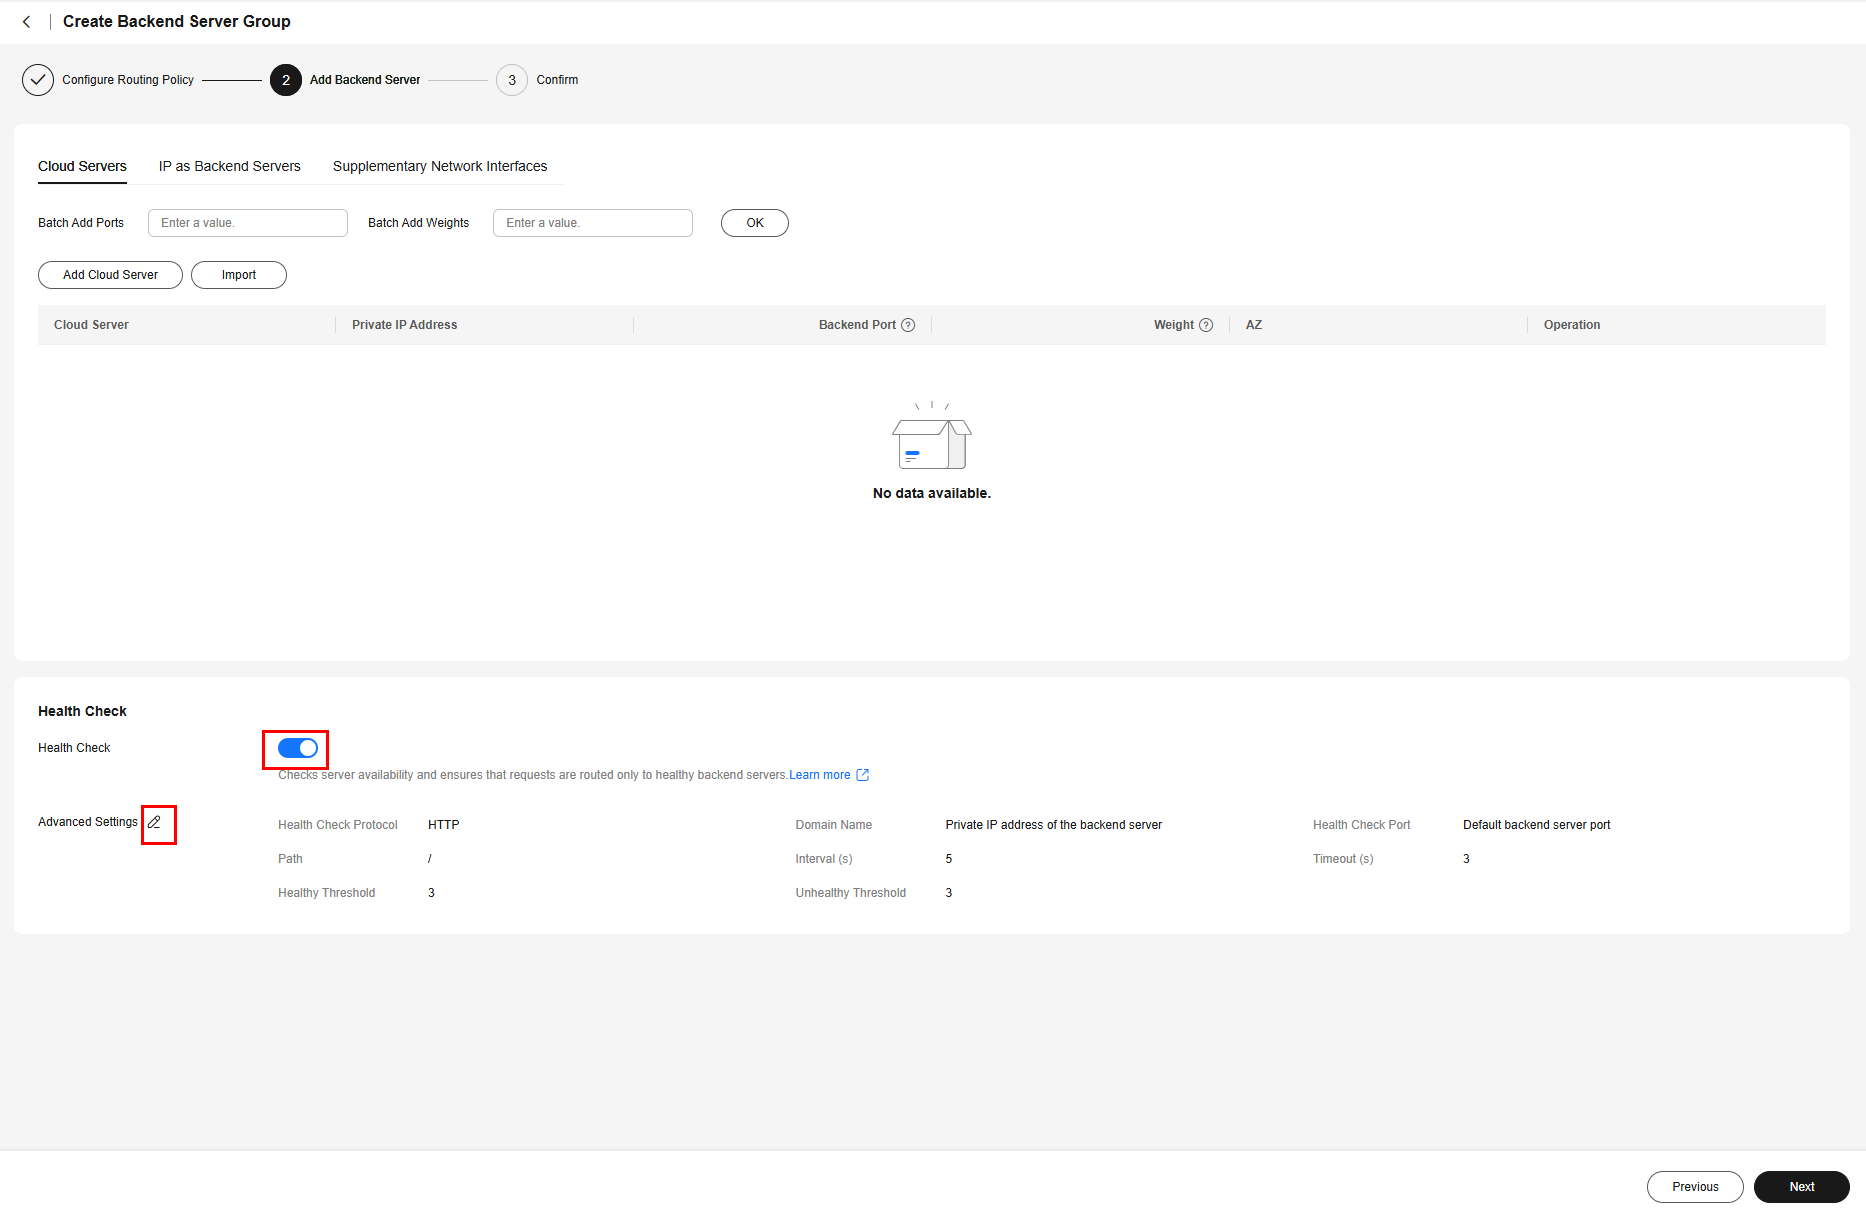
- Add backend servers.
With PoolBindings, you do not need to add pods to the backend server groups manually. You only need to determine whether to enable health check and configure the health check details. If health check is enabled, edit Advanced Settings, modify health check parameters, and ensure that access to the pod is allowed.
In this example, the Nginx image is used. After health check is enabled, you can retain the default settings.
- On the CCI 2.0 console, choose Workloads in the navigation pane, then select the corresponding namespace, and click Create from YAML.
Create two Deployments by referring to the following YAML file.
Example YAML file for creating a Deployment:kind: Deployment apiVersion: cci/v2 metadata: name: deploy-1 namespace: test-ns spec: replicas: 1 selector: matchLabels: app: nginx-test-1 template: metadata: creationTimestamp: null labels: app: nginx-test-1 spec: containers: - name: nginx image: 'nginx:latest' ports: - containerPort: 80 //Container port protocol: TCP resources: limits: cpu: 500m memory: 1Gi requests: cpu: 500m memory: 1Gi terminationMessagePath: /dev/termination-log terminationMessagePolicy: File restartPolicy: Always terminationGracePeriodSeconds: 30 dnsPolicy: Default securityContext: {} schedulerName: default-scheduler strategy: type: RollingUpdate rollingUpdate: maxUnavailable: 25% maxSurge: 25% progressDeadlineSeconds: 600 - On the CCI 2.0 console, choose Services in the navigation pane, then select the corresponding namespace, and click Create from YAML. Create two Services by referring to the following YAML file.
Example YAML file for creating a Service:
apiVersion: cci/v2 kind: Service metadata: name: svc-1 namespace: test-ns annotations: kubernetes.io/elb.class: elb kubernetes.io/elb.id: 123******* //Load balancer ID. Only dedicated load balancers are supported. kubernetes.io/elb.protocol-port: "http:2222" // HTTP and port number. The port number must be the same as that in spec.ports. spec: selector: app: nginx-test-1 //Label of the associated Deployment ports: - name: service-0 targetPort: 80 //Container port port: 2222 //Access port protocol: TCP //Protocol used to access the Deployment type: LoadBalancer - Create a PoolBinding.
Currently, creating a PoolBinding on the console is not supported. You can use the curl command or ccictl to create a PoolBinding.
The following uses ccictl as an example to describe how to create a PoolBinding. For details about how to configure ccictl, see ccictl Configuration Guide.
Create two PoolBindings using the following ccictl command and example YAML files and then associate each of them with a backend server group created in 1 and a Deployment created in 2 (or a Service created in 3):
ccictl create -f poolbinding.yaml
- Example YAML for associating a PoolBinding with a Deployment:
apiVersion: loadbalancer.networking.openvessel.io/v1 kind: PoolBinding metadata: name: plb-test-1 //Name of the PoolBinding to be created namespace: test-ns //Namespace of the PoolBinding. It must be in the same namespace as the associated Deployment. spec: poolRef: id: e08*****-****-****-****-********29c1 //ID of the backend server group created in Step 1 targetRef: kind: Deployment //Type of the backend object. In this example, the backend object is a Deployment. group: cci/v2 //Group of the backend object name: deploy-1 //Name of the backend object, which is the name of the Deployment created in Step 2 port: 80 //Target port number of the backend object. If the backend object is a Deployment, the port is the container port. - Example YAML for associating a PoolBinding with a Service:
apiVersion: loadbalancer.networking.openvessel.io/v1
kind: PoolBinding
metadata:
  name: plb-test-c1  //Name of the PoolBinding to be created
  namespace: test-ns //Namespace of the PoolBinding. It must be in the same namespace as the associated Deployment.
spec:
  poolRef:
    id: e08*****-****-****-****-********29c1 //ID of the backend server group created in Step 1
  targetRef:
    kind: Service   //Type of the backend object. In this example, the backend object is a Service.
    group: cci/v2    //Group of the backend object
     name: svc-1    //Name of the backend object, which is the name of the Service created in Step 3
    port: 2222      //Target port number of the associated backend object. If the backend object is a Service, the value is the access port of the Service.
- Example YAML for associating a PoolBinding with a Deployment:
- On the ELB console, view the details of each backend server group created in 1, select Backend Servers, and check whether the pod is already added to the backend server group.


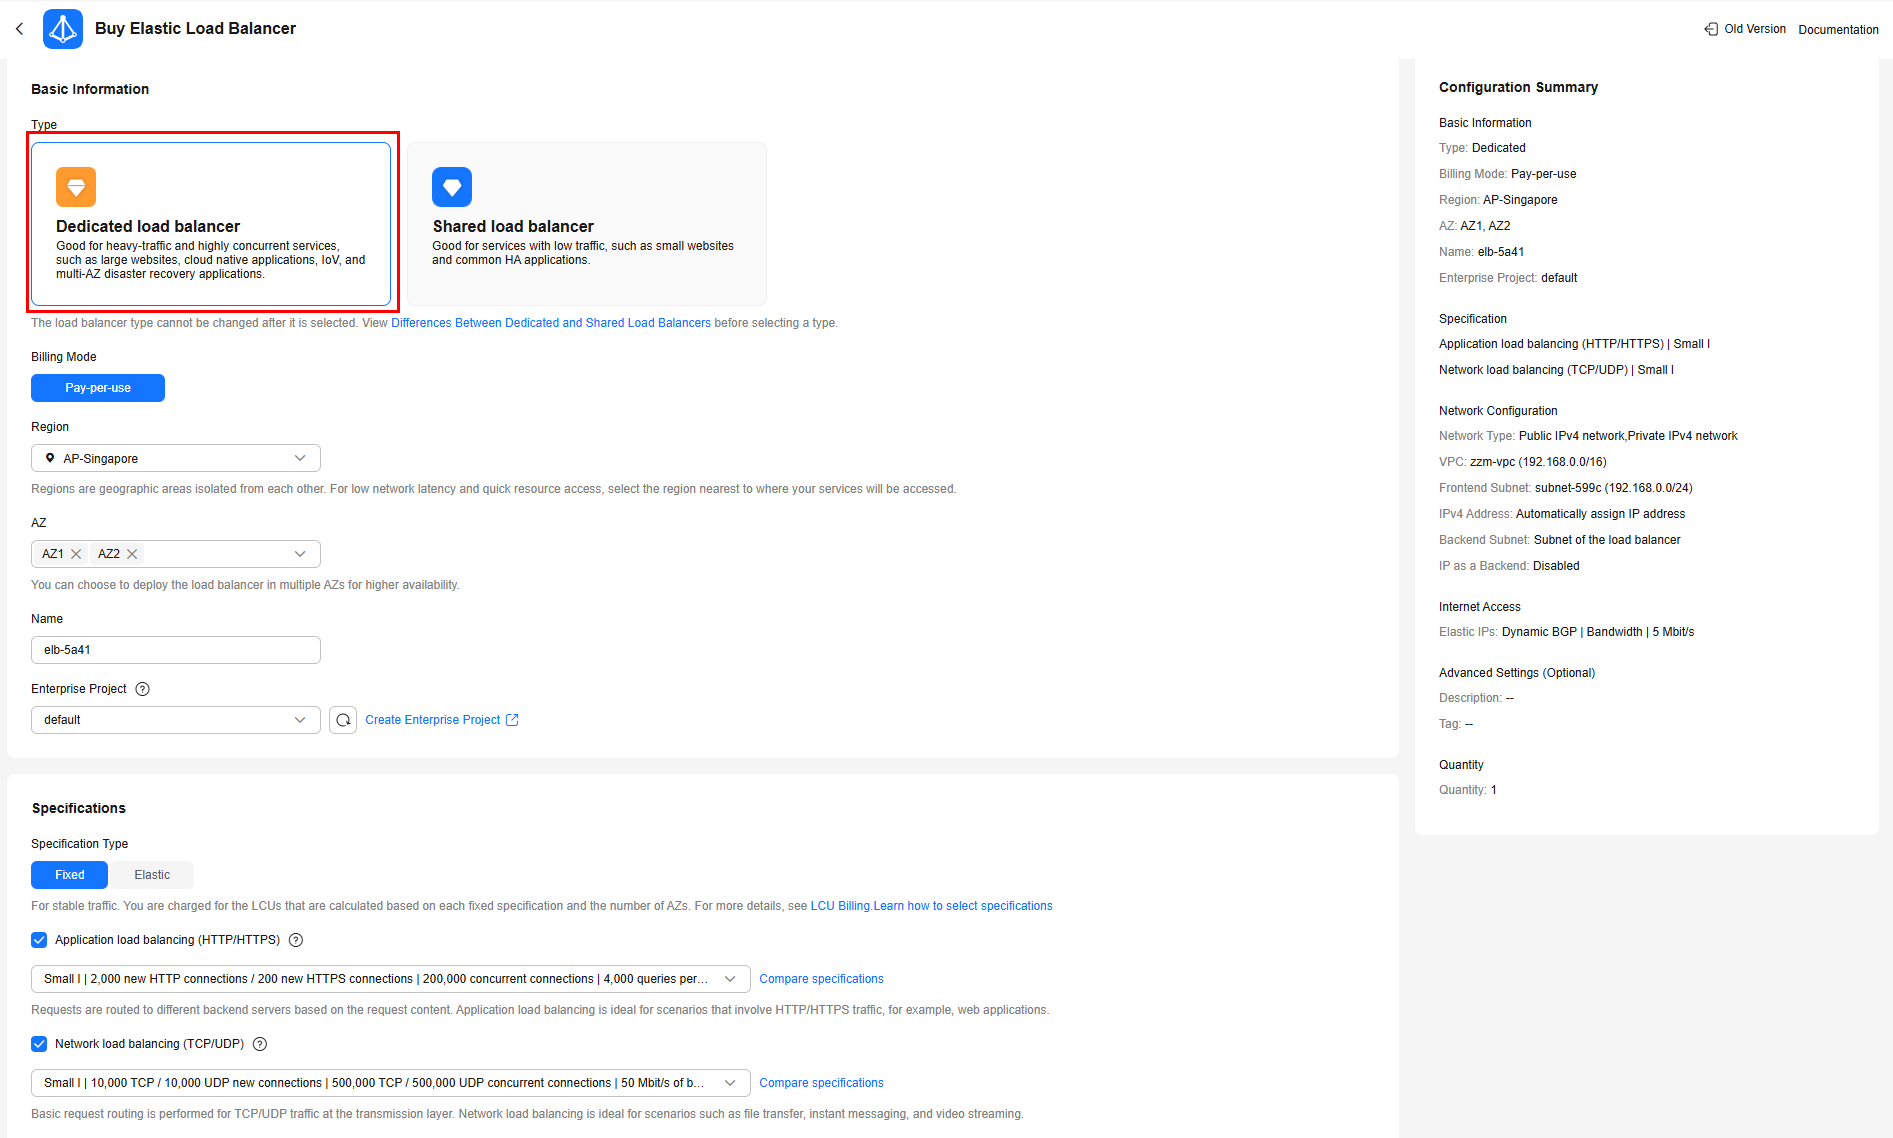
- On the ELB console, click Buy Elastic Load Balancer.
- In the Basic Information area, set Type to Dedicated load balancer.
- In the Specifications area, set Specification Type to Fixed and select both Network load balancing and Application load balancing.
- In the Network Configuration area, set Network Type to Private IPv4 network. The VPC must be the same as that of the Deployment created in 2.
- In the Internet Access area, select Auto assign for EIP.
- Specify other parameters as needed.
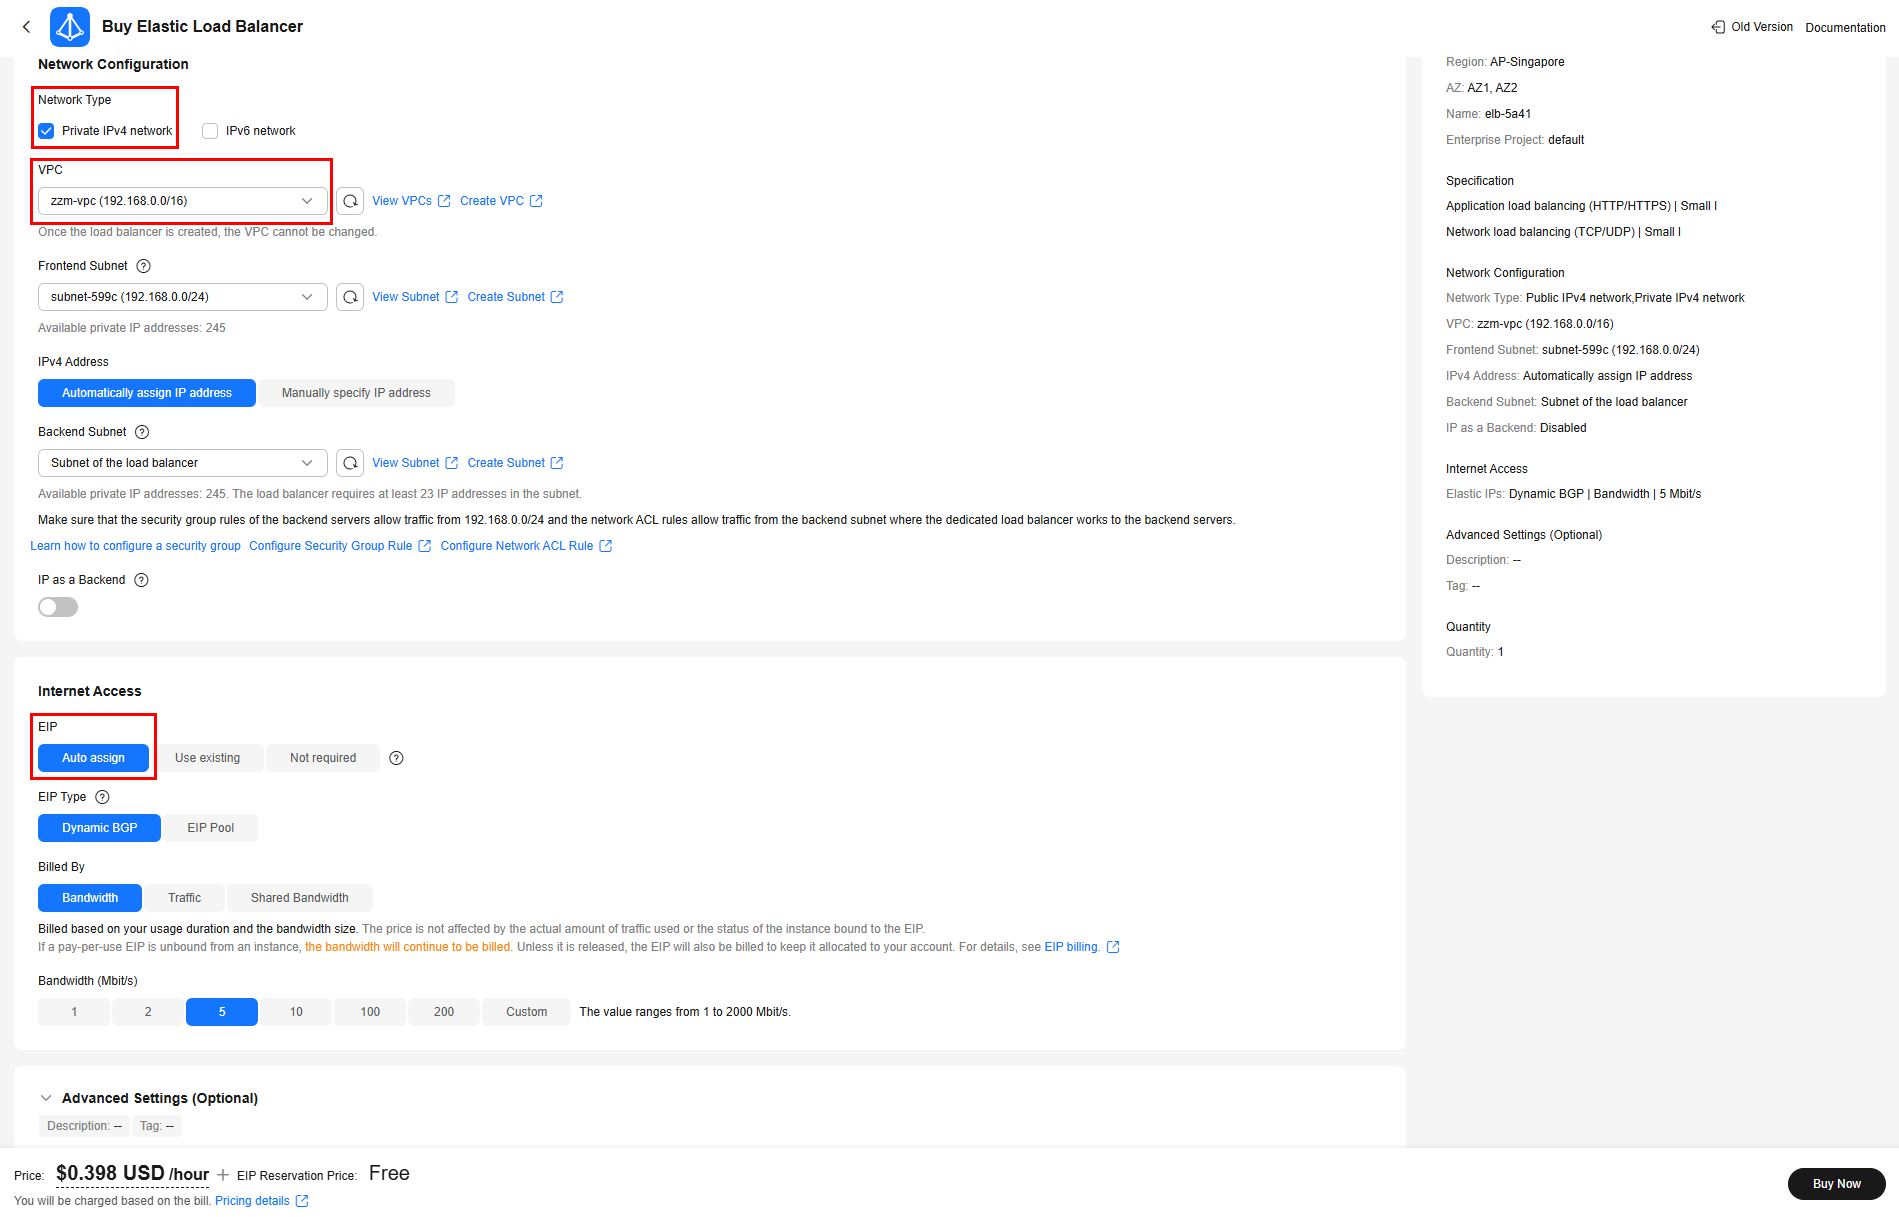
- Confirm the configuration and click Buy Now.
- On the ELB console, view the details of the load balancer created in 6. On the Listeners tab, click Add Listener.
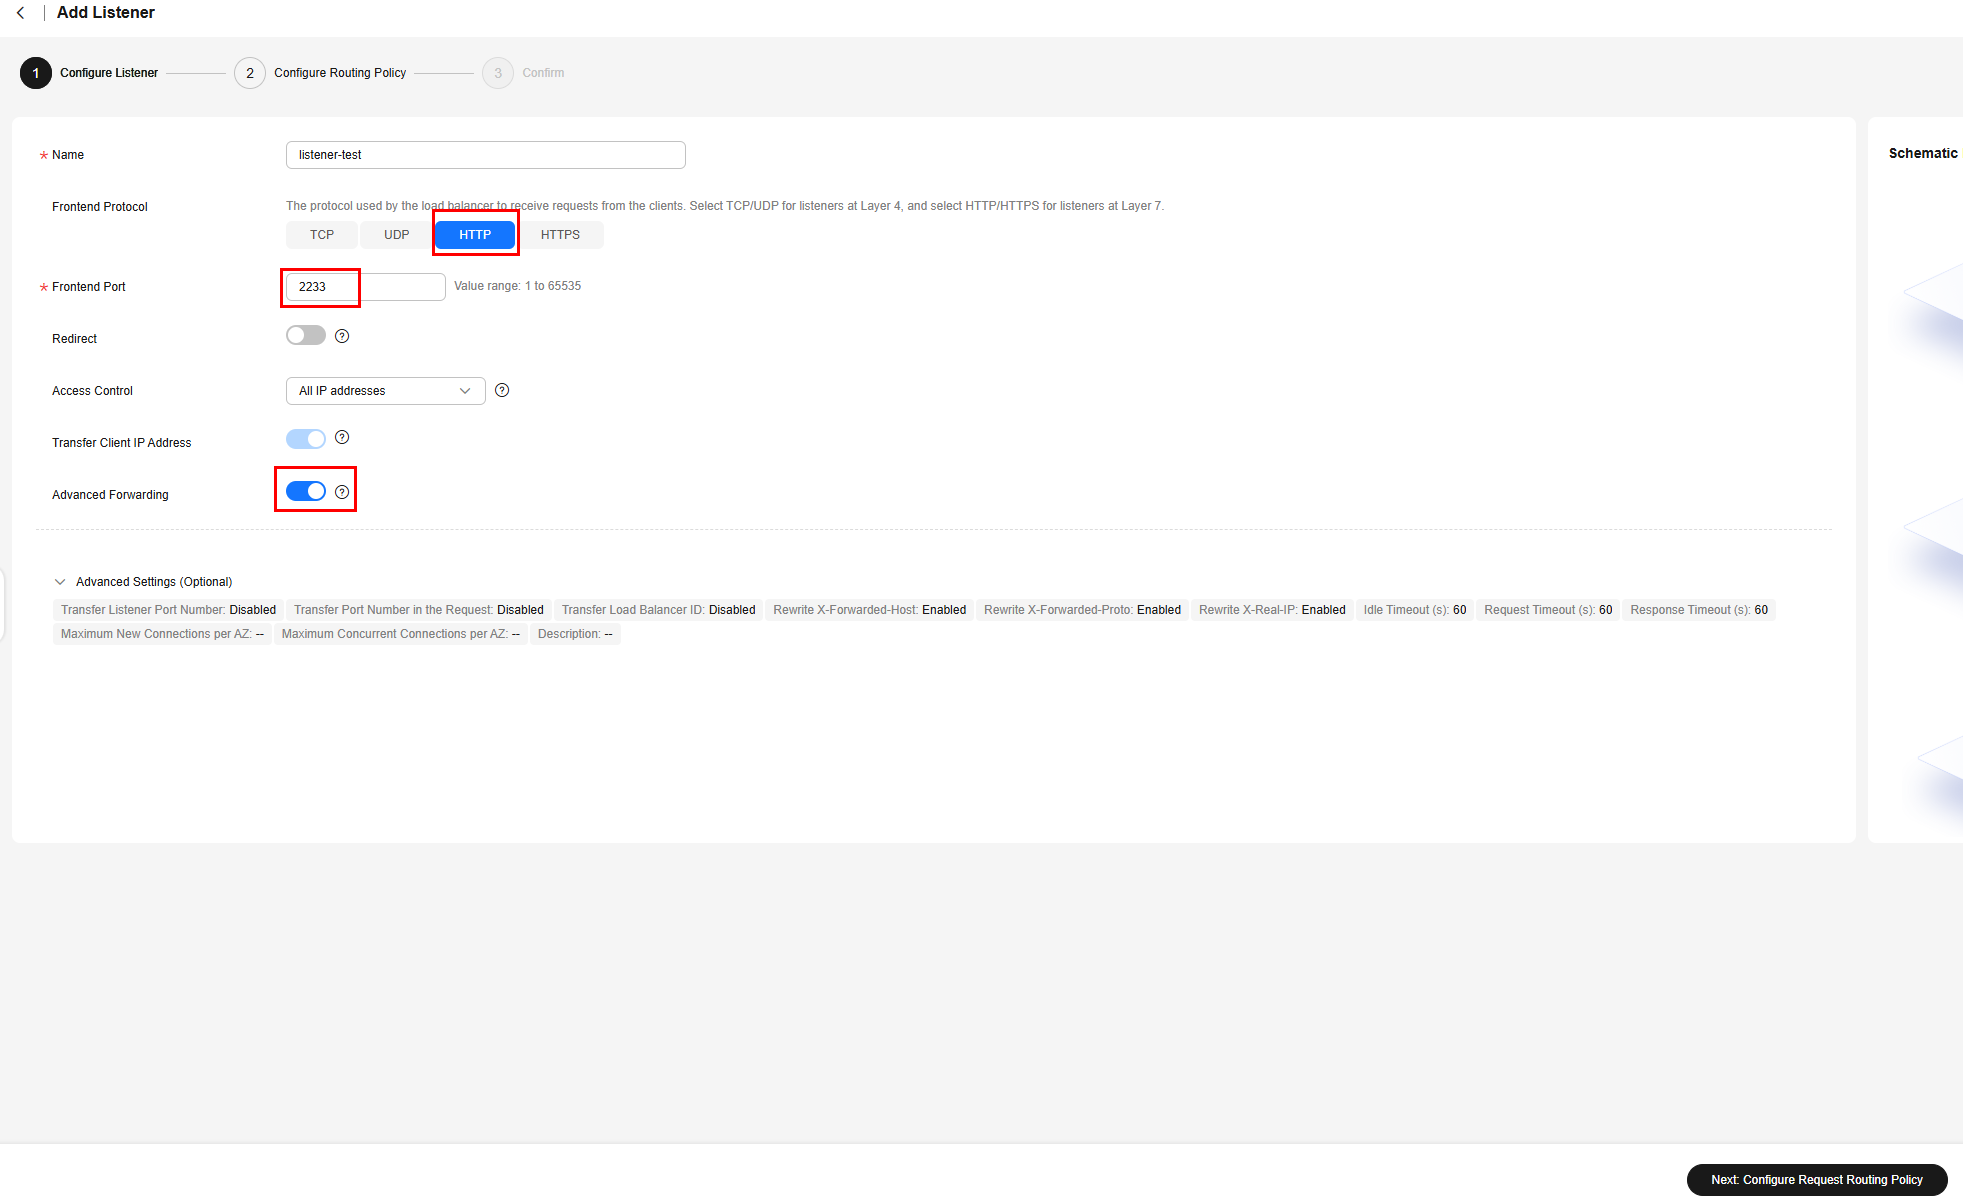
- Configure the listener as below. You can specify other parameters as needed. Then, click Next: Configure Request Routing Policy.
- Name: Enter a custom name.
- Frontend Protocol: HTTP
- Frontend Port: Enter a port.
- Advanced Forwarding: Enable this option.
- Configure a routing policy. Select Use existing for Backend Server Group, search for and select a backend server group created in 1 as the default backend server group, and click Next: Confirm.
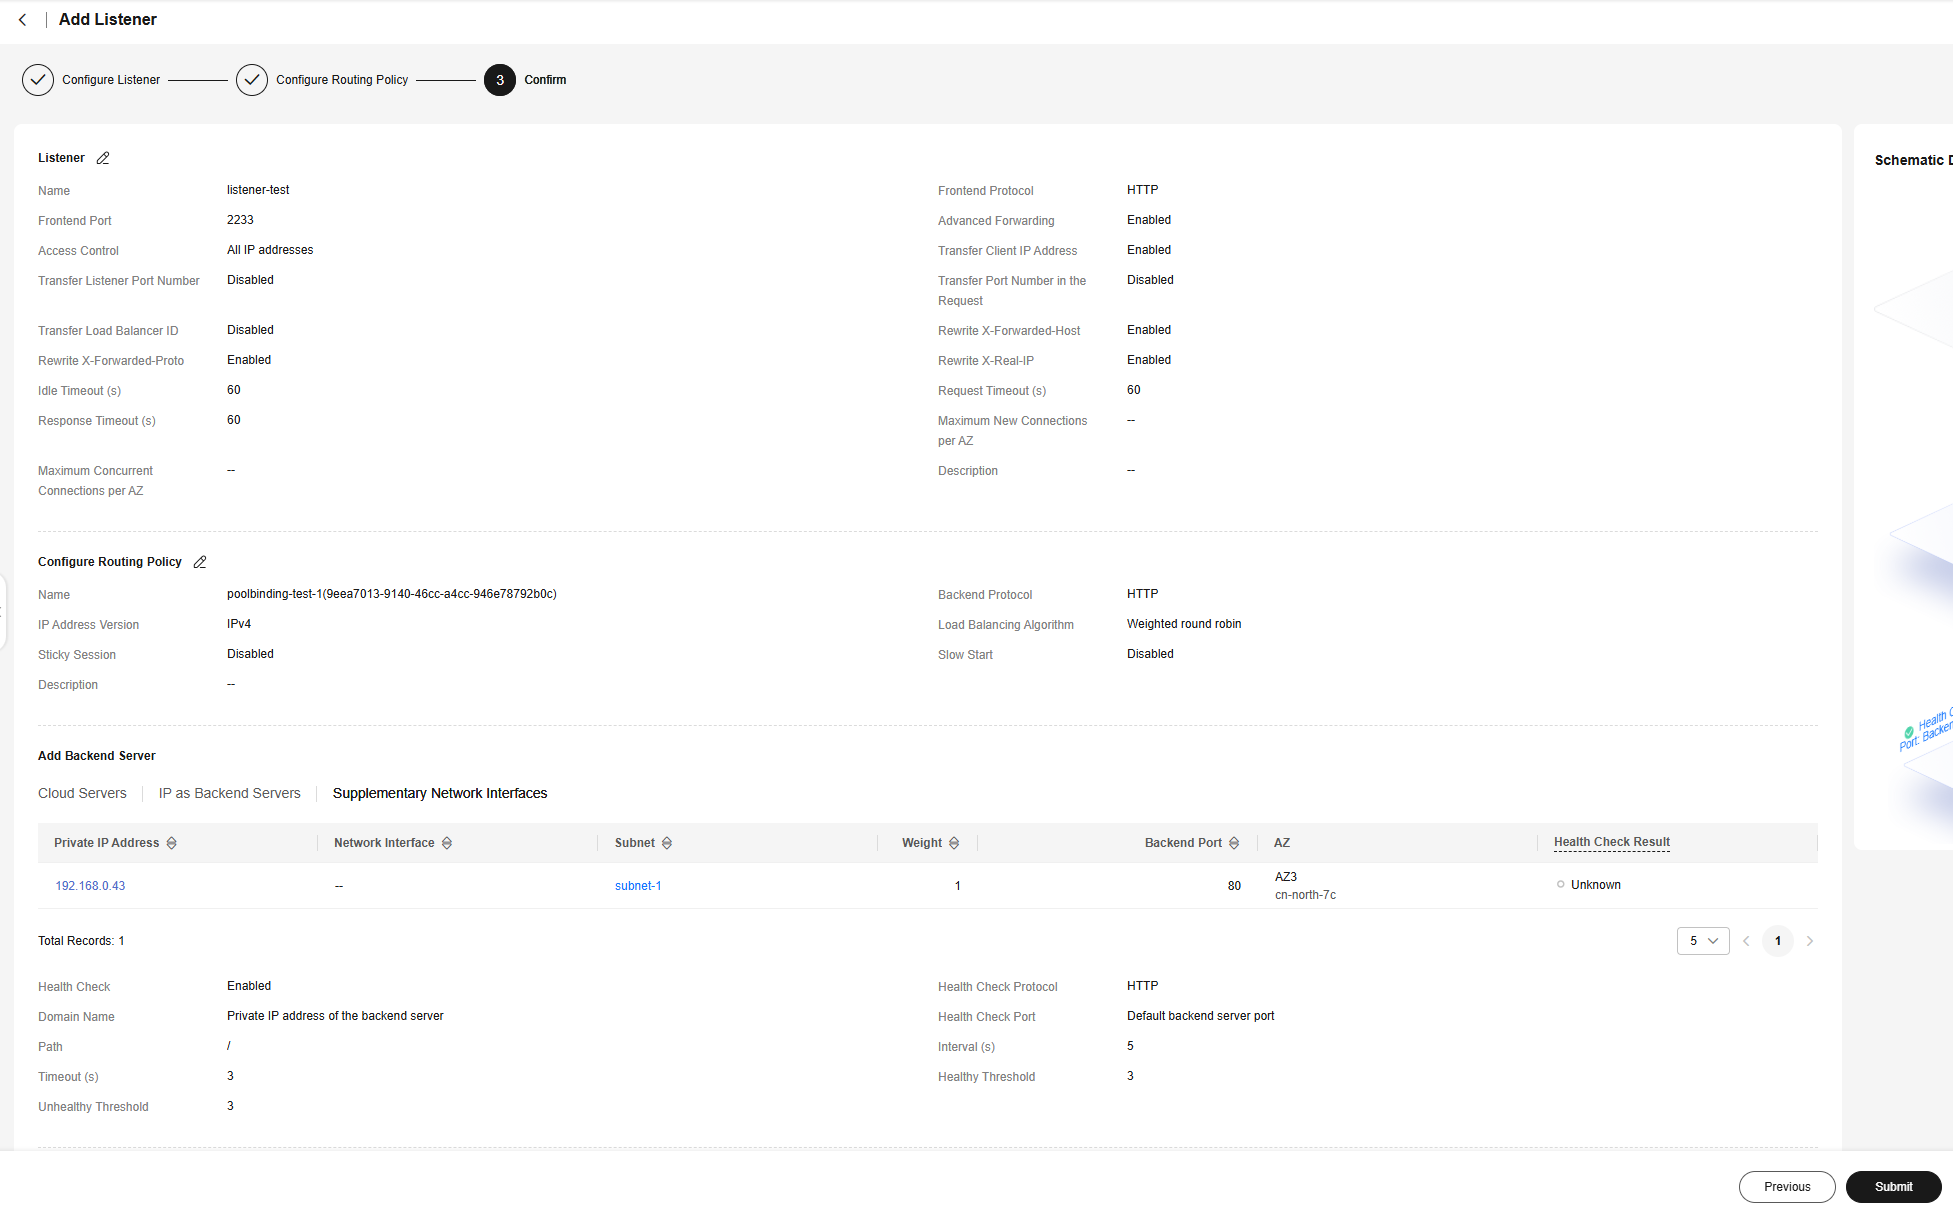
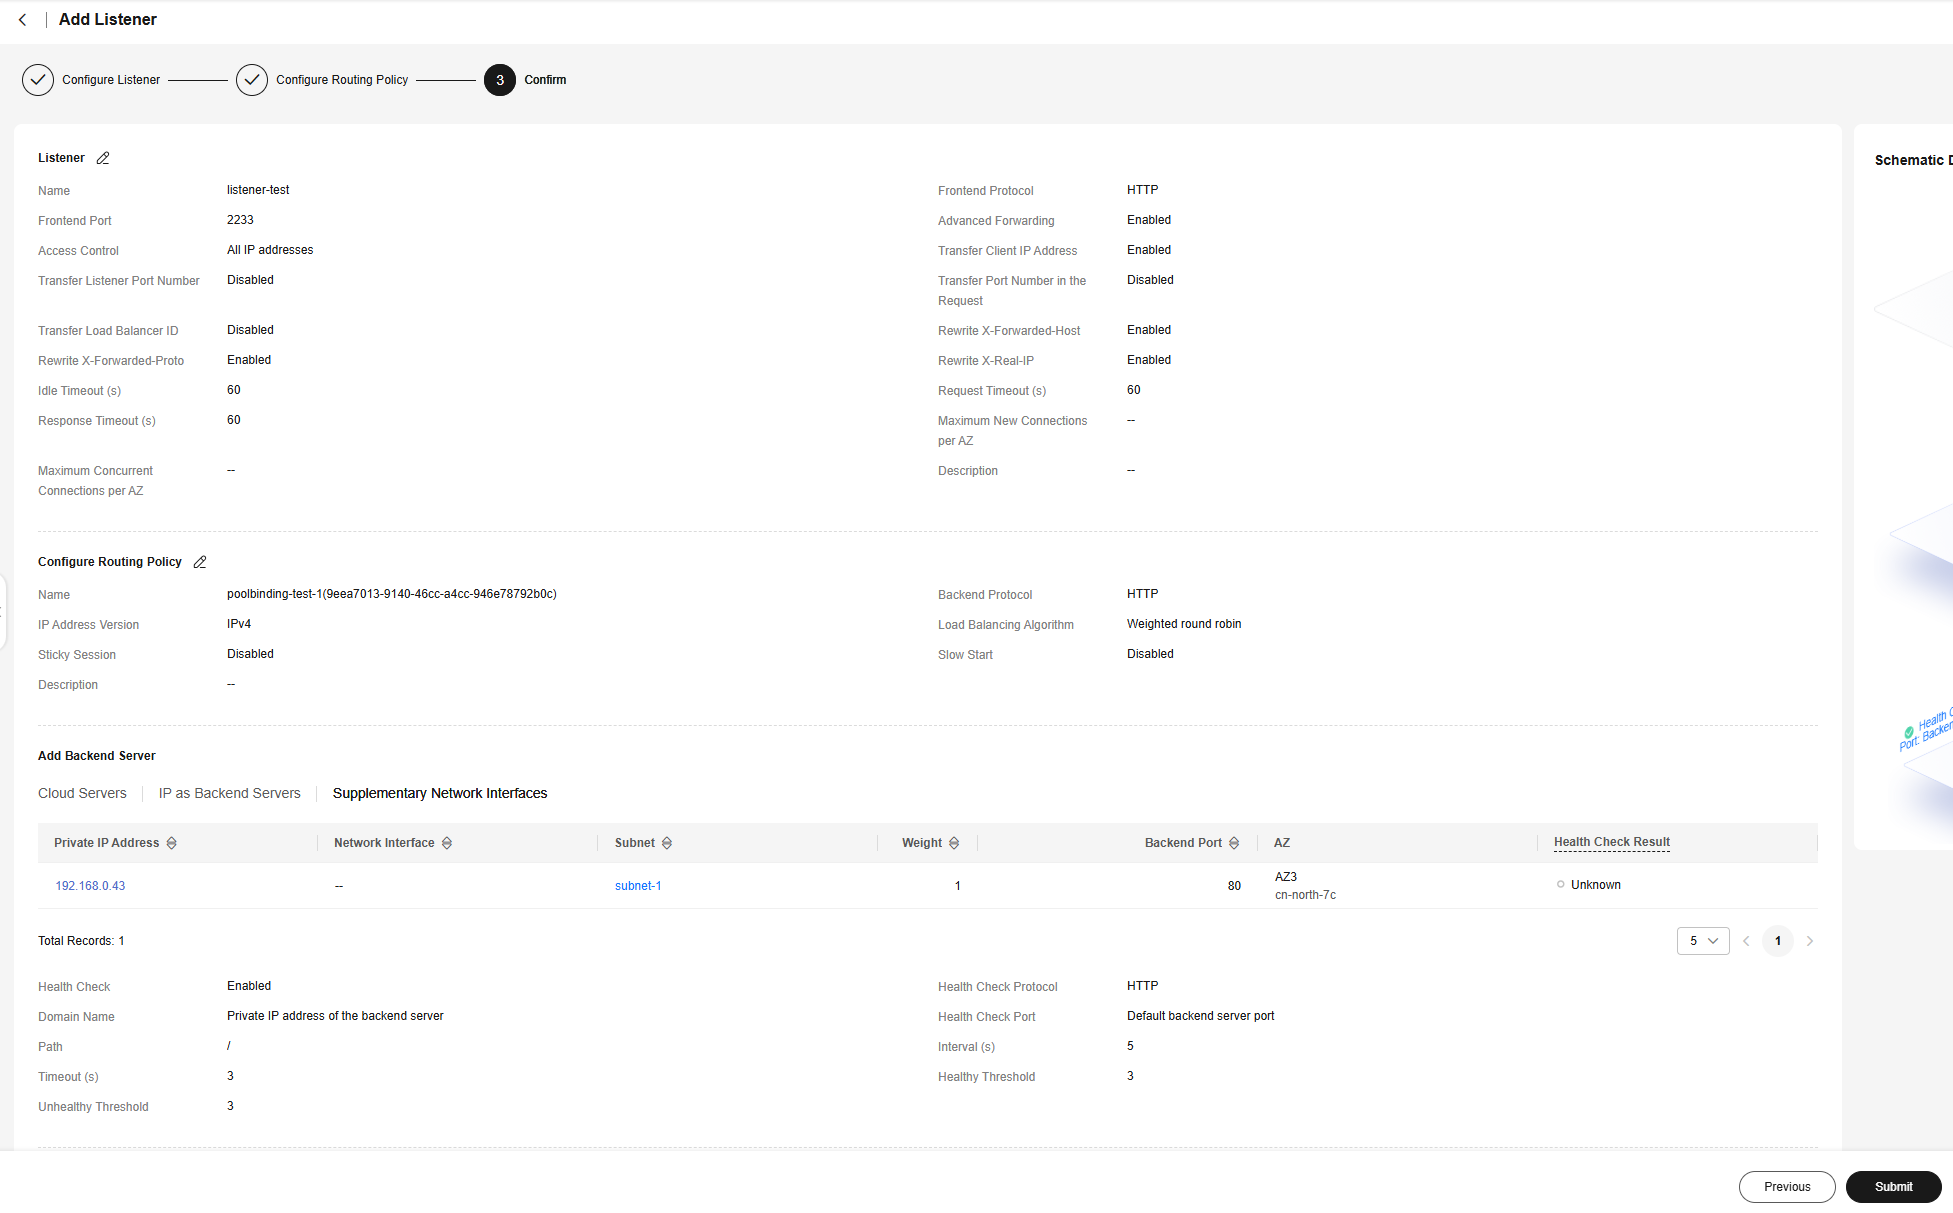
- Confirm the configurations and click Submit.
- Configure the listener as below. You can specify other parameters as needed. Then, click Next: Configure Request Routing Policy.
- On the ELB console, view details of the load balancer created in 6. On the Listeners tab, select the listener created in 8 and click Add/Edit Forwarding Policy in the Forwarding Policies column.

- Add a forwarding policy. Click Add Forwarding Policy, edit the policy, and select a forwarding rule. In this example, HTTP header is selected for If. You need to enter the key of the HTTP header. Select the backend server group that requests are forwarded to, which is the other backend server group created in 1 without used by any listeners. Confirm the configuration and click Save.

- Verify request forwarding.
- Make an HTTP request.
View the public IPv4 address of the load balancer and execute the curl command to make a request. The command syntaxes are as follows:
//No request header is carried.
while sleep 0.2;do curl http://$IP:$port;done
//A request header is carried.
while sleep 0.2;do curl http://$IP:$port -H "Type: always";done
- $IP: indicates the public IPv4 address of the load balancer.
- $port: indicates the frontend port of the listener.

- Send the request and view the backend traffic.
Execute the command to send the HTTP request. For example, if the workload is deployed using the Nginx image, you can run the ccictl logs command to view the request received by the pod.
ccictl logs -n $namespace $pod-name -f --tail=5 | grep -v "elb-healthcheck"
- $namespace: indicates the namespace where the workload is located.
- $pod-name: indicates the name of the workload pod.
- View the result.
- If the HTTP request header does not contain Type: always, the traffic is directed to the default backend server group.
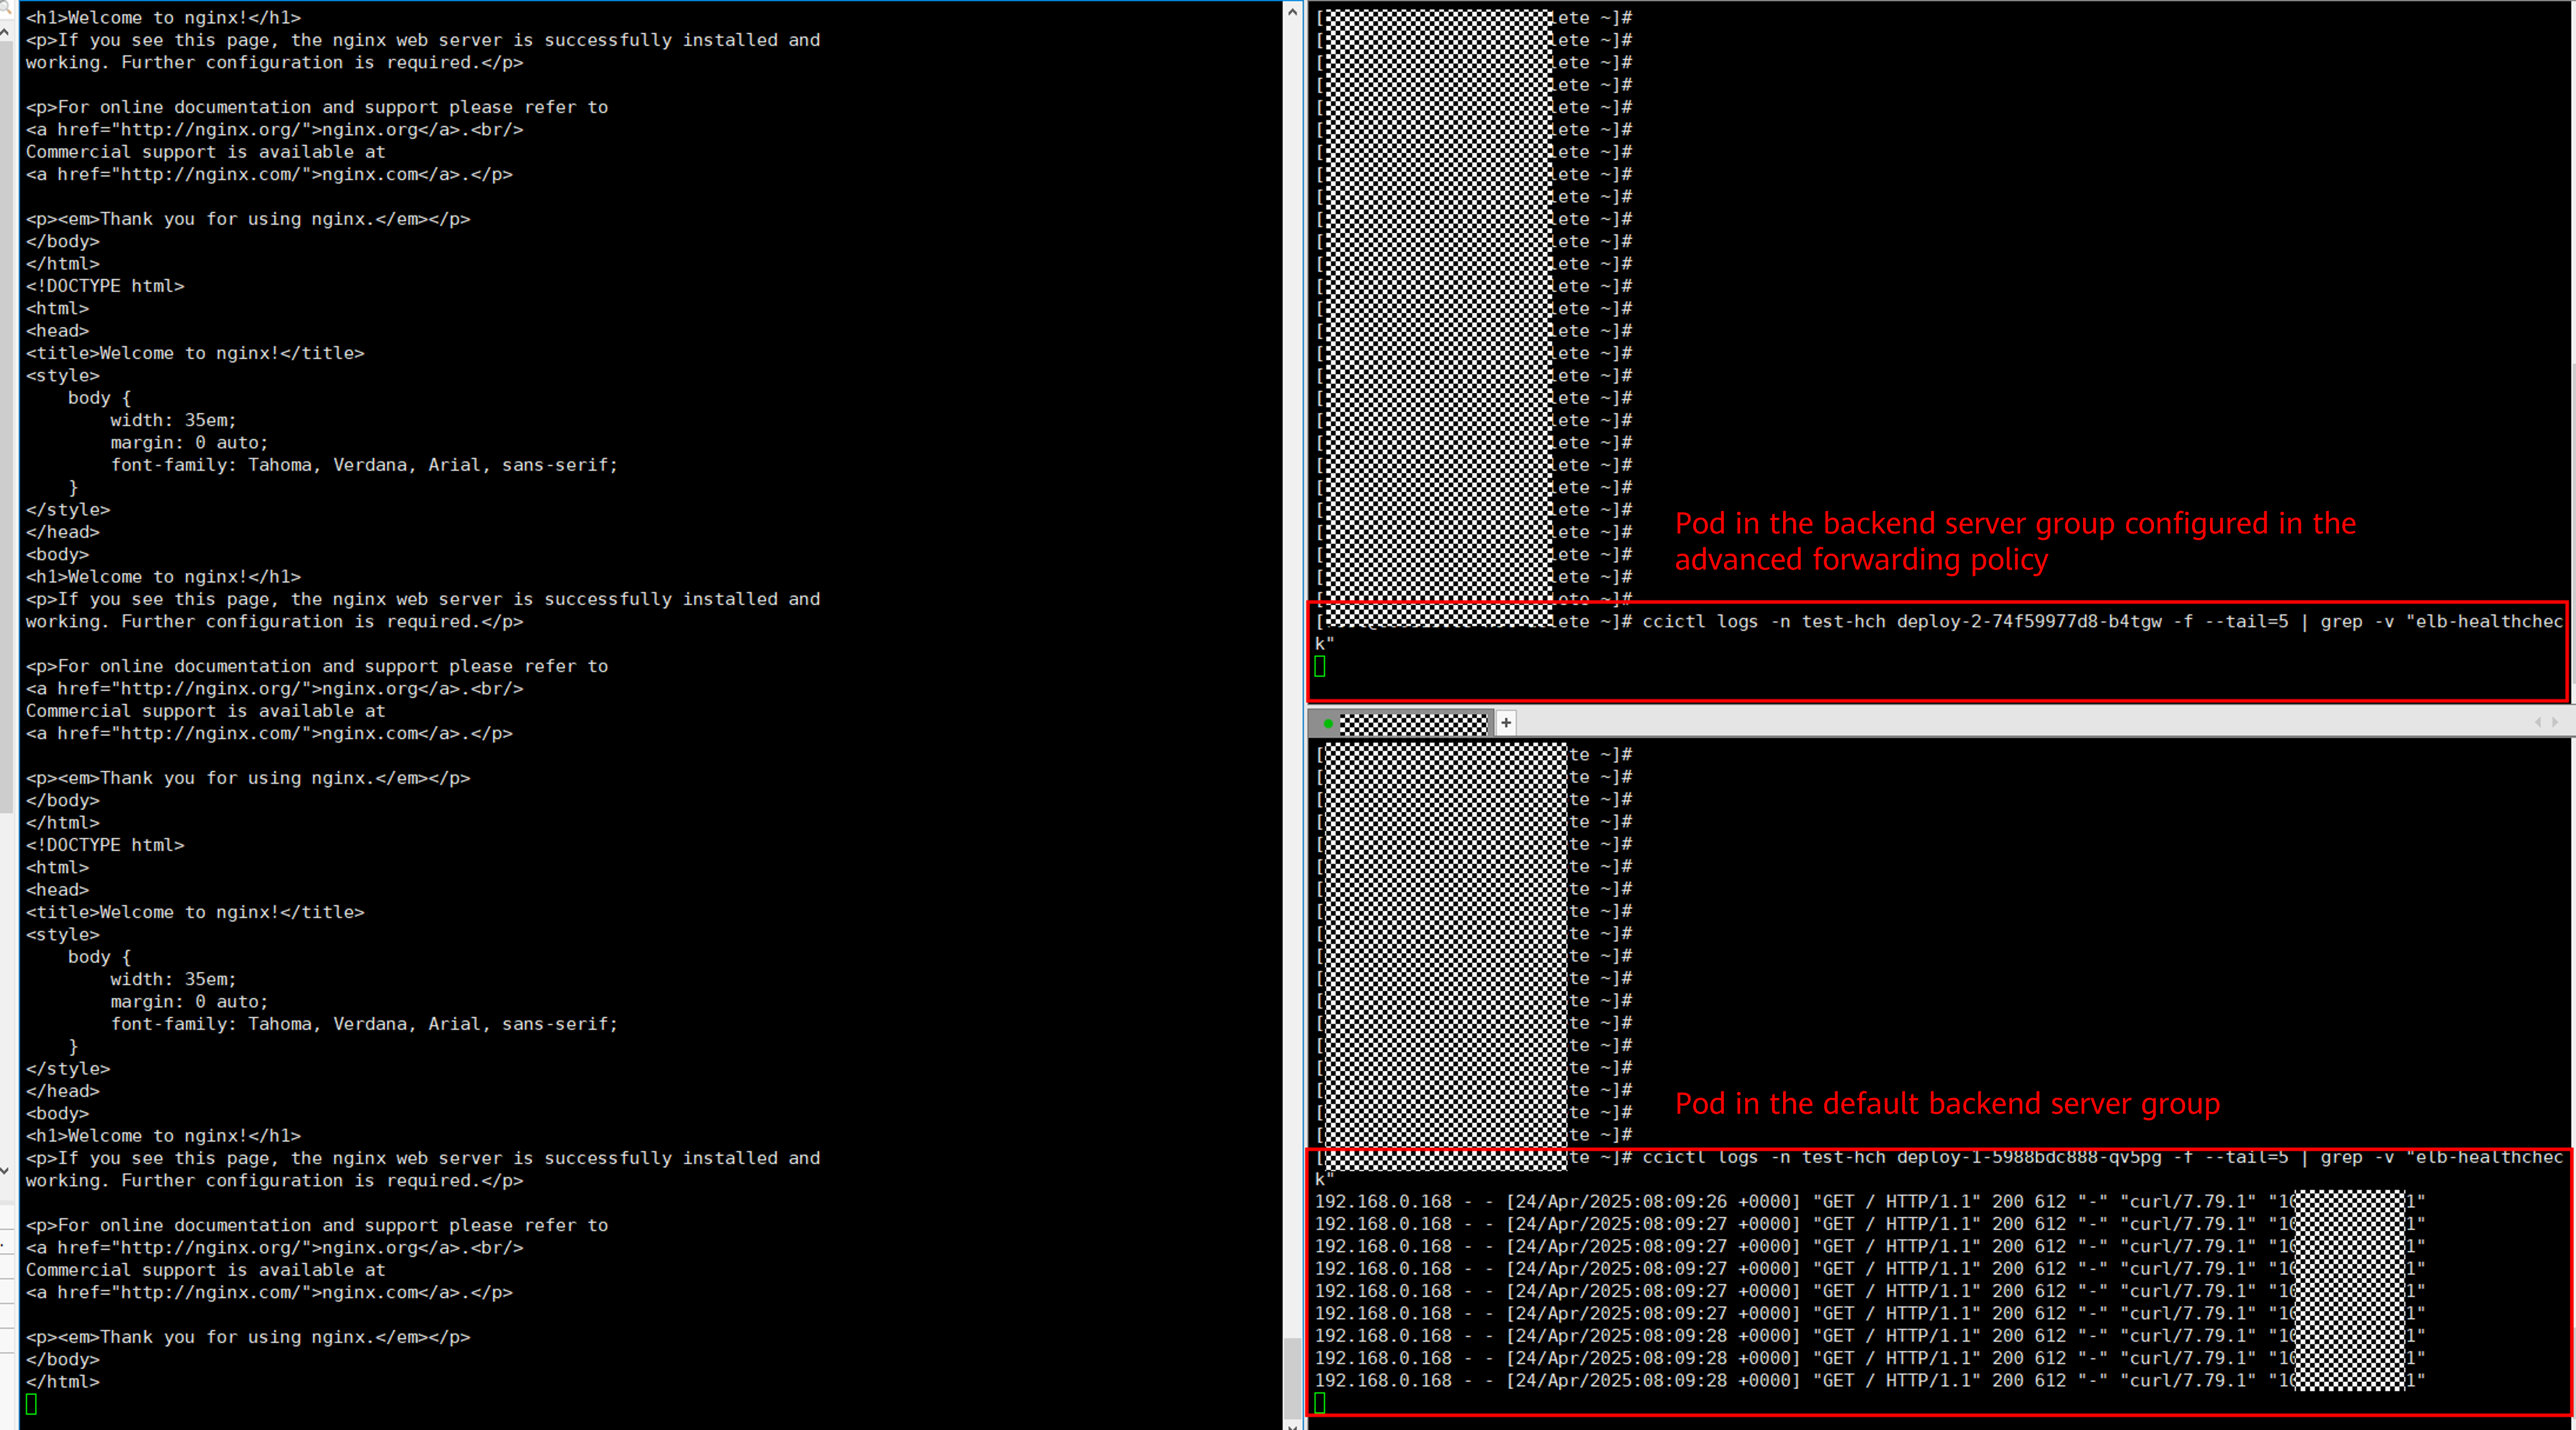
- If the HTTP request header contains Type: always, the traffic is forwarded to the backend server group configured in the advanced forwarding policy.
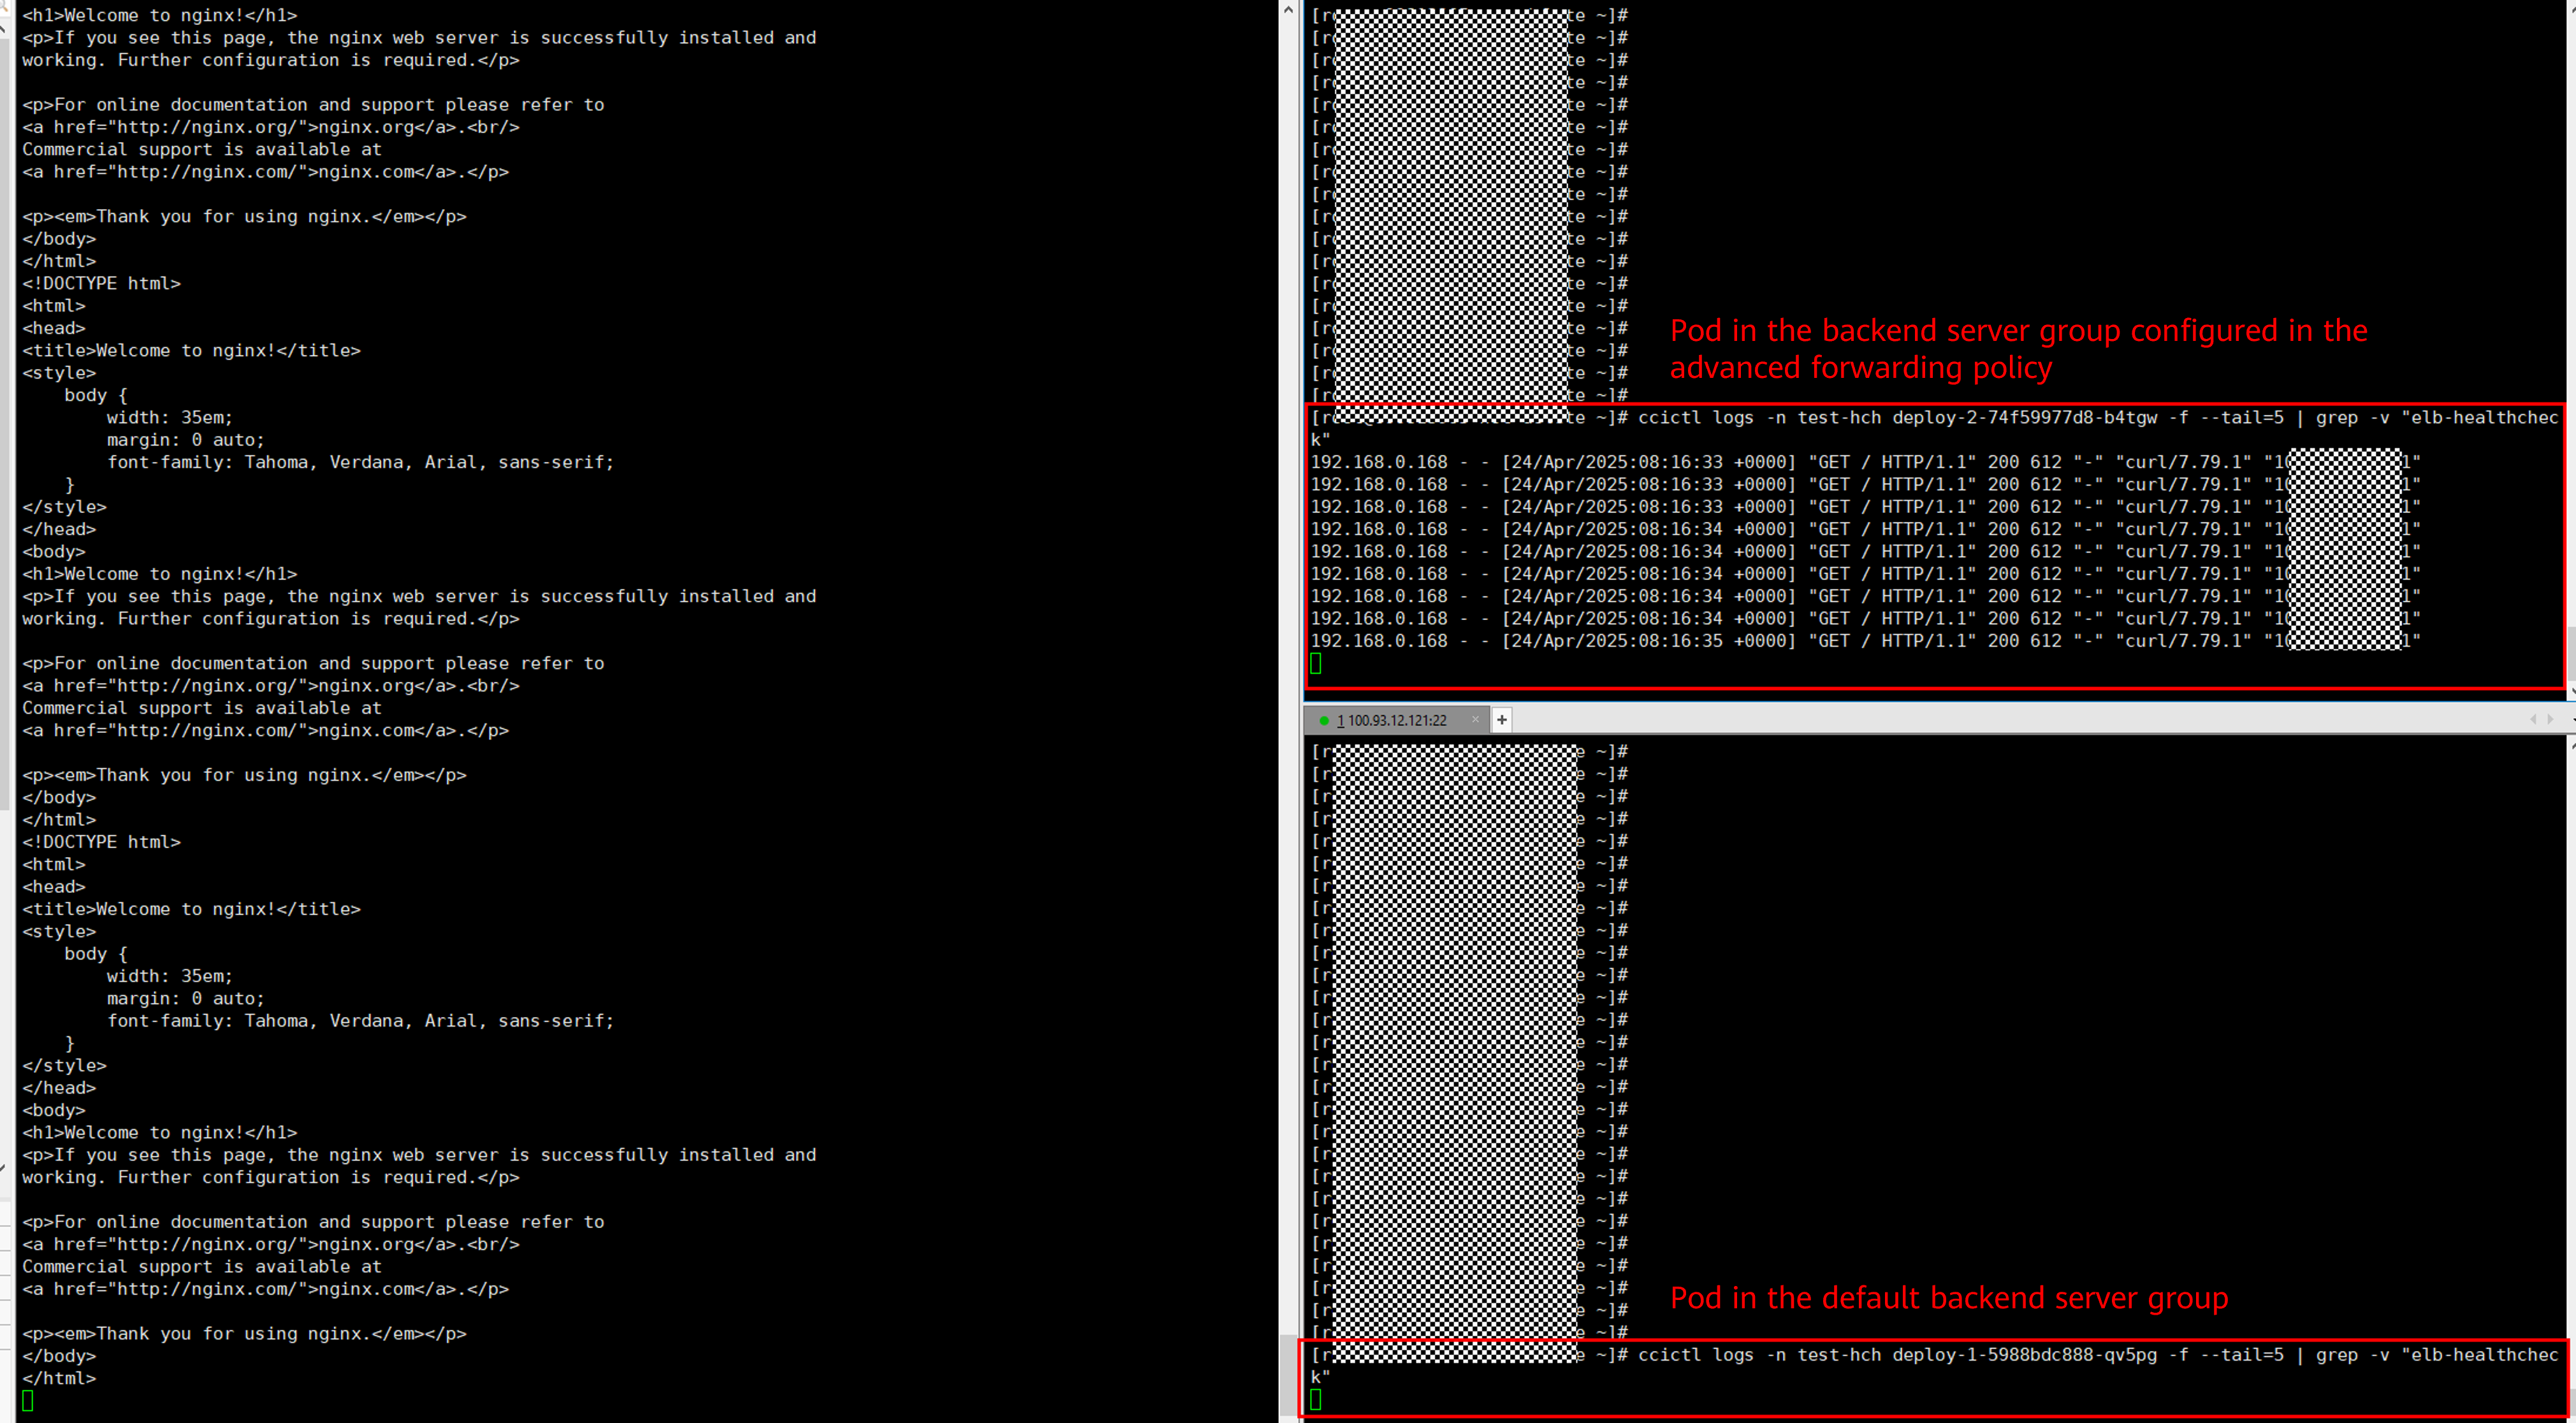
- If the HTTP request header does not contain Type: always, the traffic is directed to the default backend server group.
- Make an HTTP request.
Feedback
Was this page helpful?
Provide feedbackThank you very much for your feedback. We will continue working to improve the documentation.See the reply and handling status in My Cloud VOC.
For any further questions, feel free to contact us through the chatbot.
Chatbot

