
Implementing the Priority Approval Function with User Activities in BPMs
Application Scenarios
During enterprise operations, companies often face tasks that require quick processing or special attention. For example, urgent projects need swift approval to start promptly, and important customer requests demand immediate responses. In special cases, senior management may require priority approval rights.
To address these needs, you can set up priority approval for user activities in BPMs. A user activity is a task completed by users within a service process. When the engine processes a task at this node, it creates a task item assigned to a specific user or group.
This practice explains how to configure approval and termination actions for a user task in a BPM to enable priority approval during countersigning.
Advantages
Huawei Cloud Astro Zero BPMs provide built-in task assignment rules, including sequential approval, sign-off, and countersign. Additionally, complex task assignment rules can be implemented through user activities to handle complex interactions.
Procedure
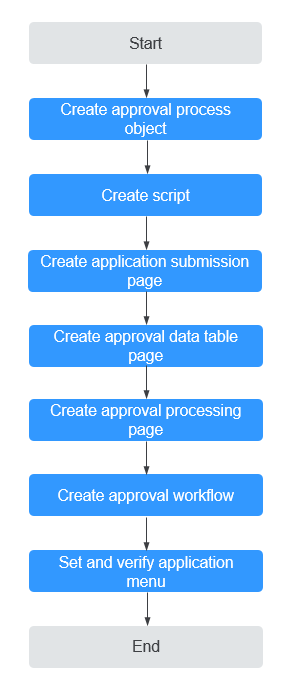
In a BPM, you can configure user activities to implement the priority approval function during countersigning, as shown in Figure 1.
Step 1: Create an Approval Process Object
Create an approval process object to store the application data submitted by users.
- Create a low-code application.
- Apply for a free trial or purchase a commercial instance by referring to Authorization of Users for Huawei Cloud Astro Zero Usage and Instance Purchases.
- After the instance is purchased, click Access Homepage on Homepage. The application development page is displayed.
- In the navigation pane, choose Applications. On the displayed page, click Low-Code or
 .
. When you create an application for the first time, create a namespace as prompted. Once it is created, you cannot change or delete it, so check the details carefully. Use your company or team's abbreviation for the namespace.
- In the displayed dialog box, choose Standard Applications and click Confirm.
- Enter a label and name of the application, and click the confirm button. The application designer is displayed. Figure 2 Creating a blank application

- In the navigation pane, choose Data, and click + next to Object.
- Complete the configuration and click the confirm button. Figure 3 Creating processDemo

- Click
 to go to the object details page.
 - On the Fields tab page, click Add and add the apply field for the object. Figure 4 Adding the apply field

Table 3 Parameters for adding the apply field Parameter
Description
Example
Display Name
Name of the new field, which can be changed after the field is created.
Value: 1–63 characters.
Application title
Unique ID
ID of a new field in the system. The value cannot be changed after the field is created. Naming rules:
- Max. 63 characters, including the prefix namespace.
- Start with a letter and use only letters, digits, and an underscore (_). Do not end with an underscore (_).
apply
Field Type
Click
 . On the page that is displayed, select the type of the new field based on the parameter description.
Text
Data Length
Length of a field that can be entered.
64
- On the Fields tab page, click Add again to add fields in Table 4. Figure 5 Fields contained in the processDemo object

Step 2: Create a Script
- Create the "submit" script to start the BPM.
- In the navigation pane, choose Logic and click + next to Script.
- Create a script, set the name to submit, and click Add. Figure 6 Creating submit

- In the script editor, enter the sample code.
import * as bpm from 'bp';

@action.object({ type: "param" })
export class ActionInput {
    @action.param({ type: 'Object', required: true, label: 'tripData' })
    applicationData: object;
}

@action.object({ type: "param" })
export class ActionOutput {
    @action.param({ type: 'String', required: true, label: 'interviewID' })
    interviewID: string;
}

@action.object({ type: "method" })
export class SubmitTrip {
    @action.method({ input: 'ActionInput', output: 'ActionOutput' })
    public run(input: ActionInput): ActionOutput {
        let out = new ActionOutput();
        out.interviewID = bpm.newClientV1().start('Namespace__bpm1', { data: input.applicationData }).interviewId;

        return out;
    }
}
Namespace__bpm1 indicates the name of the BPM to be created, that is, the value set in Step 6: Create an Approval Workflow.
- Click
 to save the script. After the script is saved, click
  to activate it.
- Create the createApplication script to submit the approval process data and write the data to the object created in Step 1: Create an Approval Process Object.
- In the navigation pane, choose Logic and click + next to Script.
- Create a script, set the name to createApplication, and click Add.
- In the script editor, enter the sample code.
import * as db from 'db';

@useObject (['Namespace__processDemo__CST'])

@action.object({ type: "param" })
export class ActionInput {
    @action.param({ type: 'object', required: true, label: 'applicationData' })
    applicationData: object;
    @action.param({ type: 'string', required: true, label: 'interviewID' })
    interviewID: string;
}
@action.object({ type: "param" })
export class ActionOutput {
    @action.param({ type: 'string', required: true, label: 'id' })
    id: string;
}
@action.object({ type: "method" })
export class CreateBusiTrip {
    @action.method({ input: 'ActionInput', output: 'ActionOutput' })
    public run(input: ActionInput): ActionOutput {
        const out = new ActionOutput();
        let engine = db.object('Namespace__processDemo__CST');
        input.applicationData['Namespace__bpmId__CST'] = input.interviewID;
        out.id = engine.insert(input.applicationData);
        return out;
    }
}
Namespace__processDemo__CST is the object created in Step 1: Create an Approval Process Object, and Namespace__bpmId__CST is the field added to the object.
- Click
 to save the script. After the script is saved, click
  to activate it.
- Create the queryApplication script to query approval process data based on bpmId.
- In the navigation pane, choose Logic and click + next to Script.
- Create a script, set the name to queryApplication, and click Add.
- In the script editor, enter the sample code.
import * as bpm from 'bp';
import * as db from 'db';
@useObject (['Namespace__processDemo__CST'])
@action.object({ type: "param" })
export class ActionInput {
    @action.param({ type: 'String', required: true, label: 'interviewID' })
    interviewID: string;
}
@action.object({ type: "param" })
export class ActionOutput {
    @action.param({ type: 'Object', required: true })
    detail: object;
}
@action.object({ type: "method" })
export class QueryMyApproDetail {
    @action.method({ input: 'ActionInput', output: 'ActionOutput' })
    public run(input: ActionInput): ActionOutput {
        let out = new ActionOutput();
        out.detail = {};
        let instanceId = input.interviewID;
        const bp = bpm.newInstanceClient();
        let appliObj = db.object('Namespace__processDemo__CST');
        let conditions = [{
            "field": "Namespace__bpmId__CST",
            "operator": db.Operator.eq,
            "value": input.interviewID
        }];
        let applications = appliObj.queryByCondition({
            "conjunction": "AND",
            "conditions": conditions
        });
        if (applications.length > 0) {
            input.interviewID;
            out.detail = {
                Namespace__apply__CST: applications[0].Namespace__apply__CST,
                Namespace__deadline__CST: applications[0].Namespace__deadline__CST,
                Namespace__type__CST: applications[0].Namespace__type__CST,
                Namespace__bpmId__CST: input.interviewID
            };
        }
        return out;
    }
}
Namespace__processDemo__CST is an object created in Step 1: Create an Approval Process Object and Namespace__bpmId__CST, Namespace__apply__CST, Namespace__deadline__CST, and Namespace__type__CST are fields added to the object.
- Click
 to save the script. After the script is saved, click
  to activate it.
- Create the approve script for processing the approval task.
- In the navigation pane, choose Logic and click + next to Script.
- Create a script, set the name to approve, and click Add.
- In the script editor, enter the sample code.
import * as bpm from 'bp'; import * as context from 'context'; import * as db from 'db'; @action.object({ type: "param" }) export class ActionInput { @action.param({ type: 'String', required: true, label: 'state' }) state: string; @action.param({ type: 'String', required: true, label: 'interviewID' }) interviewID: string; } @action.object({ type: "method" }) export class ApproveTrip { @action.method({ input: 'ActionInput', output: 'ActionOutput' }) public run(input: ActionInput) { let instanceId = input.interviewID; let taskClient = bpm.newTaskClient(); let res = taskClient.queryByCondition({ condition: { conjunction: db.Conjunction.AND, conditions: [ { field: "processInsID", operator: db.Operator.eq, value: instanceId }, { field: "assigneeID", operator: db.Operator.eq, value: context.getUserId() } ] }, }); if (res.length) { const taskId = res[0].id; var count; let vars = taskClient.getVars(taskId, ["pass"]); if (vars["pass"]) { count = vars["pass"]; } else { count = 0; } if (input.state == "PASS") { bpm.newTaskClient().complete(taskId, '', { pass: count + 1 }) } else { bpm.newTaskClient().complete(taskId, '', {}) } } } } - Click
 to save the script. After the script is saved, click
  to activate it.
- Create the getTask script to obtain the task ID in the approval process.
- In the navigation pane, choose Logic and click + next to Script.
- Create a script, set the name to getTask, and click Add.
- In the script editor, enter the sample code.
import * as db from 'db'; import * as bp from 'bp'; import * as context from 'context'; @action.object({ type: "param" }) export class ActionInput { @action.param({ type: 'String', required: true, label: 'interviewID' }) interviewID: string; } export class ActionOutput { @action.param({ type: 'String', required: true, label: 'taskId' }) taskId: string; } @action.object({ type: "method" }) export class ApproveTrip { @action.method({ input: 'ActionInput', output: 'ActionOutput' }) public run(input: ActionInput): ActionOutput { let out = new ActionOutput(); let instanceId = input.interviewID; let taskClient = bp.newTaskClient() let res = taskClient.queryByCondition({ condition: { conjunction: db.Conjunction.AND, conditions: [ { field: "processInsID", operator: db.Operator.eq, value: instanceId }, { field: "assigneeID", operator: db.Operator.eq, value: context.getUserId() } ] }, }); if (res.length > 0) { let taskId = res[0]['id']; out.taskId = taskId; console.log(taskId) return out; } return out; } } - Click
 to save the script. After the script is saved, click
  to activate it.
- Create the getUserName script for obtaining the user name.
- In the navigation pane, choose Logic and click + next to Script.
- Create a script, set the name to getTask, and click Add.
- In the script editor, enter the sample code.
import * as objectstorage from 'objectstorage'; import * as buffer from 'buffer'; import * as excel from 'excel'; import * as context from 'context'; import * as db from 'db';//Import the standard library related to the object. //Define the input parameter structure. @action.object({ type: "param" }) export class ActionInput { } //Define the output parameter structure. The output parameter contains one parameter, that is, the record ID of workOrder. @action.object({ type: "param" }) export class ActionOutput { @action.param({ type: 'string', required: false, label: 'string' }) res: string; } //Use the data object namespace__processDemo__CST. @useObject(['User']) @action.object({ type: "method" }) export class CreateWorkOrder { //Define the API class. The input parameter of the API is ActionInput, and the output parameter is ActionOutput. @action.method({ input: 'ActionInput', output: 'ActionOutput' }) public createWorkOrder(input: ActionInput): ActionOutput { let out = new ActionOutput(); try { let s = db.object('User'); //Query the user table. let condition = { "conjunction": "AND", "conditions": [{ "field": "id", "operator": "eq", "value": context.getUserId() }] }; let userRecod = s.queryByCondition(condition); if (userRecod) { out.res = userRecod[0].usrName; return out; } } catch (error) { console.error(error.name, error.message); } return out; } } - Click
 to save the script. After the script is saved, click
  to activate it.
Step 3: Create an Application Submission Page
Create a standard page for submitting applications, including fields for application title, type, and time.
- Create a blank standard page.
- In the navigation pane, choose Page, and click + next to Standard Page.
- Enter a label and name and click Add to create a standard page. Figure 7 Creating a standard page for submitting an application

- Create an object model apply.
- At the bottom of the standard page, click Model View.
- Click New, specify Model Name (for example, apply), select Objects for Source, and click Next. Figure 8 Creating an object model

- Select the object created in Step 1: Create an Approval Process Object, select the apply, type, and deadline fields, click Next, and click OK. The model is created. Figure 9 Selecting objects and fields

- Create a service model submit_bpm.
- On the Model View page, click New, enter the model name (for example, submit_bpm), select Services for Source, and click Next. Figure 10 Creating a service model

- Select the script created in 1 and click the confirm button. Figure 11 Selecting the submit script
 Figure 12 Effect after script selection
- Click Next and then click OK.
- On the Model View page, click New, enter the model name (for example, submit_bpm), select Services for Source, and click Next.
- Return to the design view page, drag the text box, date selection box, and drop-down list box widget, and bind the corresponding object model.
- At the bottom of the standard page, click Designer View.
- In the area, drag the text box, date selection box, drop-down list, and button widgets to the canvas and arrange them, as shown in Figure 13.
- Select the text box, date selection box, and drop-down list, and change their labels to the application title, time, and type, respectively. Figure 14 Modifying the widget labels

- Select the input widget. In the Properties > Data Binding area, click
 next to Value Binding to bind the Namespace__apply__CST field of the object model in 2 to the widget. Figure 15 Binding the apply field in the object model to the widget
- Repeat the previous steps to bind the Namespace__deadline__CST and Namespace__type__CST fields of the object model in 2 to the date selection box and drop-down list widget, respectively. Figure 16 Binding the deadline field in the object model to the widget
 Figure 17 Binding the type field in the object model to the widget
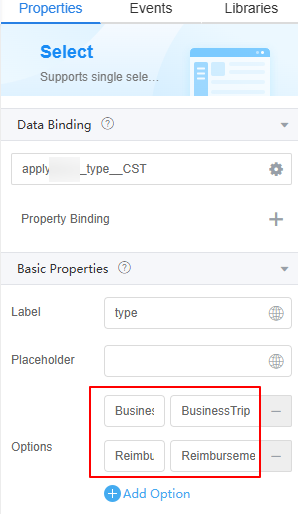
- Select the drop-down box widget. In the Properties > Basic Properties area, set Options to BusinessTrip and Reimbursement. Figure 18 Options
- Select the button widget and set the display name to "Submit Application".
- On the Events tab page, click + next to on-click and add the following event for the button widget.
var apply = $model.ref("apply").getData();
var submit = $model.ref("submit_bpm").getData();
submit.inputParam.applicationData = apply;
$model.ref("submit_bpm").run().then(function(data){
    context.$message.success('Submitted successfully.');
    closeCurrentTab();
    })
.catch(function (err) {
    console.log('error is', error);
    context.$message.error('Submission failed:' + error.resMsg);
});

function closeCurrentTab() {
    if (parent.bingo) {
        var removeTab = parent.bingo.removeTab;
        var getCurrentTab = parent.bingo.getCurrentTab;
        if (removeTab && getCurrentTab) {
            return removeTab(getCurrentTab());
        }
    }
    if (window.parent != window) {
        window.parent.close();
    } else {
        window.close();
    }
}
- Click
 in the upper part of the page to save the page settings.
 - After the settings are saved, click
 in the upper part of the page to preview.

Step 4: Create an Approval Data Table
Create a standard page to display submitted approval data and add an "approve" button in the operation column. Clicking this button navigates to the approval page.
- Create a blank standard page.
- In the navigation pane, choose Page, and click + next to Standard Page.
- Enter a label and name (such as processBpm) and click Add. Figure 19 Creating a standard page for approving the data table

- Create an object model processBpm.
- At the bottom of the standard page, click Model View.
- Click New, specify Model Name (for example, processBpm), select Objects for Source, and click Next.
- Select the object created in Step 1: Create an Approval Process Object, select the apply, type, and deadline, bpmId, and bpmState fields, click Next, and click OK. The model is created. Figure 20 Selecting objects and fields

- Return to the design view page, drag a table widget to the canvas, and bind an object model to the widget.
- In the area, drag a table widget to the canvas. Figure 21 Layout

- Select the table widget, choose Properties > Data Binding, click
 next to Value Binding, and bind the object model processBpm in 2 to the widget. Figure 22 Binding the object model processBpm to the widget
- Select the table widget, choose Properties > Table Columns, and click
 to add operation columns to the table. Figure 23 Adding operation columns
- Click
 next to the Operation1 column and change the column title to Operation. Figure 24 Changing the column title to Operation
- In the Operation Button area, click Add Operation Button and change Label to approve.
- Click
 next to the approval button and click + next to the action list. Figure 25 Adding a custom action for the approval button
context.$page.openStdPage('Namespace__Approval', 'interviewID=' + $current.$attrs.row.Namespace__bpmId__CST);Namespace__Approval is the standard page created in Step 5: Create an Approval Processing Page, and Namespace__bpmId__CST is the field added in Step 1: Create an Approval Process Object.
- In the Disabled text box, enter the following code to disable the approval button after the application is approved. Figure 26 Disabling the button

$row.Namespace__bpmState__CST == "PASS" || $row. Namespace__bpmState__CST == "FAIL"Namespace__bpmState__CST is the object field added in 6.
- In the area, drag a table widget to the canvas.
- Click
 in the upper part of the page to save the page settings.
Step 5: Create an Approval Processing Page
Create a standard page for approving applications. The page contains three fields: application title, application type, and application time. The page also contains four buttons: approve, reject, approved by the manager, and rejected by the manager.
- Create a blank standard page.
- In the navigation pane, choose Page, and click + next to Standard Page.
- Enter a label and name (such as Approval) and click Add. Figure 27 Creating a standard page for approving the data table

- Create the script model queryApplication for querying the approval data corresponding to bpmId.
- At the bottom of the standard page, click Model View.
- Click New, specify Model Name (for example, queryApplication), select Services for Source, and click Next.
- Select the script created in 3, click Next, and then click OK. Figure 28 Selecting the required script
 Figure 29 Effect after script selection
- Create an object model process.
- On the Model View page, click New, enter the model name (for example, process), select Objects for Source, and click Next.
- Select the object created in Step 1: Create an Approval Process Object, select the apply, type, and deadline fields, click Next, and click OK. The model is created. Figure 30 Selecting objects and fields

- Create the script model approve for submitting the approval result.
- On the Model View page, click New, enter the model name (for example, approve), select Services for Source, and click Next.
- Select the script created in 4, click Next, and then click OK. Figure 31 Selecting the required script
 Figure 32 Effect
- Create the script model getTask, which is used to automatically complete the node after a leader approves the application. The node ignores the comments of others and submits the approval result.
- On the Model View page, click New, enter the model name (for example, getTask), select Services for Source, and click Next.
- Select the script created in 5, click Next, and then click OK. Figure 33 Selecting the required script
 Figure 34 Effect
- Create the script model getUserName to obtain usernames.
- On the Model View page, click New, enter the model name (for example, getUserName), select Services for Source, and click Next.
- Select the script created in 6, click Next, and then click OK. Figure 35 Selecting the required script
 Figure 36 Effect
- The customized models managerFlag and approverFlag are added to control the button display.
- On the Model View page, click New, enter the model name (for example, managerFlag), select Custom for Source, and click Next.
- Click Next and then click OK.
- Repeat the preceding operations to create the custom model approverFlag. Figure 37 Checking the created model

- Return to the design view page, drag a widget, and bind an object model to the widget.
- In the area, drag two text box widgets and one date selection box widget to the canvas. Figure 38 Layout of the approval processing standard page

- Select widgets and change their label to the application title, application time, and application type. Figure 39 Modifying the widget label

- Select the first input widget. In the Properties > Data Binding area, click
 next to Value Binding to bind the Namespace__apply__CST field of the object model in 3 to the widget. Figure 40 Binding the apply field in the object model to the widget
- Use the same method to bind the Namespace__deadline_CST field to the date selection box widget and bind the Namespace__type_CST field to the second input widget.
- Drag four button widgets to the canvas and change the button names to Pass, Refuse, Manager Pass, and Manager Refuse. Figure 41 Modifying the button name

- Select the page widget. On the Events tab page, click + next to on-load. Figure 42 Adding an event for the page

- In the custom action, enter the following code: Figure 43 Entering an event code

var bpTaskId = context.$page.params.interviewID;

if (bpTaskId) {
    var model = $model.ref('queryApplication');
    var data = model.getData();
    data.inputParam.interviewID = bpTaskId;
    model.run().then(function (data) {
        var result = data.detail;
        $model.ref("process").setData(result);
    }).catch(function (err) {
        context.$message.error(err.resMsg || err.message || err);
    });
}
//Approver list
var approver = ["user_name1","user_name2"]
//Manager list
var manager = ["user_name3"]
$model.ref('getUserName').run().then(function(data){
        if (!approver.includes(data['res'])) {
        $model.ref("approverFlag").setData(true);
    }
    if (!manager.includes(data['res'])) {
        $model.ref("managerFlag").setData(true);
    } else {
        //If the approver is a manager, the approver button is also hidden.
       $model.ref("approverFlag").setData(true);
    }
}).catch(function(error){
    console.log('error is', error);
    context.$message.error('Submission failed:' + error.resMsg);
});
queryApplication indicates the script model created in 2, user_name1 and user_name2 indicate the approver names, and user_name3 indicates the manager's approver name.
- Select the Pass button. On the Events tab page, click + next to on-click to add a custom action for the button.
var data = $model.ref('process').getData();
var approve = $model.ref('approve').getData();
approve.inputParam.interviewID = data['Namespace__bpmId__CST'];
approve.inputParam.state = 'PASS';
$model.ref('approve').run().then(function(data){
    context.$message.success('Submitted successfully.');
    closeCurrentTab();
}).catch(function(error){
    console.log('error is', error);
    context.$message.error('Submission failed:' + error.resMsg);
});
function closeCurrentTab() {
    if (parent.bingo) {
        var removeTab = parent.bingo.removeTab;
        var getCurrentTab = parent.bingo.getCurrentTab;
        if (removeTab && getCurrentTab) {
            return removeTab(getCurrentTab());
        }
    }
    if (window.parent != window) {
        window.parent.close();
    } else {
        window.close();
    }
}
process is the object model created in 3, and approve is the script model created in 4. Namespace__bpmId__CST is the field added in Step 1: Create an Approval Process Object.
- Select the Pass button again. In the Properties area, click + next to Value Binding to bind the approverFlag model defined in 7 to the widget. Figure 44 Binding the approverFlag model to the button widget

- Select the Refuse button. On the Events tab page, click + next to on-click to add a custom action for the button.
var data = $model.ref('process').getData();
var approve = $model.ref('approve').getData();
approve.inputParam.interviewID = data['Namespace__bpmId__CST'];
approve.inputParam.state = 'FAIL';
$model.ref('approve').run().then(function(data){
    context.$message.success('Submitted successfully.');
    closeCurrentTab();
}).catch(function(error){
    console.log('error is', error);
    context.$message.error('Submission failed:' + error.resMsg);
});
function closeCurrentTab() {
    if (parent.bingo) {
        var removeTab = parent.bingo.removeTab;
        var getCurrentTab = parent.bingo.getCurrentTab;
        if (removeTab && getCurrentTab) {
            return removeTab(getCurrentTab());
        }
    }
    if (window.parent != window) {
        window.parent.close();
    } else {
        window.close();
    }
}
process is the object model created in 3, and approve is the script model created in 4. Namespace__bpmId__CST is the field added in Step 1: Create an Approval Process Object.
- Select the Refuse button again. In the Properties area, click + next to Value Binding to bind the approverFlag model defined in 7 to the widget. Figure 45 Binding the approverFlag model to the Refuse button widget

- Select the Manager Pass button. On the Events tab page, click + next to on-click to add a custom action for the button.
var dataTask = $model.ref('getTask').getData();
dataTask.inputParam.interviewID= context.$page.params.interviewID;
$model.ref('getTask').run().then(function(data){
    context.$message.success('Submitted successfully.');
    console.log(data);
    var taskId = data.taskId;
    var _url = `/u-route/baas/bp/v2.0/runtime/tasks/${taskId}`;
    var _inputParam = {action:'Manager approval', variables:{pass:2}};
    var _method = 'PUT';
    var _header = {'Content-Type':'application/json'};
    context.service(_url).run(_inputParam,_method,_header).then(function(response){
        console.log("success");
    });
    closeCurrentTab();
}).catch(function(error){
    console.log('error is', error);
    context.$message.error('Submission failed:' + error.resMsg);
});

function closeCurrentTab() {
    if (parent.bingo) {
        var removeTab = parent.bingo.removeTab;
        var getCurrentTab = parent.bingo.getCurrentTab;
        if (removeTab && getCurrentTab) {
            return removeTab(getCurrentTab());
        }
    }
    if (window.parent != window) {
        window.parent.close();
    } else {
        window.close();
    }
}
getTask indicates the script model created in 5.
- Select the Manager Pass button again. In the Properties area, click + next to Value Binding to bind the custom model managerFlag created in 7 to the widget. Figure 46 Selecting the managerFlag model for the Manager Pass button

- Select the Manager Refuse button. On the Events tab page, click + next to on-click to add a custom action for the button.
var dataTask = $model.ref('getTask').getData();
dataTask.inputParam.interviewID= context.$page.params.interviewID;
$model.ref('getTask').run().then(function(data){
    context.$message.success('Submitted successfully.');
    console.log(data);
    var taskId = data.taskId;
    var _url = `/u-route/baas/bp/v2.0/runtime/tasks/${taskId}`;
    var _inputParam = {action:'Manager approval', variables:{pass:0}};
    var _method = 'PUT';
    var _header = {'Content-Type':'application/json'};
    context.service(_url).run(_inputParam,_method,_header).then(function(response){
        console.log("success");
    });
    closeCurrentTab();
}).catch(function(error){
    console.log('error is', error);
    context.$message.error('Submission failed:' + error.resMsg);
});

function closeCurrentTab() {
    if (parent.bingo) {
        var removeTab = parent.bingo.removeTab;
        var getCurrentTab = parent.bingo.getCurrentTab;
        if (removeTab && getCurrentTab) {
            return removeTab(getCurrentTab());
        }
    }
    if (window.parent != window) {
        window.parent.close();
    } else {
        window.close();
    }
}
getTask indicates the script model created in 5.
- Select the Manager Refuse button again. In the Properties area, click + next to Value Binding to bind the custom model managerFlag created in 7 to the widget. Figure 47 Selecting the managerFlag model for the Manager Refuse button

- In the area, drag two text box widgets and one date selection box widget to the canvas.
- Click
 in the upper part of the page to save the page settings.
Step 6: Create an Approval Workflow
Create an approval workflow and configure the user activity's approval and termination actions to implement priority approval.
- In the navigation pane of the application designer, choose BPMs and click + next to BPM.
- Enter a label and name (for example, bpm1) and click Add.
- Create variables and object variables.
- Click
 . The Context page is displayed.
 - Click + next to Variable to create variable0.
- Click
 next to Variable, click the button to set the name to pass and the data type to Number. Figure 48 Creating a variable pass
- In Context, click + next to Object Variable to create an object variable. Figure 49 Creating an object variable data

Table 5 Parameters for creating an object variable data Parameter
Description
Example
Name
Name of the new variable. The name is the unique identifier of the variable referenced in a flow. Changing this name does not change its reference in the diagram element, but may cause the flow to be unavailable.
Value: 1–80 characters.
data
Object
Select an object from the drop-down list. In this example, select the object created in Step 1: Create an Approval Process Object.
Namespace__processDems__CST
Figure 50 Viewing the created variables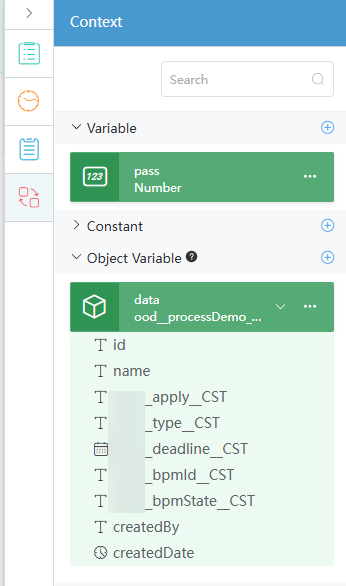
- Click
- Create an approval workflow.
- Add required diagram elements to the workflow, as shown in Figure 51.
- Select the script, user activity, and record update diagram elements, click
 , and change the diagram element labels to createApprove, approve, success, and fail. Figure 52 Modifying the diagram element labels
- Connect diagram elements and specify their logical relationships. See Figure 53.
Based on the logic implementation, drag and configure all diagram elements and connect them in the correct sequence. When executing a workflow, the system processes these elements in order to complete the entire workflow.
- Configure diagram elements.
- Select the script diagram element, click
 , and set this diagram element based on Figure 54.
 - Select the user activity diagram element, click
 , and set this diagram element based on Figure 55. Figure 56 Approval configuration
Table 6 Parameters for configuring a user activity Parameter
Description
Example
Interface > Task Title
Title displayed on the task page.
submit
Interface > Render Type
Page on which the user processes a task. This parameter can be set to Standard Page, Standard Form, or Advance Page.
Standard Page
Interface > Page
Select a page based on Render Type.
Select the Namespace__Approval page created in Step 5: Create an Approval Processing Page.
Recipients > Recipient Type
Type of the user who processes a task.
Name and Expressions
Recipients > Participants > Type
This parameter is displayed only when Recipient Type is set to Name and Expressions. The participant type can be a user, portal user, group, or expression.
User
Recipients > Participants > Value
Select the user who receives the task, excluding portal users.
user_name1
user_name2
user_name3
Approval Config > Who can approve
Select an approver type.
- Joint: wait for all assignees to approve
If any one recipient completes the approval, the task process advances to the next task.
- Single: one of selected members to approve
The task process advances to the next task only if the recipient's user group meets the approval conditions you set.
Single: one of selected members to approve
Approval Config > Outcome Percentage
The value of this parameter indicates the percentage. If the percentage is reached, the approval result with the highest vote will overwrite the value of $BP.TaskOutcome.
66
Approval Config > Default Outcome
Default approval result when the approval percentage (number of approved employees/total number of valid approvers) does not reach the voting result threshold. This parameter is displayed only when the approval type is Single: one of selected members to approve.
approve
Approval Config > Approval Actions
Set specific candidate actions as the default approval results.
approve,managerApprove
Approval Config > Skip Approval on
When one or more specified actions exist, the task is terminated immediately.
managerApprove
- Joint: wait for all assignees to approve
- Select the connection between the Exclusive gateway and success diagram element and set the parameters as follows: Figure 57 Setting the connection line between the Exclusive gateway and success diagram element

- Select the connection between the Exclusive gateway and fail diagram element and set the parameters as follows: Figure 58 Setting the connection line between the Exclusive gateway and fail diagram element

- Select the success diagram element and set it based on Figure 59.
- Select the fail diagram element and set Figure 60.
- Select the script diagram element, click
- Click
 in the upper part of the page to save the workflow.
 - Click
 to activate the workflow.


Step 7: Configure and Verify the Application Menus
Add the trip and PendingTask menus for the application and check whether the workflow is executed based on the preset process.
- Set the application navigation bar.
- On the Home page, click Application Navigation Settings.
- On the main navigation settings tab page, click New to create a trip menu. Figure 61 Adding the trip menu

- Repeat the preceding steps to add a PendingTask menu. Figure 62 Adding the PendingTask menu

- An employee submits a business trip application.
- On the main menu of the application, choose Run > Run Now. The application preview page is displayed.
- Choose trip to submit an application. Figure 63 Submitting an application

After the submission is successful, the message Submitted successfully is displayed.
- The supervisor approves the application.
- On the main menu of the application, choose Run > Run Now. The application preview page is displayed.
- Choose PendingTask. On the displayed page, click approve next to the data to be approved. Figure 64 Clicking approve

- Approve the application.
The application submitted in this practice needs to be approved by user_name1, user_name2, and user_name3 configured in 5.b. user_name3, as the manager, has approval priority. Once user_name3 approves the application, user_name1 and user_name2 are no longer required to approve it.
Assume Tom submits a trip application. Normally, user_name1 approves it first, followed by user_name2, and finally by user_name3 (the manager). Once user_name3 approves, the entire approval process ends. If user_name3 (the manager) approves the application after Tom submits it, the approval process ends. user_name1 and user_name2 are not required to approve it, as user_name3 has priority.Figure 65 Normal approval page Figure 66 Manager approval page
Feedback
Was this page helpful?
Provide feedbackThank you very much for your feedback. We will continue working to improve the documentation.See the reply and handling status in My Cloud VOC.
For any further questions, feel free to contact us through the chatbot.
Chatbot


