Creating a Business Trip Approval Workflow Using Templates
Overview
Huawei Cloud Astro Zero has developed its own Business Process Management (BPM), following the BPMN 2.0 industry standards. BPMs in Huawei Cloud Astro Zero is a graphical process orchestration engine designed for building service processes involving user interactions, such as approval and ticket dispatch processes. This practice walks you through creating a business trip approval workflow to familiarize you with Huawei Cloud Astro Zero's BPMs.
Business trips are a common business scenario in enterprises, involving processes like trip applications, approvals, itinerary planning, and expense reimbursement. This example uses a simple business trip scenario to illustrate how to use BPMs. Here, an employee submits a trip application for approval. The supervisor then either approves or rejects it. The business trip approval application includes the following functions:
- Create a business trip e-flow based on a template.
- Send an email.

Procedure
Figure 2 shows the process of developing a business trip approval application.
- Step 1: Add a Portal User and Grant Permissions
The application in this example involves portal users with supervisor and employee roles. Before creating the business trip approval application, add employees and supervisors to Huawei Cloud Astro Zero.
- Step 2: Create a Queue
In Huawei Cloud Astro Zero, a work queue records a set of members with the same permissions and task objects. In this example, two queues are created to separate tasks processed by different roles.
- Step 3: Create a Blank Application
Creating an application is the first step for developing a project in the development environment and is also the entry for building end-to-end software applications.
- Step 4: Create a BPM
Create a BPM using the HR BPM template and assign owners to each lane.
- Step 5: Configure the BTA Application
In the application configuration, define the navigation menu bar of the business trip approval application.
- Step 6: Debug Service Functions
Check whether the business trip approval workflow is executed as expected. That is, the employee submits a business trip application, and the supervisor approves, rejects, and re-fills the application.
Step 1: Add a Portal User and Grant Permissions
The application in this example involves portal users with supervisor and employee roles. Before creating the business trip approval application, add employees and supervisors to Huawei Cloud Astro Zero.
- Create two member accounts (supervisor and employee) in IAM.
- Log in to the Huawei Cloud official website. On the right of the top navigation menu, click Console to go to the management console.
- Click
 and select the region and project where the service instance is located.
 - Click
 , search for the Identity and Access Management service in the search box, and click the search result to go to the IAM console.
You can also choose Management & Governance > Identity and Access Management to go to the IAM console.
- In the user area, click the button to create users for supervisor and an employee, respectively.
For details about how to create an IAM user, see Creating an IAM User. In this example, the supervisor is Helen and the employee is Mike.
- Add a sub-account to Huawei Cloud Astro Zero and authorize the sub-account.
- Log in to the using a Huawei account.
- On the homepage, click Access Homepage. The development page is displayed.
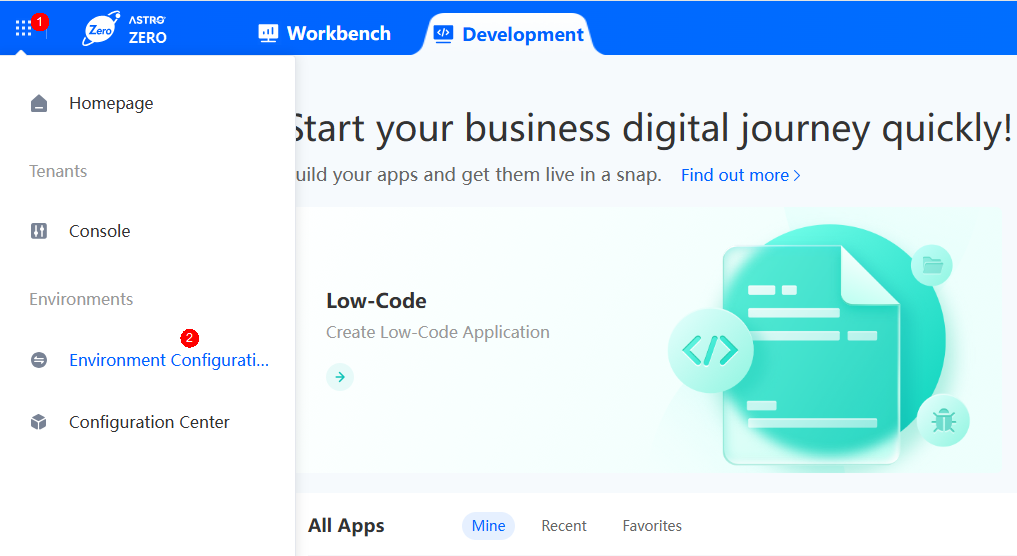
- In the upper left corner of the page, click
 and choose Environments > Environment Configuration.
Figure 3 Entering the Huawei Cloud Astro Zero environment configuration page
- In the navigation pane, choose User Security > Users and click Add IAM User.
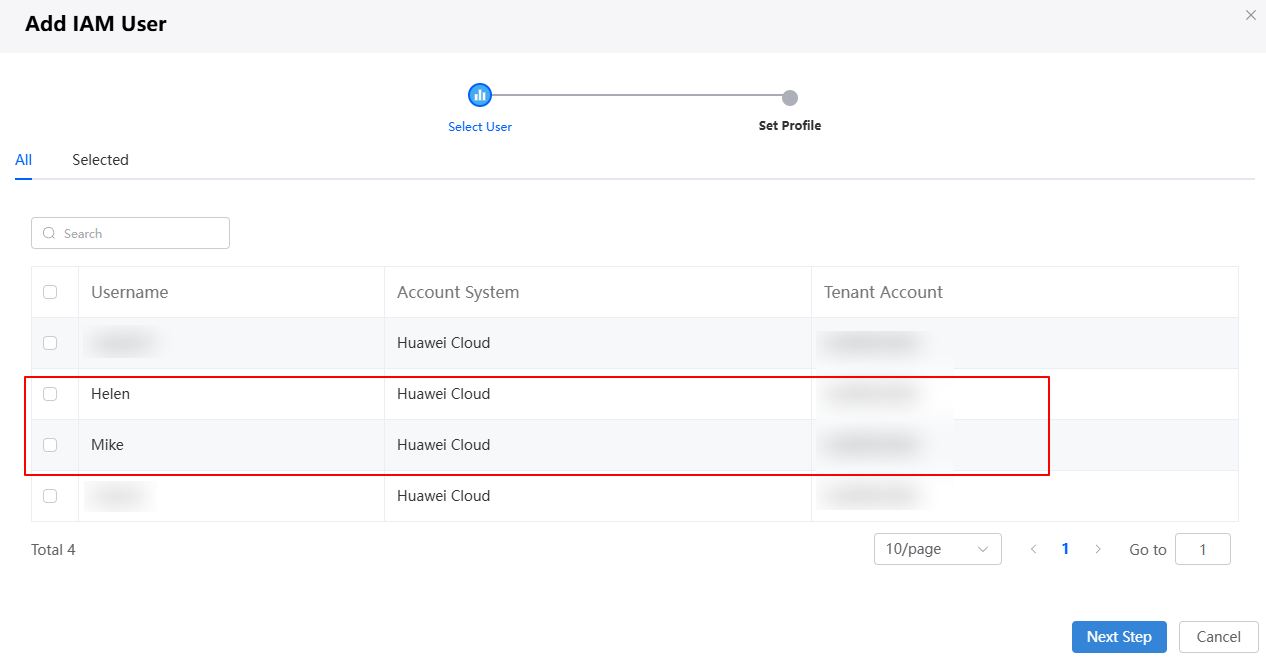
- In the user list, select the sub-account created in 1 and click the next button.
Figure 4 Selecting the sub-account to be added
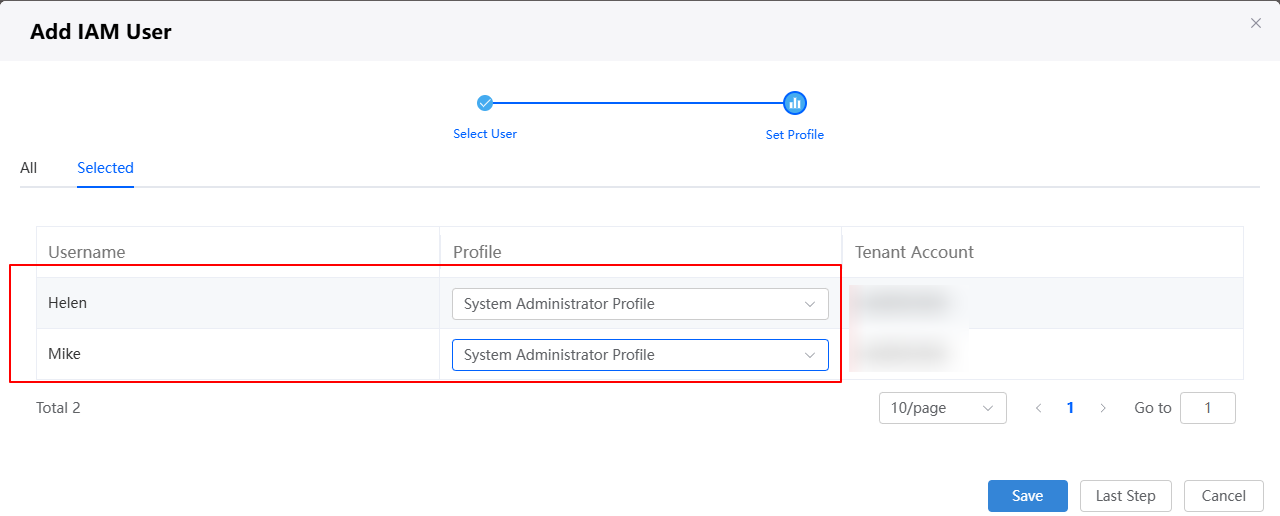
- Assign the System Administrator Profile profile to the supervisor and employee, and click the save button.
System Administrator Profile grants users full permissions. In the actual business trip approval application, you only need to assign the Portal User Profile or Anonymous User Profile profile to portal users. To verify the functions of the business trip approval application, assign the System Administrator Profile profile to portal users (employee Mike and supervisor Helen).Figure 5 Granting permissions to the sub-account
Step 2: Create a Queue
In Huawei Cloud Astro Zero, a work queue records a set of members with the same permissions and task objects. In this example, the two queues in Table 1 are used to separate tasks processed by different roles.
|
Name |
Description |
|---|---|
|
Employee |
Employee queue. The added queue member is a common employee, for example, Mike. |
|
Manager |
Supervisor queue (responsible for level-1 approval). The added queue member is a supervisor, for example, Helen. |
- Log in to Huawei Cloud Astro Zero using a Huawei account and configure the environment.
- Choose Maintenance from the main menu.
- In the navigation pane, choose Global Elements > Queues.
- On the displayed page, click New to create the Employee queue in Table 1.
- In the basic information about the new queue, set the queue label and name, and retain the default values for other parameters.
- Label: Set the label of the new queue to Employee in this example.
- Name: Set the name of the new queue to Employee in this example.
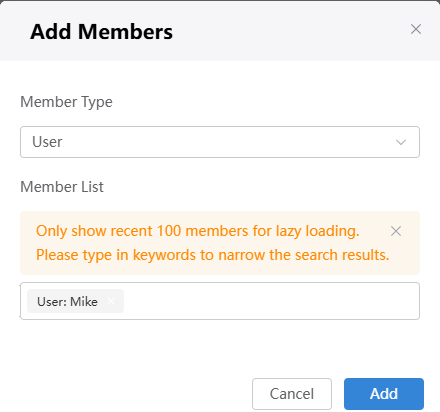
- In the queue member area, click Add to add Mike and the current tenant account as members of the Employee work queue.
Figure 6 Adding Mike as a member
- Click Save. The queue details page is displayed.
On the Employee queue details page, you can view its information. If no member is added when you create a queue, click the add button in the member information area to add members.
- In the basic information about the new queue, set the queue label and name, and retain the default values for other parameters.
- Create a Manager queue by referring to 4.
Figure 7 Setting the label and name
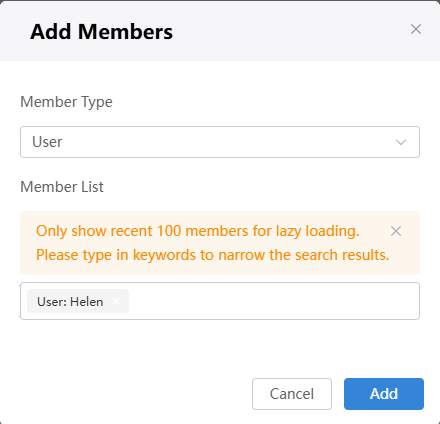
 Figure 8 Adding Helen and tenant accounts to the queue
Step 3: Create a Blank Application
Creating an application is the first step for developing a project in the Huawei Cloud Astro Zero development environment and is also the entry for building end-to-end software applications.
- Log in to the using a Huawei account.
- On the homepage, click Access Homepage. The application development page is displayed.
- In the navigation pane, choose Applications.
- Click
 next to Low-Code. The page for creating a blank application is displayed.
Figure 9 Accessing the page for creating an application
- On the page that is displayed, select Standard Applications and click Confirm.
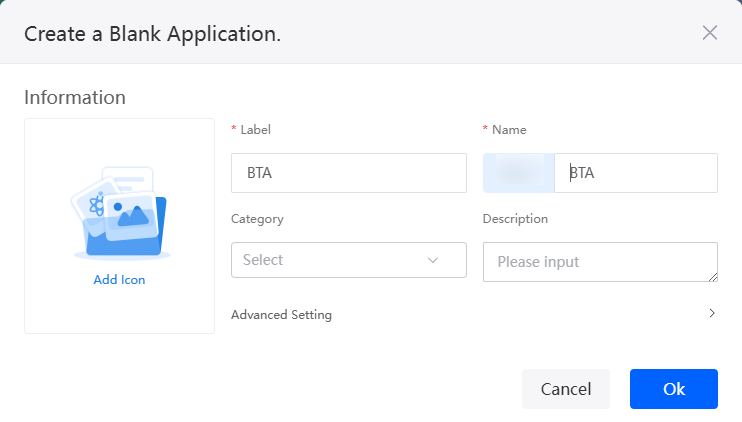
- Set the application label and name to BTA.
As shown in Figure 10, the content that is blurred in front of the ID is a namespace. To prevent duplicate data names among different tenants, each tenant must define a unique namespace when first creating an application. A tenant can only create one namespace, and once it is created, it cannot be modified.
- Click the confirm button to access the application designer.
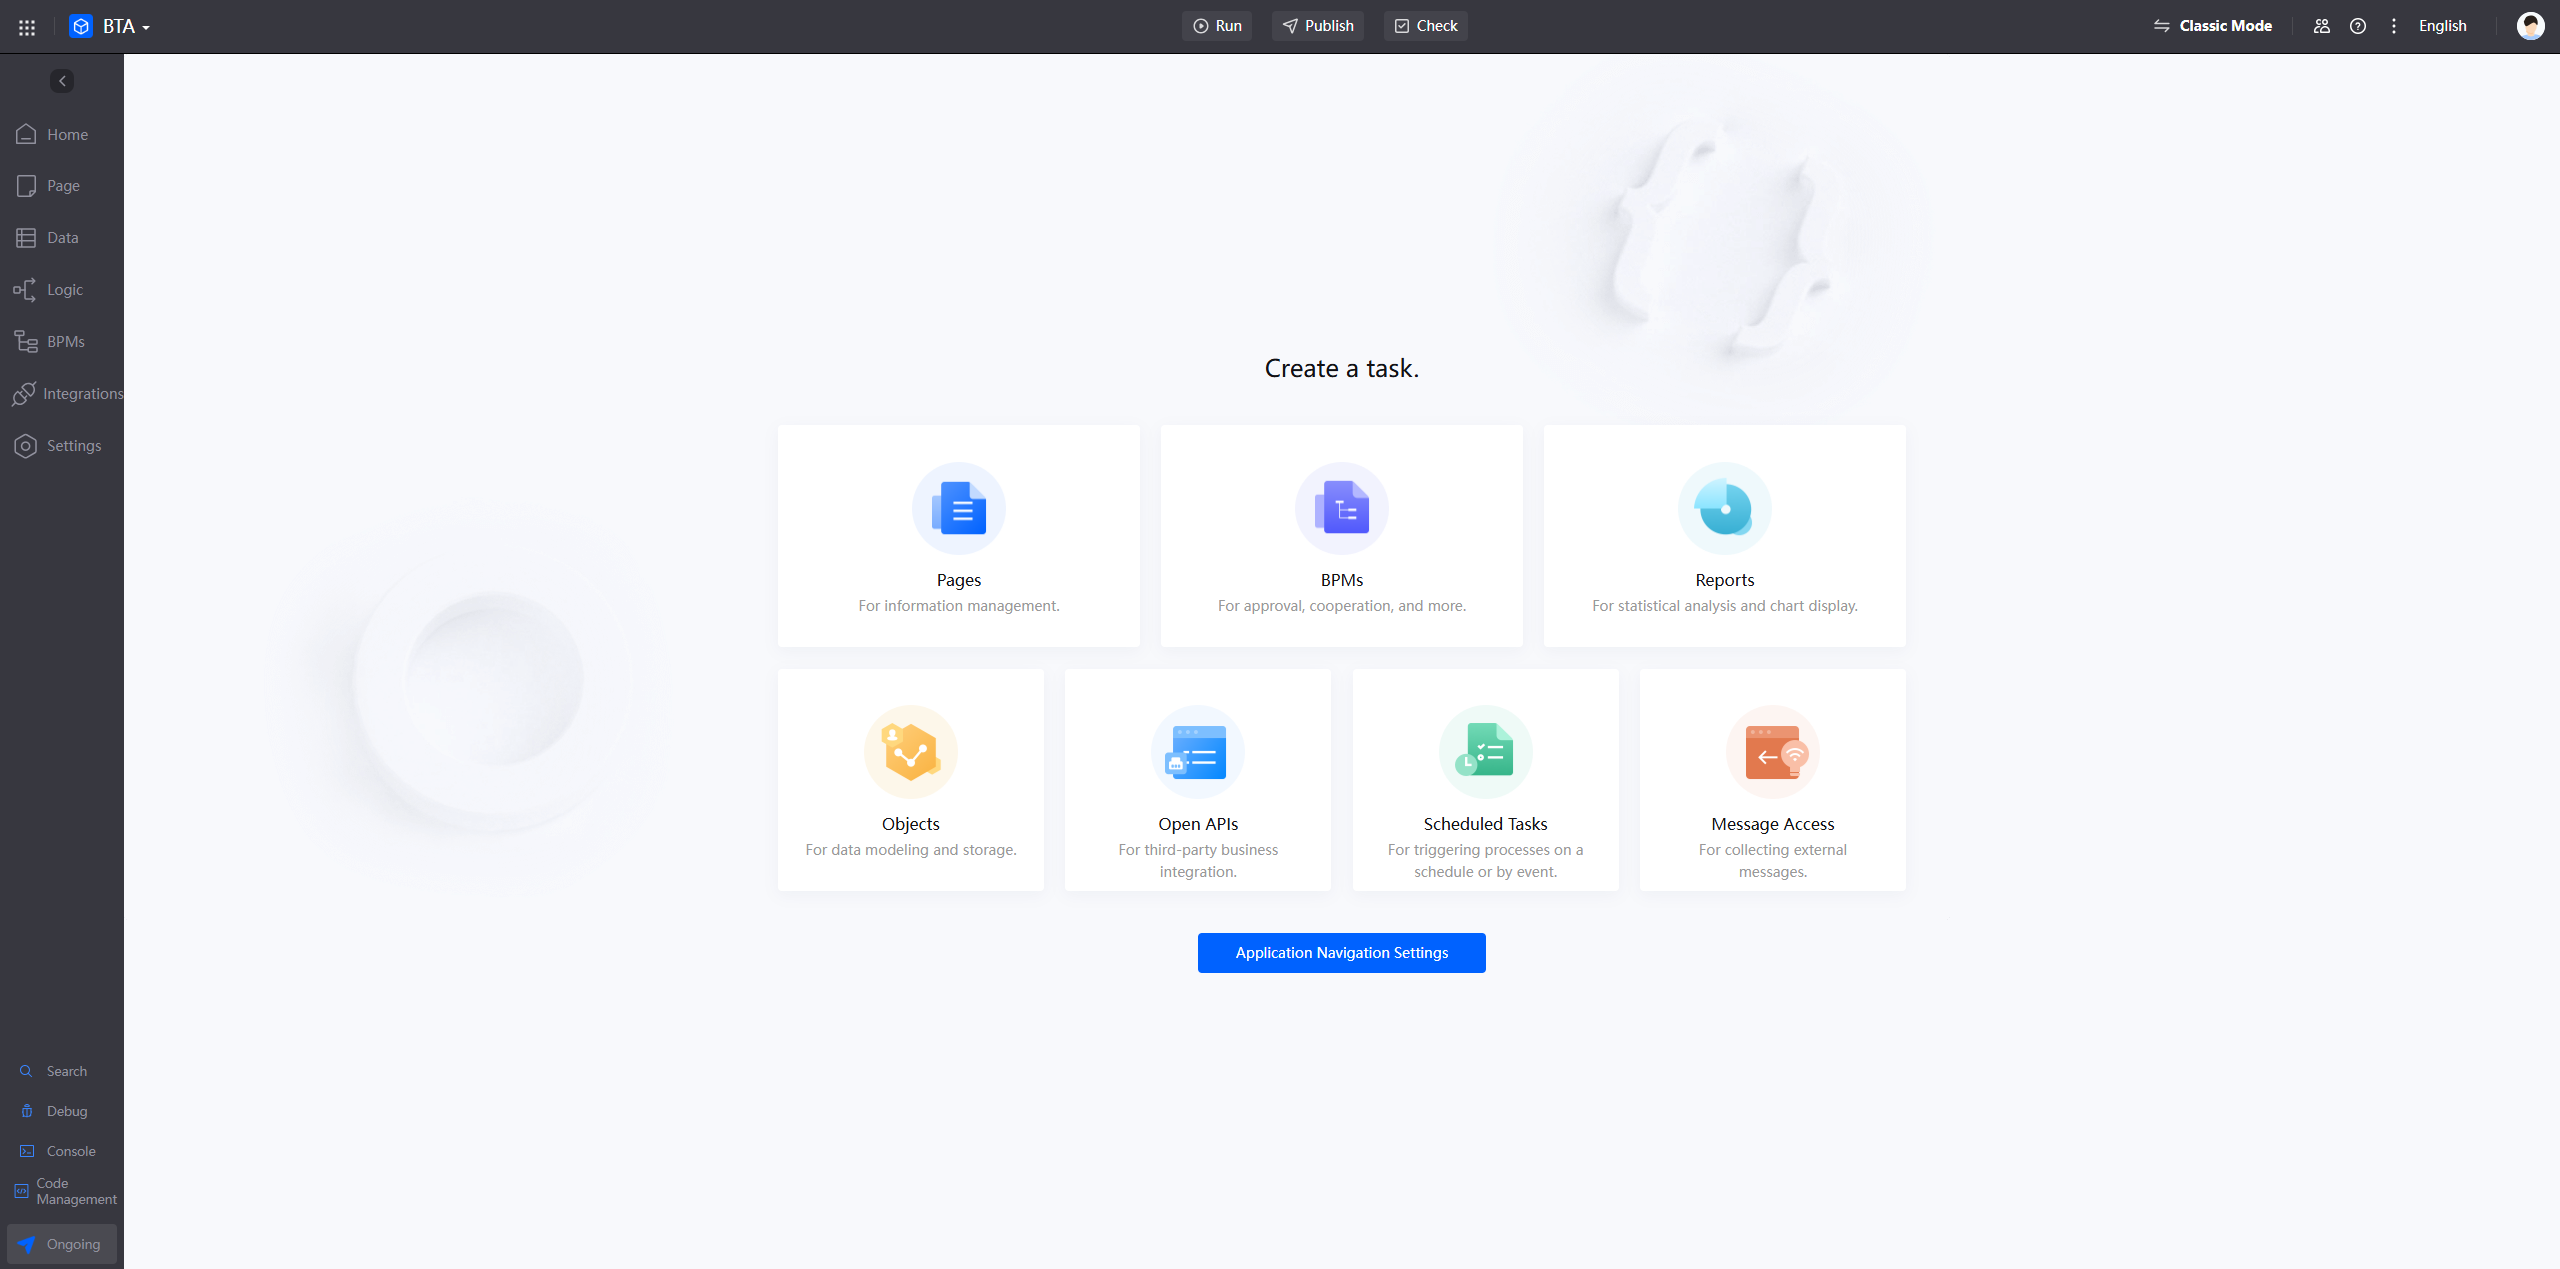
Figure 11 Application designer
Step 4: Create a BPM
Create a BPM using the HR BPM template and assign owners to each lane.
- Create a BPM.
- On the Home page of the application designer, click BPMs.
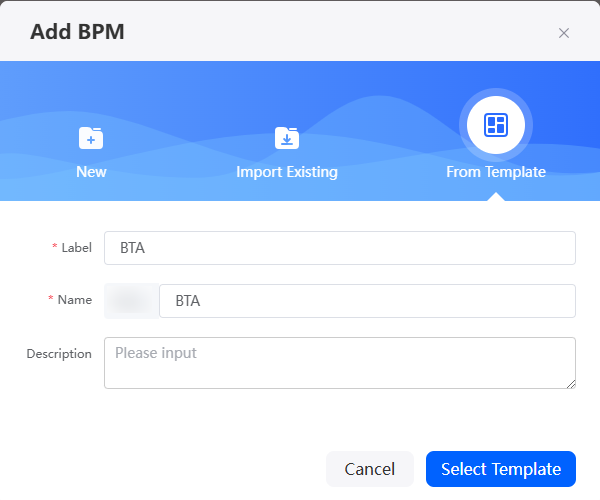
- On the displayed dialog box, click From Template, and specify the label, name, and description.
Figure 12 Adding a BPM
- Click Select Template, choose HR > Travel Request, and click Create.
Figure 13 Selecting a business trip application template

After you click Create, the page for editing the business trip application workflow is displayed. Before setting the workflow, you can understand the functions of each node in the business trip application workflow by referring to Table 2.
Figure 14 Development page
Table 2 Functions of each node in the business trip application workflow No.
Node
Description
1
Request submission
Start node, which calls a standard form for business trip applicants to submit business trip applications.
2
Data mapping
Maps the request fields in the standard business trip application form to the object.
3
Request approval
User task. Renders the fields in the object to the business trip application standard form and determine the approver.
4
Approval gateway
The approver approves or rejects the application.
5
Data mapping
After the application is rejected, the fields in the standard form are mapped back to the business trip application standard form.
6
Reapplication
Update the content in the business trip application form and submit the application again.
7
Data mapping
Map the field values in the business trip application form to the approval from and re-initiate the approval application.
8
Sending emails
If the application is approved, send an email to notify the applicant of the result.
9
End
End node, which is used to end the entire workflow.
- Set the workflow and configure the handler of each lane.
- On the development page, click the Process Owner lane and set the queue to Employee.
Figure 15 Configuring an employee as the applicant

- Click the Reviewer lane and set the queue to Manager.
Figure 16 Configuring the manager as the approver

- Click the Refill the request user task element on the Process Owner lane and set the task title to "To be resubmitted".
After this operation is performed, you can view the status of the task to be resubmitted in Pending Task.
Figure 17 Setting the title to "To be resubmitted"
- Click the user task element "Apply for approval" on the Reviewer lane and set the task title to "Waiting for supervisor approval".
After this operation is performed, you can view the status of the task to be approved by the supervisor in Pending Task.
Figure 18 Setting the title to "Waiting for supervisor approval"
- Click
 to save the BPM.
 - Click
 to activate the BPM.
- On the development page, click the Process Owner lane and set the queue to Employee.
Step 5: Configure the BTA Application
In the application configuration, define the navigation menu bar of the business trip approval application.
- On the Home page of the new BTA application designer, click Application Navigation Settings at the bottom.
Figure 19 Accessing the application configuration page

- On the Main Navigation tab page, click Home, set the menu name to PendingTask, and click Save.
Figure 20 Editing a tab

- On the Main Navigation tab page, click New, create a menu item, for example, I want to go on a business trip menu item, and click Save.
Figure 21 Adding a tab
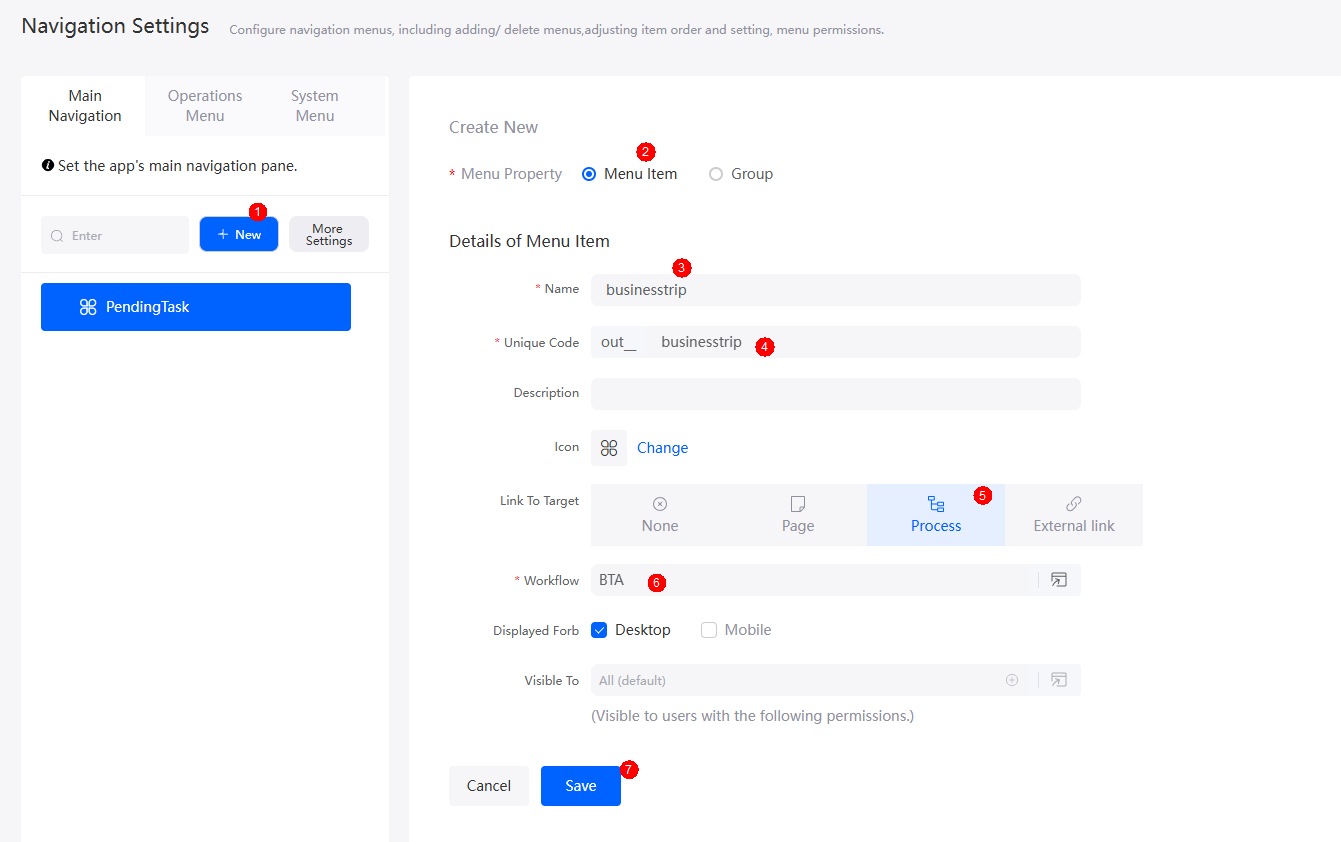 Figure 22 Final effect
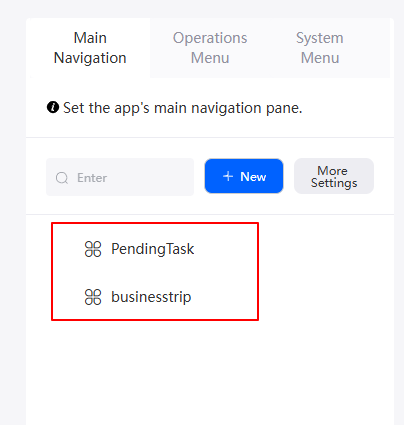
- On the main menu of the new BTA application designer, click Run > Run Now to preview the business trip approval application.
Figure 23 Final effect of the business trip approval application

The business trip approval application is developed.
Question: How do I display the navigation bar menu at the top of the business trip approval application?
On the Appearance Settings tab of the application configuration page, you can adjust the menu style and application icon to display the navigation bar menu at the top.
Figure 24 Modifying the menu style and application icon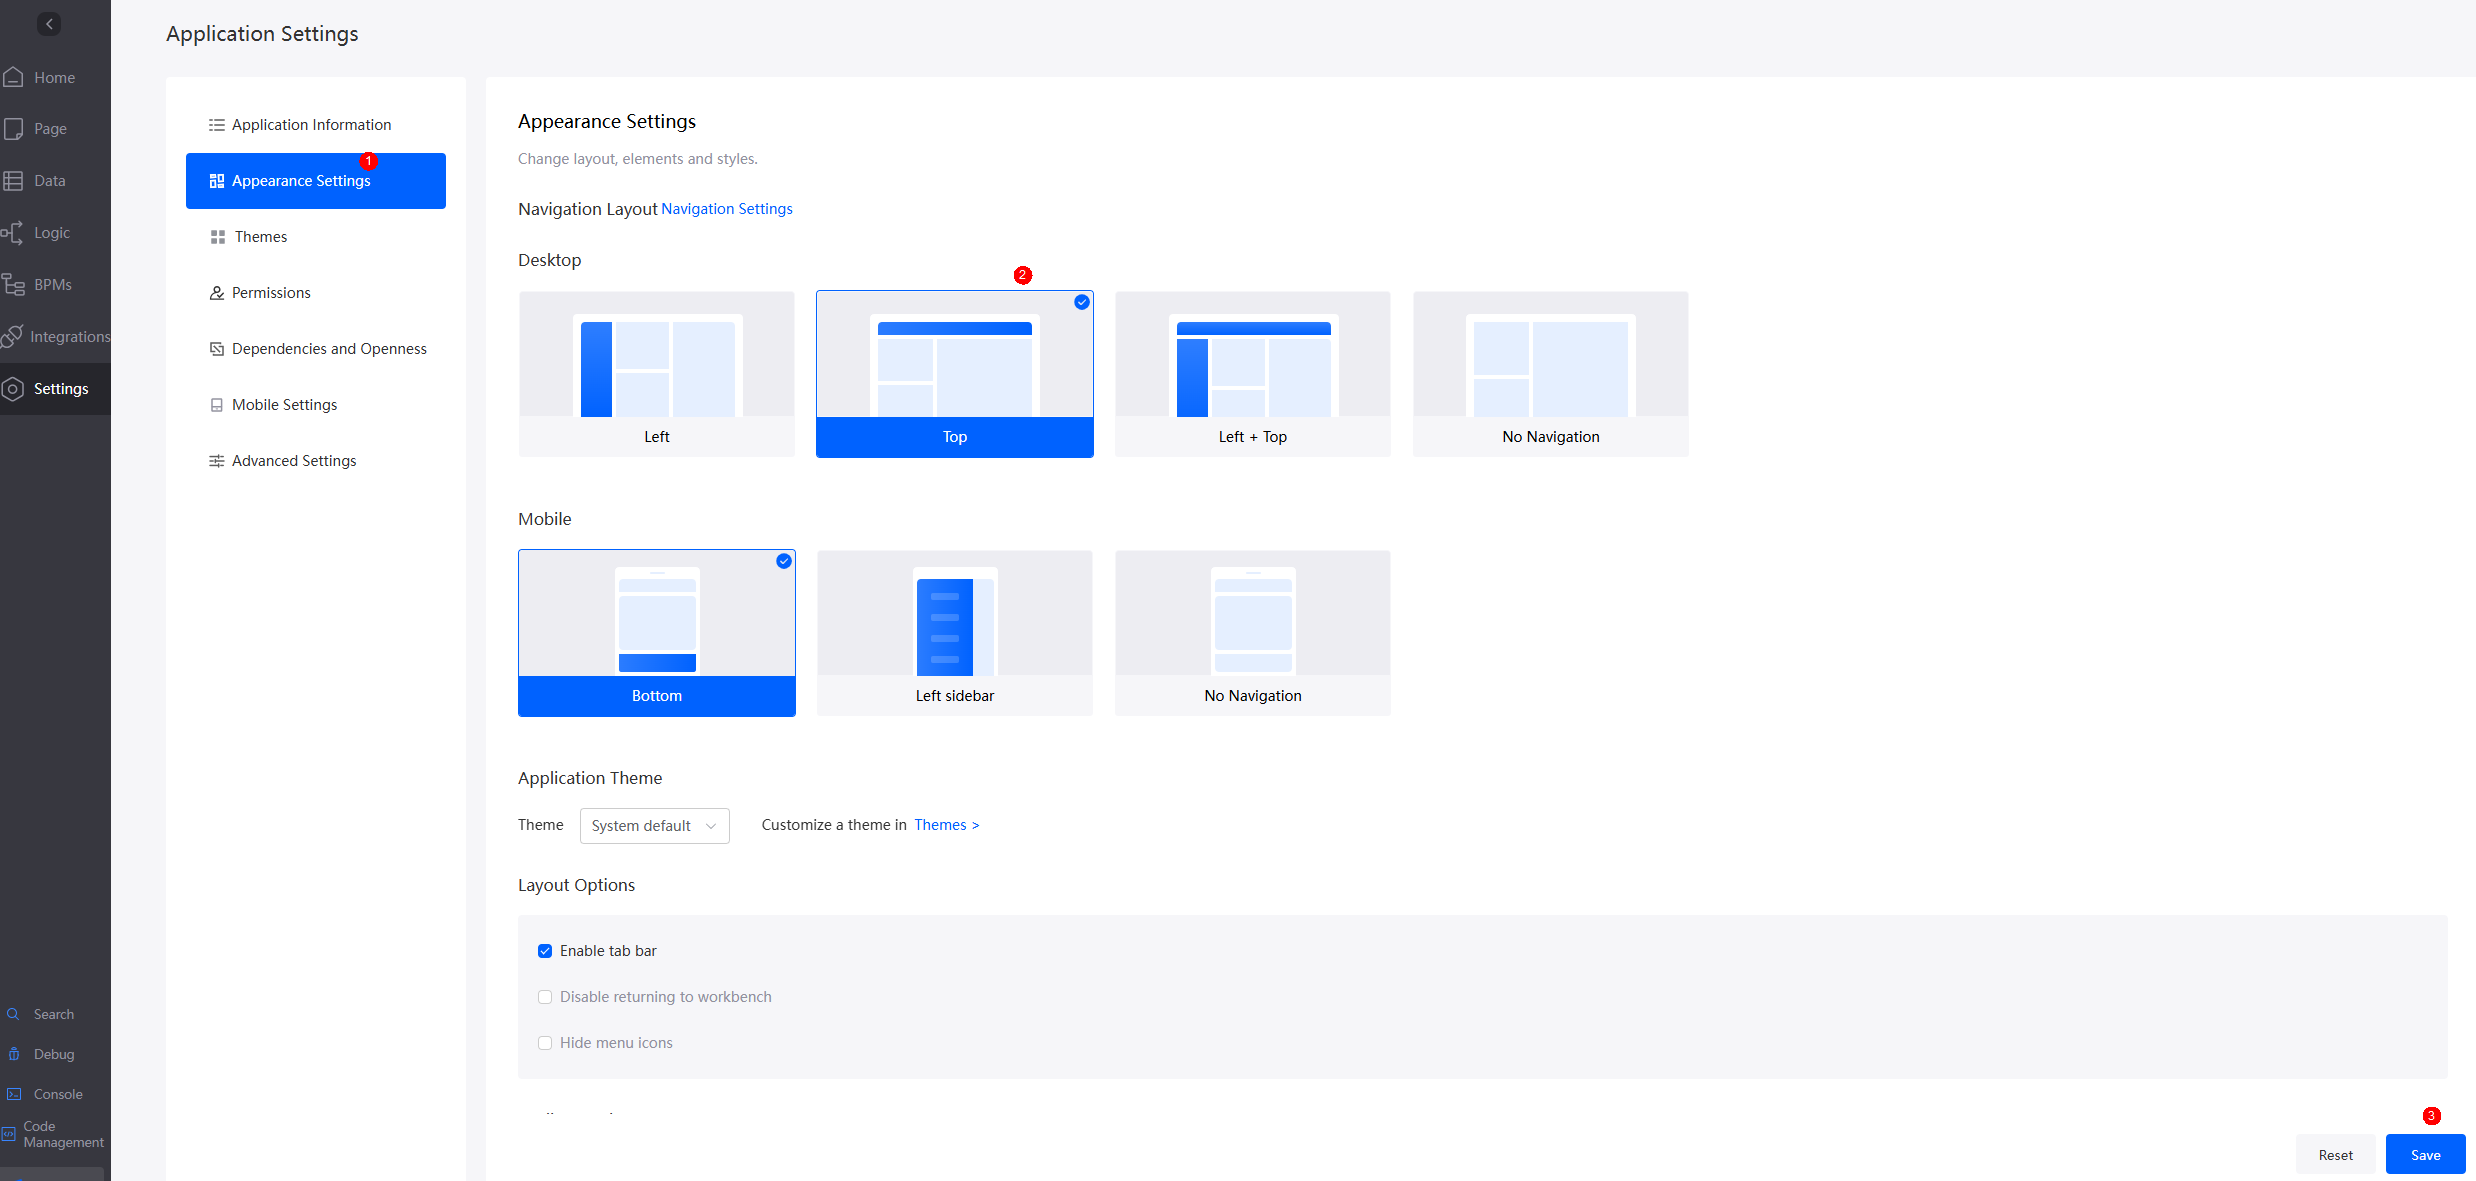 Figure 25 Effect after setting
Step 6: Debug Service Functions
Business trip approval test process: An employee submits a business trip application. The supervisor approves the application, rejects the application, and the employee re-fills in the application.
- Fill out a business trip application as an employee.
- Log in to the Huawei Cloud Astro Zero console as an employee (Mike in this example).
Figure 26 Logging in to Huawei Cloud Astro Zero

- On the homepage, click Access Homepage. The application development page is displayed.
- In the navigation pane, choose Applications.
- In the low-code application list, click Edit next to the created BTA application to access the BTA application designer.
- On the main menu, choose Run > Run Now. The application preview page is displayed.
- Click businesstrip, enter travel information, and click Submit.
- Choose Pending Task > My Application. You can view the submitted business trip application.
Figure 28 Viewing my applications

- Log in to the Huawei Cloud Astro Zero console as an employee (Mike in this example).
- Approve the business trip application as a supervisor.
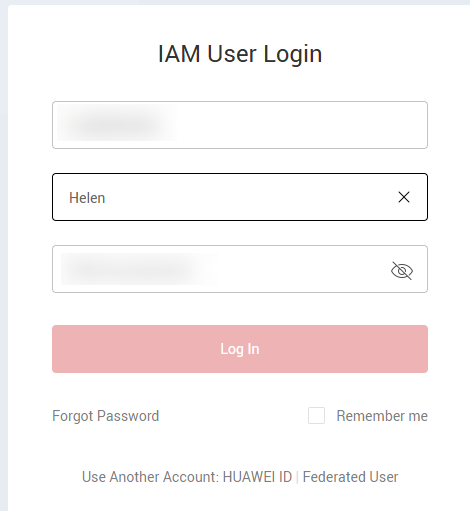
- Log in to the Huawei Cloud Astro Zero console as a supervisor (Helen in this example).
Figure 29 Logging in to Huawei Cloud Astro Zero
- On the homepage, click Access Homepage. The application development page is displayed.
- In the navigation pane, choose Applications.
- In the low-code application list, click Edit next to the created BTA application to access the BTA application designer.
- On the main menu, choose Run > Run Now. The application preview page is displayed.
- Click Pending Task and click Pending approval by the supervisor. The supervisor approval page is displayed.
Figure 30 Pending Task
 Figure 31 Supervisor approval page
- Approve or reject the application.
You have completed the development and functional testing of the business trip approval application. Through the operations in this section, you are now familiar with the quick applications and BPMs.
- Log in to the Huawei Cloud Astro Zero console as a supervisor (Helen in this example).
Feedback
Was this page helpful?
Provide feedbackThank you very much for your feedback. We will continue working to improve the documentation.See the reply and handling status in My Cloud VOC.
For any further questions, feel free to contact us through the chatbot.
Chatbot


