
Getting Started with Cost Center
Viewing Cost Analyses
- Access the Cost Analysis page.
- Select a recommended report or a custom report.
- Set search criteria to view desired cost data.

- You can view your cost data at a specific time granularity within a given time range.
- You can use different dimensions, for example, to identify the most frequently used service types, view the cost distribution in a specific region, and learn the linked accounts with the highest costs.
- Cost Type: For original costs and net original costs, the data is displayed nearly in real time. For amortized costs and net amortized costs, it may take 24 to 48 hours to display the most recent data.
- Filters: You can select any combination of filters to control which datasets are displayed.
- Export: You can click Export to download the Cost Analysis - Overview file.
Creating a Budget
You can create a budget to follow your original costs and specify an alert threshold.
- Access the Budgets page.
- Click Create a Budget.
- Select Custom Budget and click Create Budget.
- Select Cost Budget (used as an example in this procedure) or Usage Budget, and click Next.
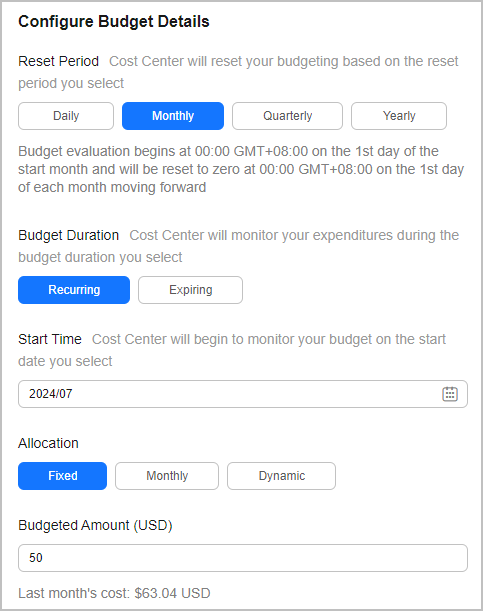
- Configure the budget details and define the budget scope, and click Next.
- Configure alert thresholds and recipients, and click Next.
- Confirm your budget settings and click Save.
Setting Preferences
Some functions in Cost Center are disabled by default. You need to enable them before they are available for use. Enabling such functions is free of charge. After you enable a function, it will be available to you on the following day.
Changing Pay-per-Use to Yearly/Monthly
This function is enabled by default. It can be disabled at any time, but only by an enterprise master account.

Cost Splitting
For cloud services that are used by multiple domains or IP addresses, you can enable cost splitting to split the costs by tag or enterprise project configured for the domain names or IP addresses.
- Access the Preferences page.
- Turn on the toggle for Amortized cost.


- Once enabled, cost splitting cannot be disabled.
- After you enable cost splitting, you can go to the Cost Analysis page to view the splitting results of amortized costs after 12:00:00 on the 4th day of the following month.
Activating Cost Tags
If you want to use tags to group costs, you need to activate the tags first. Then, you can group cost data by cost tag on the Cost Analysis and Budgets pages. You need to plan and activate the cost tags as early as possible because the tags can only be used to organize resource costs generated after the activation.
- See Creating Predefined Tags, and create predefined tags on Tag Management Service (TMS).
- Access the Cost Tags page.
- Select the tag you want and click Activate.

Feedback
Was this page helpful?
Provide feedbackThank you very much for your feedback. We will continue working to improve the documentation.See the reply and handling status in My Cloud VOC.
For any further questions, feel free to contact us through the chatbot.
Chatbot


