
NodeLocal DNSCache
Introduction
The NodeLocal DNSCache add-on (formerly node-local-dns) is developed based on the community NodeLocal DNSCache. This add-on functions as a DaemonSet to run the DNS cache proxy on each cluster node to improve cluster DNS performance.
Open-source community: https://github.com/kubernetes/dns
After NodeLocal DNSCache is enabled, a DNS query goes through the path as shown below.
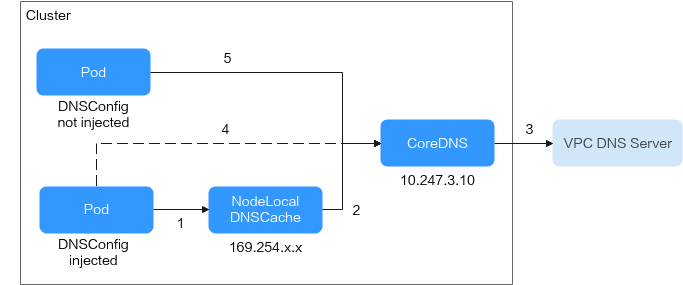
- 1. By default, the pods with DNSConfig injected use NodeLocal DNSCache to resolve requested domain names.
- 2. If NodeLocal DNSCache cannot resolve domain names, it will ask CoreDNS for resolution.
- 3. CoreDNS resolves domain names outside of the cluster by using the DNS server in the VPC.
- 4. If a pod with DNSConfig injected cannot access NodeLocal DNSCache, CoreDNS will resolve the domain name.
- 5. By default, CoreDNS resolves domain names for the pods without DNSConfig injected.
Notes and Constraints
- This feature is available only to clusters of v1.19 or later.
Installing the Add-on
- Log in to the CCE console and click the cluster name to access the cluster console. In the navigation pane, choose Add-ons, locate NodeLocal DNSCache on the right, and click Install.
- On the Install Add-on page, configure the specifications as needed.
- If you selected Preset, you can choose between Standalone or HA based on the cluster scale. The system will automatically set the number of add-on pods and resource quotas according to the preset specifications. You can see the configurations on the console.
Standalone means that a DNSConfig admission controller is deployed on a single pod, which helps to reduce resource usage. HA means that DNSConfig admission controllers are deployed on two pods, which enhances the availability of the add-on.
- If you selected Custom, you can adjust the number of pods and resource quotas as needed. High availability is not possible with a single pod. If an error occurs on the node where the add-on instance runs, the add-on will fail.
- If you selected Preset, you can choose between Standalone or HA based on the cluster scale. The system will automatically set the number of add-on pods and resource quotas according to the preset specifications. You can see the configurations on the console.
- Configure the add-on parameters.
- DNSConfig: After this function is enabled, a DNSConfig admission controller will be created. The controller intercepts pod creation requests in the namespace labeled with node-local-dns-injection=enabled based on admission webhooks and automatically configures DNSConfig for pods. If this function is disabled or the pod belongs to a non-target namespace, you must manually configure DNSConfig for the pod.
After automatic injection is enabled, you can customize the following configuration items for DNSConfig (supported when the add-on version is 1.6.7 or later):

If DNSConfig has been configured in the pod when automatic injection is enabled, DNSConfig in the pod will be used first.
- (Optional) IP Address of DNS Server: IP address list of the DNS server obtained when the container resolves the domain name. NodeLocal DNSCache and CoreDNS IP addresses are added by default. You have the option to add an additional IP address, but duplicates will be removed.
- (Optional) Search Domain: a search list for host-name lookup. When a domain name cannot be resolved, DNS queries will be attempted combining the domain name with each domain in the search list in turn until a match is found or all domains in the search list are tried. You can add up to three extra search domains, but any duplicates will be removed.
- (Optional) ndots: specifies that if a domain name has fewer periods (.) than the specified value of ndots, it will be combined with the search domain list for DNS query. If the domain name still cannot be resolved, it will be used for DNS query. The system will perform a DNS query on a domain name if the number of periods (.) in it is greater than or equal to the value of ndots. If the domain name cannot be resolved correctly, the system will sequentially combine it with the search domain list and then perform a DNS query.
- Target Namespace: This parameter is available after DNSConfig is enabled. Only NodeLocal DNSCache of v1.3.0 or later supports this function.
- Enable All: CCE adds the node-local-dns-injection=enabled label to all created namespaces excluding built-in ones (such as kube-system), identifies namespace creation requests, and automatically adds the label to newly created namespaces.
- Manual Configure: You must manually add the node-local-dns-injection=enabled label to the namespaces requiring the injection of DNSConfig. For details, see Managing Namespace Labels.
- DNSConfig: After this function is enabled, a DNSConfig admission controller will be created. The controller intercepts pod creation requests in the namespace labeled with node-local-dns-injection=enabled based on admission webhooks and automatically configures DNSConfig for pods. If this function is disabled or the pod belongs to a non-target namespace, you must manually configure DNSConfig for the pod.
- Configure deployment policies for the add-on pods.
- Scheduling policies do not take effect on add-on pods of the DaemonSet type.
- When configuring multi-AZ deployment or node affinity, ensure that there are nodes meeting the scheduling policy and that resources are sufficient in the cluster. Otherwise, the add-on cannot run.
Table 1 Configurations for add-on scheduling Parameter
Description
Multi-AZ Deployment
- Preferred: Deployment pods of the add-on will be preferentially scheduled to nodes in different AZs. If all the nodes in the cluster are deployed in the same AZ, the pods will be scheduled to different nodes in that AZ.
- Equivalent mode: Deployment pods of the add-on are evenly scheduled to the nodes in the cluster in each AZ. If a new AZ is added, you are advised to increase add-on pods for cross-AZ HA deployment. With the Equivalent multi-AZ deployment, the difference between the number of add-on pods in different AZs will be less than or equal to 1. If resources in one of the AZs are insufficient, pods cannot be scheduled to that AZ.
- Forcible: Deployment pods of the add-on are forcibly scheduled to nodes in different AZs. There can be at most one pod in each AZ. If nodes in a cluster are not in different AZs, some add-on pods cannot run properly. If a node is faulty, add-on pods on it may fail to be migrated.
Node Affinity
- Not configured: Node affinity is disabled for the add-on.
- Specify node: Specify the nodes where the add-on is deployed. If you do not specify the nodes, the add-on will be randomly scheduled based on the default cluster scheduling policy.
- Specify node pool: Specify the node pool where the add-on is deployed. If you do not specify the node pools, the add-on will be randomly scheduled based on the default cluster scheduling policy.
- Customize affinity: Enter the labels of the nodes where the add-on is to be deployed for more flexible scheduling policies. If you do not specify node labels, the add-on will be randomly scheduled based on the default cluster scheduling policy.
If multiple custom affinity policies are configured, ensure that there are nodes that meet all the affinity policies in the cluster. Otherwise, the add-on cannot run.
Toleration
Using both taints and tolerations allows (not forcibly) the add-on Deployment to be scheduled to a node with the matching taints, and controls the Deployment eviction policies after the node where the Deployment is located is tainted.
The add-on adds the default tolerance policy for the node.kubernetes.io/not-ready and node.kubernetes.io/unreachable taints, respectively. The tolerance time window is 60s.
For details, see Configuring Tolerance Policies.
- Click Install.
Components
|
Component |
Description |
Resource Type |
|---|---|---|
|
node-local-dns-admission-controller |
Automatic DNSConfig injecting |
Deployment |
|
node-local-dns-cache |
DNS cache proxy on nodes to improve the DNS performance of the cluster |
DaemonSet |
Using NodeLocal DNSCache
By default, application requests are sent through the CoreDNS proxy. To use NodeLocal DNSCache as the DNS cache proxy, use any of the following methods: (For details, see Using NodeLocal DNSCache.)
- Auto injection: Automatically configure the dnsConfig field of the pod when creating the pod. (This function is not available for pods in system namespaces such as kube-system.)
- Manual configuration: Manually configure the dnsConfig field of the pod.
Uninstalling the Add-on
Uninstalling the add-on will affect the pods that have used the node-local-dns address for domain name resolution. Before uninstalling the add-on, delete the node-local-dns-injection=enabled label from the involved namespaces, and delete and recreate the pods with the node-local-dns-webhook.k8s.io/status: injected label.
- Check the add-on.
- Log in to the CCE console and click the cluster name to access the cluster console. In the navigation pane, choose Add-ons, locate NodeLocal DNSCache on the right, and click Edit.
- In the Parameters area, check whether DNSConfig is enabled.
If DNSConfig has been enabled:
- In the navigation pane, choose Namespaces.
- Locate the rows that contain the namespaces with the node-local-dns-injection=enabled label and delete the label. For details, see Managing Namespace Labels.
- Delete the pods in these namespaces and recreate pods.
If DNSConfig has not been enabled:
- Use kubectl to access the cluster.
- Check the pods with DNSConfig manually injected. If multiple namespaces are involved, check all the pods in these namespaces.
For example, to check pods in the default namespace, run the following command:
kubectl get pod -n default -o yaml - Manually remove DNSConfig and recreate pods.
- Uninstall NodeLocal DNSCache.
- In the navigation pane, choose Add-ons. Locate NodeLocal DNSCache and click Uninstall.
- In the displayed dialog box, click Yes.
Helpful Links
Feedback
Was this page helpful?
Provide feedbackThank you very much for your feedback. We will continue working to improve the documentation.See the reply and handling status in My Cloud VOC.
For any further questions, feel free to contact us through the chatbot.
Chatbot


