(Optional) Creating a Load Balance Channel
Overview
This channel allows ROMA Connect to access backend services deployed on servers in load balancing mode (direct access to ECSs in the same VPC, or to ECSs in other VPCs and private servers by specifying IP addresses).
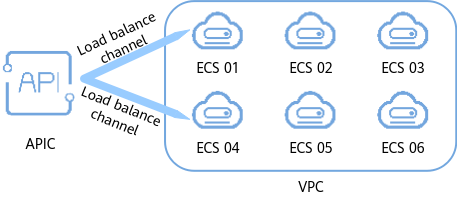
For example, six ECSs deployed in a VPC have a load balance channel to reach ECS 1 and ECS 4. ROMA Connect can access these two ECSs through the channel.

Prerequisites
- The network between ROMA Connect and the servers in the load balance channel is normal.
- You have the VPC Administrator permission.
Procedure
- Log in to the ROMA Connect console. On the Instances page, click View Console of an instance.
- In the navigation pane on the left, choose API Connect > API Management. On the Load Balance Channels tab page, click Create.
- On the Create Load Balance Channel page, configure load balance channel information.
- Configure basic information about the load balance channel.
Table 1 Parameters for configuring the load balance channel Parameter
Description
Name
Enter a load balance channel name. It is recommended that you enter a name based on naming rules to facilitate search.
Port
Enter the access port number in the load balance channel.
Distribution Algorithm
Select a distribution algorithm for backend service requests. The load balance channel determines the server to which the request is to be sent based on the distribution algorithm.
Backend Server Type
Select the member type in the load balance channel. The member type is a one-time configuration and cannot be changed after you create the VPC channel.
- Cloud server: Add a load balance channel member by selecting a cloud server.
- IP address: Add a load balance channel member by entering a server IP address.
- Create a server group.
- Click Create Server Group.
- In the Create Server Group dialog box, configure the group information and click OK.
You can divide servers into multiple groups.
Table 2 Server group configuration Parameter
Description
Group Name
Name of a server group. Set this parameter as planned. It is recommended that you enter a name based on naming rules to facilitate search.
Weight
Enter the weight of the server group. A larger weight indicates that more requests are forwarded to the server in the group.
Description
Enter a brief description of the group.
- Add cloud servers or server addresses to the load balance channel based on the backend server type configured.
- Add a cloud server.
- Click Select ECS.
- In the Select ECS dialog box, select a subnet, select the ECS to be added, and click OK.
- Add a backend server address.
- Click Add Backend Server Address.
- On the page displayed, configure backend server information.
Table 3 Backend server information Parameter
Description
Backend Server Address
Enter the IP address of the backend server.
Standby Node
After you enable this option, the backend server serves as a standby node. It works only when all non-standby nodes are faulty.
Port
Enter the access port number of the backend server. If the port number is 0, the port of the load balance channel is used.
Server Status
Specify whether to enable the server. Requests are distributed to the server only after it is enabled.
- Add a cloud server.
- Configure the health check.
The health check function is enabled by default. If you do not need to perform the health check, disable this parameter.
Table 4 Health check configurations Parameter
Description
Protocol
Select the protocol used for the health check. The value can be TCP, HTTP, or HTTPS.
Two-Way Authentication
This parameter is available only if Protocol is set to HTTPS.
Specify whether to enable two-way authentication between ROMA Connect and backend servers.
Path
Mandatory for Protocol set to HTTP or HTTPS.
Enter the health check URL.
Method
Mandatory for Protocol set to HTTP or HTTPS.
Select the HTTP request method used for the health check. The value can be GET or HEAD.
Health Check Port
Enter the destination port of the health check. By default, the port number configured for the load balance channel is used.
Healthy Threshold
Number of consecutive successful checks required for a server to be considered healthy. For example, if Healthy Threshold is set to 2, the server is considered healthy when it passes two consecutive health checks.
Unhealthy Threshold
Number of consecutive failed checks required for a server to be considered unhealthy. For example, if Unhealthy Threshold is set to 5, the server is considered unhealthy when it fails five consecutive health checks.
Timeout Interval
Response timeout of a health check, in seconds. If no response is received within the specified duration, the health check fails.
Interval (s)
Interval between two consecutive checks, in seconds.
Response Codes
Mandatory for Protocol set to HTTP or HTTPS.
When the server returns a specified HTTP response code, the server considers the response as successful. Multiple response codes can be specified at the same time.
- Configure basic information about the load balance channel.
- Click Finish.
Feedback
Was this page helpful?
Provide feedbackThank you very much for your feedback. We will continue working to improve the documentation.See the reply and handling status in My Cloud VOC.
For any further questions, feel free to contact us through the chatbot.
Chatbot


