

Creating a Pod
To access cloud services, such as pulling images from SWR, accessing OBS, or calling cloud service APIs, CCI workloads must use a VPC endpoint.
Scenarios
You can use CCI to quickly create pods for running workloads. On the CCI 2.0 console, you can view details about all pods, such as basic information, container list, storage volumes, and events. In addition, you can use remote terminals to access pods. You can also delete pods if you no longer need them.
Prerequisites
- A namespace has been created. If there are no namespaces, create one by referring to Creating a Namespace.
- Images have been uploaded. For details, see Pushing an Image Through a Container Engine Client.
Constraints
There are system components that help run the pods. These system components occupy some underlying resources, such as CPU and memory. As a result, the resource usages of pods may not reach the expected limits. To avoid this, you can reserve system overhead.
Procedure
- Log in to the CCI 2.0 console.
- In the navigation pane, choose Workloads. On the Pods tab, click Create Pod.
- On the Create Pod page, specify the basic information.
Parameter
Description
Pod Name
- Enter a name for the pod. The pod name must be unique in the same namespace.
- Enter 1 to 204 characters, starting and ending with a lowercase letter or digit. Only lowercase letters, digits, hyphens (-), and periods (.) are allowed. The total length of the pod name and namespace name cannot exceed 217 characters.
Namespace
Select the namespace that the pod belongs to.
Description (Optional)
Enter a description, which cannot exceed 250 characters.
CPU Architecture
x86
Pod Type
Select General-computing or General-computing-lite.
NOTE:Only x86-based general-computing-lite pods are supported. General-computing-lite pods provide cost-effective compute with comparable performance.
General-computing-lite pods are in the open beta test (OBT) phase. Their prices vary depending on the pod type. For details, see Unit Prices of Pay-per-Use Billing in Different Regions.
vCPUs
Select a value from 0.25 to 64.
Memory
Select the memory based on the selected vCPUs.
Data Storage (Optional)
Only emptyDir volumes, ConfigMaps, and secrets are supported. Add a volume to the pod and then mount the volume to the specified container.
Click Add Volume, select a volume type, and enter a volume name.- emptyDir volume: By default, CCI provides 30 GiB of free storage space, which is shared by emptyDir volumes and the system disk.
- ConfigMap: Select a ConfigMap. If no ConfigMaps are available, create one first. For details, see Creating a ConfigMap.
- Secret: Select a secret. If no secrets are available, create one first. For details, see Creating a Secret.
- Specify container settings.
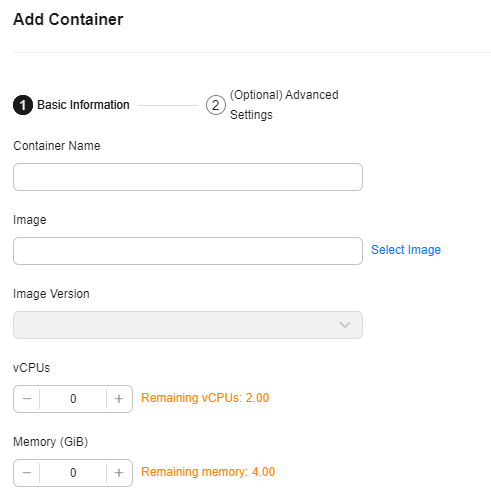
- Add basic container information. The total resources of a container cannot exceed the pod flavor.
Table 1 Basic container information Parameter
Description
Container Name
- The container name must be unique.
- Enter 1 to 63 characters, starting and ending with a lowercase letter or digit. Only lowercase letters, digits, and hyphens (-) are allowed.
Image
Select a container image.
CAUTION:Custom domain name images of the SWR Enterprise Edition cannot be used to create workloads.
Image Tag
Select a container image tag.
vCPUs
Specify the vCPUs. The value cannot exceed that in the pod flavor.
Memory
Specify the memory. The value cannot exceed that in the pod flavor.
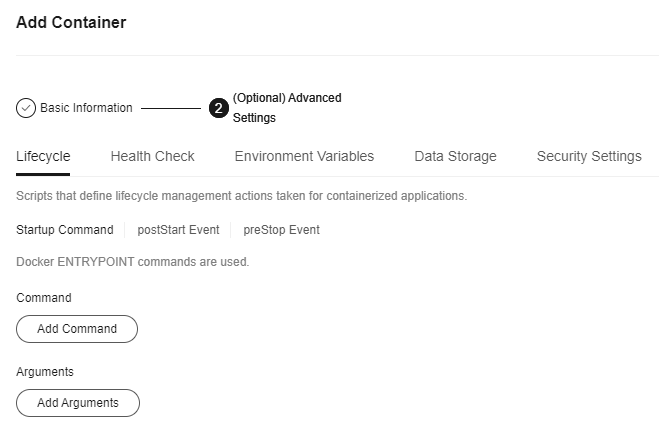
- (Optional) Specify advanced container settings.
Table 2 Advanced container settings Parameter
Description
Lifecycle
CCI provides containers with lifecycle hooks, which enable containers to run code triggered by events during their lifecycle. For example, if you want a container to perform a certain operation before it is stopped, you can register a hook. For details, see Lifecycle. CCI provides the following lifecycle hooks:
- Startup command: Docker ENTRYPOINT commands are used.
- PostStart: This hook is triggered after an application is started.
- PreStop: This hook is triggered before an application is stopped.
Health Check
Container health can be checked regularly when the container is running. For details, see Health Check.
CCI supports the following types of probes:
- Liveness probe: checks whether a container is normal and a restart is required.
- Readiness probe: checks whether a container is ready to respond to requests.
- Startup probe: checks whether an application has already started.
Environment Variables
Environment variables affect the way a running container will behave. You can update them after deploying the workload.
Data Storage
Volumes can be mounted to containers to read data from files or store data files persistently. To mount a volume to a container, add the volume for the pod first.
Security Settings
Specify a user ID for all the containers to run with. For example, enter 0 to run as root.
- Add basic container information. The total resources of a container cannot exceed the pod flavor.
- (Optional) Select an image repository access credential.
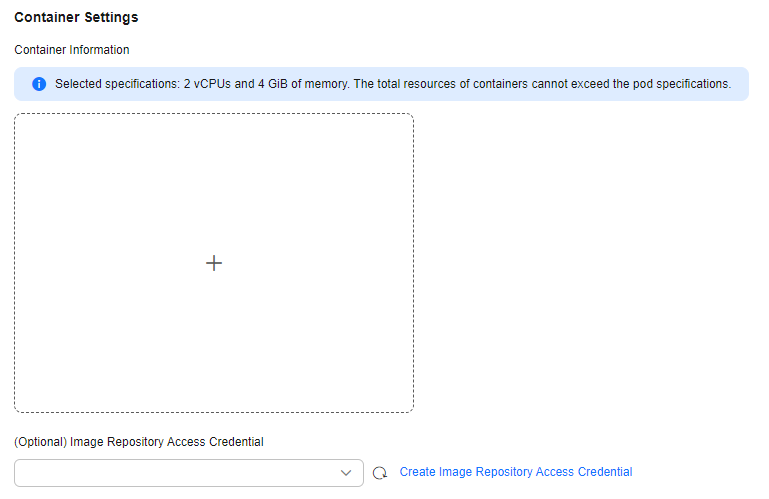
- Optional: To deliver container logs to LTS for centralized management, select Ingest Logs to LTS and complete the configuration by referring to Table 3. For details about the constraints, see Log Collection.
Table 3 Interconnection with LTS Parameter
Description
Log Group
Select the logical group that the logs belong to. You can select an existing log group or click Create Log Group to create one.NOTE:The log group name cannot be the same as the current or original name of an existing log group. The log group name cannot start with a period or underscore, or end with a period. Only letters, digits, underscores (_), hyphens (-), and periods (.) are allowed.
Log Stream
Select a log stream (basic unit of log storage) in the log group. You can select an existing log stream or click Create Log Stream to create one.NOTE:The log stream name cannot start with a period or underscore, or end with a period. Only letters, digits, underscores (_), hyphens (-), and periods (.) are allowed.
Policy Name
Enter a custom name for the log collection policy, which is used to identify the log collection rule.NOTE:The policy name can contain a maximum of 63 characters and must start and end with a letter or digit. Only lowercase letters, digits, and hyphens (-) are allowed.
Log Type
- Container standard output: Collect logs that are printed to the standard output or standard error stream when containers are running.
- Container file logs: Collect the content of a specified log file in a container. NOTE:
- You can add a maximum of 20 log directories.
- Each path must be an absolute path. If there are duplicate paths, only the logs of one log directory can be collected.
- Log files in .gz, .tar, or .zip format are not supported.
- A maximum of three levels of directories can be matched using wildcards. The level-1 directory does not support wildcards. The directory name and file name must be complete names and support asterisks (*) and question marks (?) as wildcards. An asterisk (*) can match multiple characters. A question mark (?) can match only one character.
Log Format
- Single-line text: Each log contains only one line of text. The newline character \\n denotes the start of a new log.
- Multi-line text: Each log may span multiple lines of text and is matched for the first line by using a regular expression. To print multi-line logs, you need to enter the log matching format.
- Click Create Now.
What is your overall rating for this page?
Thank you very much for your feedback. We will continue working to improve the documentation.See the reply and handling status in My Cloud VOC.
For any further questions, feel free to contact us through the chatbot.
Chatbot


