
Using Macros to Implement Widget Interaction Between Advanced Pages
Scenario
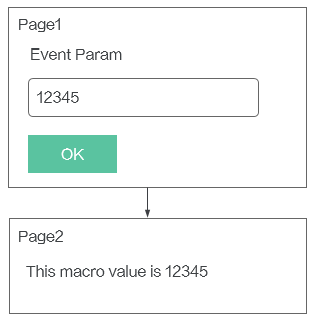
Widget interaction between pages requires the event-action mechanism and the page macros. This section uses an example to describe inter-page widget interaction. As shown in Figure 1, advanced page Page 1 contains widgetEventTemplate, and advanced page Page 2 contains widgetPageMacroTemplate. Click OK on Page 1 to pass the data in the text box to Page 2 through a page macro.
The following figure demonstrates the widget interaction between pages. When configuring an event, select Page Navigation in the Default category, and add an action parameter to transfer event parameters to the page macro so that the page macro data can be read on the target page.

The implementation is as follows:
- widgetPageMacroTemplate
Define page macro data in the widgetPageMacroTemplate.editor.js file.
propertiesConfig: [
    {
        config: [
        {
            "type": "text",
            "name": "pageMacro",
            "label": "Page Macro",
            "value": "${pm.pageMacro}",
            "validation":
            {
                "rules":
                {}
            }
        }]
}];
Table 1 Page macro data configuration items Configuration Item
Description
propertiesConfig
Sets a custom property for this widget.
type
Data type. In this example, the data type is text.
name
Variable name. In this example, the variable name is pageMacro. The name can be obtained by calling the API used to obtain custom properties of a widget.
label
Display label.
value
Default value. In this example, the default value is ${pm.pageMacro}.
pageMacro is the page macro variable name and ${pm.} is the syntax defined by the platform.
validation
This configuration item can be ignored.
Page macro data is read from the widgetPageMacroTemplate.js file and then displayed on the page.
var widgetProperties = thisObj. getProperties ();// API for obtaining custom properties of a widget.
...
var pageMacro = widgetProperties.pageMacro || "";
$("#macro",elem).html(pageMacro);
In the preceding sample code, PageMacro of widgetProperties.pageMacro is the variable name (name) set in Table 1.
- widgetEventTemplate: See Using the Event-Action Mechanism to Implement Widget Interaction Between Advanced Pages.
Configuring Widget Interaction Between Pages
- Upload widgetEventTemplate (ignore this template if it has already been uploaded) and widgetPageMacroTemplate to the widget library. For details, see Developing Custom Widgets.
- Create two advanced pages named Page 1 and Page 2.
- Configure Page 1.
- In the upper left corner of Page 1, click
 , select widgetEventTemplate from Custom, and drag it to the canvas.
 - Click widgetEventTemplate in the canvas. On the Events tab page of the widget property settings panel on the right, click the gear icon next to sendEvent.
- Choose Create Action > Default > Page Navigation, set the required parameters, specify the redirection page, add parameter pageMacro with value ${e.param1}, and click the confirm button.
The parameters in the event editing dialog box are described as follows:
- Page type: In this scenario, Page 2 is an internal page. Select an internal page.
- Internal page: Select Page2.
- Action parameters: Click the create button and set pageMacro = ${e.param1}. The value of the sendEvent event parameter is assigned to the page macro pageMacro of Page 2 through ${e.param1}.
- How does it open: Select Current Window or New Window.
- Click the confirm button. Then save and publish Page 1.
- In the upper left corner of Page 1, click
- Configure Page 2.
- In the upper left corner of Page 2, click
 , select widgetPageMacroTemplate from Custom, and drag it to the canvas. Figure 3 Dragging widgetPageMacroTemplate to the canvas
- Create a page macro.
In the navigation pane, click
 next to Page2 and choose Settings. In the displayed dialog box, click the Page Macro tab and click New.
 - Configure the page macro.
In the Create Page Macro dialog box, set parameters and click Confirm.
- ID: unique ID of a page macro. The value must be the same as the page macro variable name (pageMacro of ${pm.pageMacro} in this example) defined in widgetPageMacroTemplate.editor.js.
- Name: page macro name, which can be set to any value.
- Default Value: default value of the macro. Figure 4 Creating a page macro

- Return to the Page Macro tab page, confirm the information, and click Save. Figure 5 Page settings

Astro Zero allows you to obtain page macros by customizing actions on the Events tab of a widget.
- Select the widget. On the Events tab page on the right, click
 next to Click Event.
 - Click Create Action and choose Custom > Custom Action.
- In Edit Event, enter code console.log(`${pm.pageMacro}`) to obtain the page macro.
Replace pageMacro with the actual page macro ID. Note that ` must be added to the code.
Figure 6 Code for obtaining the page macro
- Select the widget. On the Events tab page on the right, click
- View the default value displayed in the widgetPageMacroTemplate widget in the canvas. Then save and publish Page 2. Figure 7 Saving and publishing Page 2

- In the upper left corner of Page 2, click
- Click
 in the upper part of Page 1 to preview the page.
Feedback
Was this page helpful?
Provide feedbackThank you very much for your feedback. We will continue working to improve the documentation.See the reply and handling status in My Cloud VOC.
For any further questions, feel free to contact us through the chatbot.
Chatbot


