Using Scaffolding to Develop Vue3 Widgets for Advanced Pages
To enhance widget development and debugging efficiency, the platform offers the Scaffolding tool. This tool allows you to create, develop, debug, preview, release, and download widgets, as well as create local asset projects.
This section describes how to install and use the Scaffolding tool.
Constraints
The Scaffolding tool can be installed and used only on Windows.
Installing Scaffolding
- Install Node.js and Yarn version 18 or later on your local PC. For installation instructions and environment variable settings, refer to the official websites.
- If the npm command is used to install Yarn, the environment variables of Yarn cannot be automatically configured. You need to run the yarn global bin command in the command prompt and add the directory displayed in the command output to the Path variable of the computer environment variables:
- Right-click Computer (for Windows 7) or This PC (for Windows 10) and choose Properties from the shortcut menu. Choose Advanced system settings in the navigation pane, click the Environment Variables button, and add the directory displayed in the command output to the Path variable.
- Click assets_starter.zip, download the assets_starter.zip package to the local PC, and decompress it.
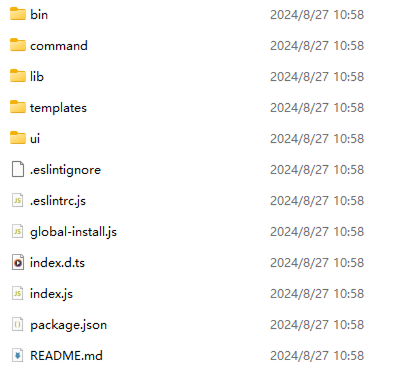
The directory structure after the decompression is as follows. If you have downloaded Scaffolding before, the decompressed directory will overwrite the original one.Figure 1 Directory structure
- Open the command prompt and go to the assets_starter directory.
- (Optional) Uninstall the original tool.
Perform this step if the Scaffolding tool was previously installed and the installation directory has changed, but the original directory still exists.
In the newly decompressed assets_starter directory, run the yarn unlink command. If information similar to the following is displayed, the original tool is uninstalled:
yarn unlink v1.12.3
success Unregistered "XXX".
info You can now run `yarn unlink "XXX"` in the projects where you no longer want to use this package.
Done in 0.14s.
XXX depends on the value of name in the package.json file of the installed Scaffolding package. For example, if the value of name is appengine-scaffolding, the value of XXX is appengine-scaffolding.
- Before using yarn and npm, configure the image path. If not configured, run the following command in the command window and press Enter. If the image path is not set, a network connection error will occur during Scaffolding installation.
The following figure shows the Huawei image settings. The following image sources are recommended. If the connection fails, use other image sources.
In the command window, run the following command and press Enter to configure the npm repository:npm config set registry https://mirrors.tools.huawei.com/npm/ // If the preceding sources fail to be connected, use the standby source. npm config set registry http://npm.cloudartifact.dgg.dragon.tools.huawei.com/artifactory/api/npm/sz-npm-public/
In the command window, run the following command and press Enter to configure the yarn repository:yarn config set registry https://mirrors.tools.huawei.com/npm/ // If the preceding sources fail to be connected, use the standby source. npm config set registry http://npm.cloudartifact.dgg.dragon.tools.huawei.com/artifactory/api/npm/sz-npm-public/
- Run the yarn run bootstrap command in the assets_starter directory to install Scaffolding.
If information similar to the following is displayed and no error is reported, the installation is successful:
success Registered "appengine-scaffolding".
info You can now run `yarn link "appengine-scaffolding"` in the projects where you want to use this package and it will be used instead.
Done in 147.28s.
- If the error message error No registered package found called "appengine-scaffolding" is displayed during the installation, no action is required.
- If a network connection error occurs during the installation, for example, An unexpected error occurred: "https://registry.yarnpkg.com/killable/-/killable-1.0.0.tgz: connect ETIMEDOUT 104.16.19.35:443", the resource address request times out. In this case, replace the request address. For details about how to configure image path, see 5.
- (Optional) When using the CLI to create a widget, you need to use the template function of Vue CLI 2 (not required for Magno UI visualization operations). To install vue/cli and vue/cli-init, run the following commands in any local directory:
yarn global add @vue/cli
yarn global add @vue/cli-init
If the following information is displayed, the command is successfully executed:...... success Installed "@vue/cli@4.5.13" with binaries: - vue Done in 23.56s. - Run the following command so you can use the workspaces of Yarn to manage dependencies of multiple packages:
yarn config set workspaces-experimental true
If the following information is displayed, the command is successfully executed:
success Set "workspaces-experimental" to "true".
Done in 0.07s.
- (Optional) If a new version of Scaffolding is available, you can download the new version of the assets_starter.zip package, decompress it to overwrite the local package, and run the yarn run bootstrap command to reinstall Scaffolding.
Scaffolding GUI Operation Mode
The following describes how to use Scaffolding in the GUI mode:
- Start Scaffolding.
Run the magno ui command in any directory in the command window. The GUI is automatically displayed in the browser.Figure 2 Homepage of the Scaffolding graphical operation page

Area 1 is the project management area. You can create or import a local asset project. Area 2 displays the list of existing asset projects. This list is empty when using the Scaffolding tool for the first time. If the Scaffolding tool fails to be started, rectify the fault by referring to Handling Exceptions.
- Create an application (that is, a new asset project).
- On the Scaffolding homepage, click the create button.
- In the displayed dialog box, set the directory and name of the new application.
Figure 3 Setting application information
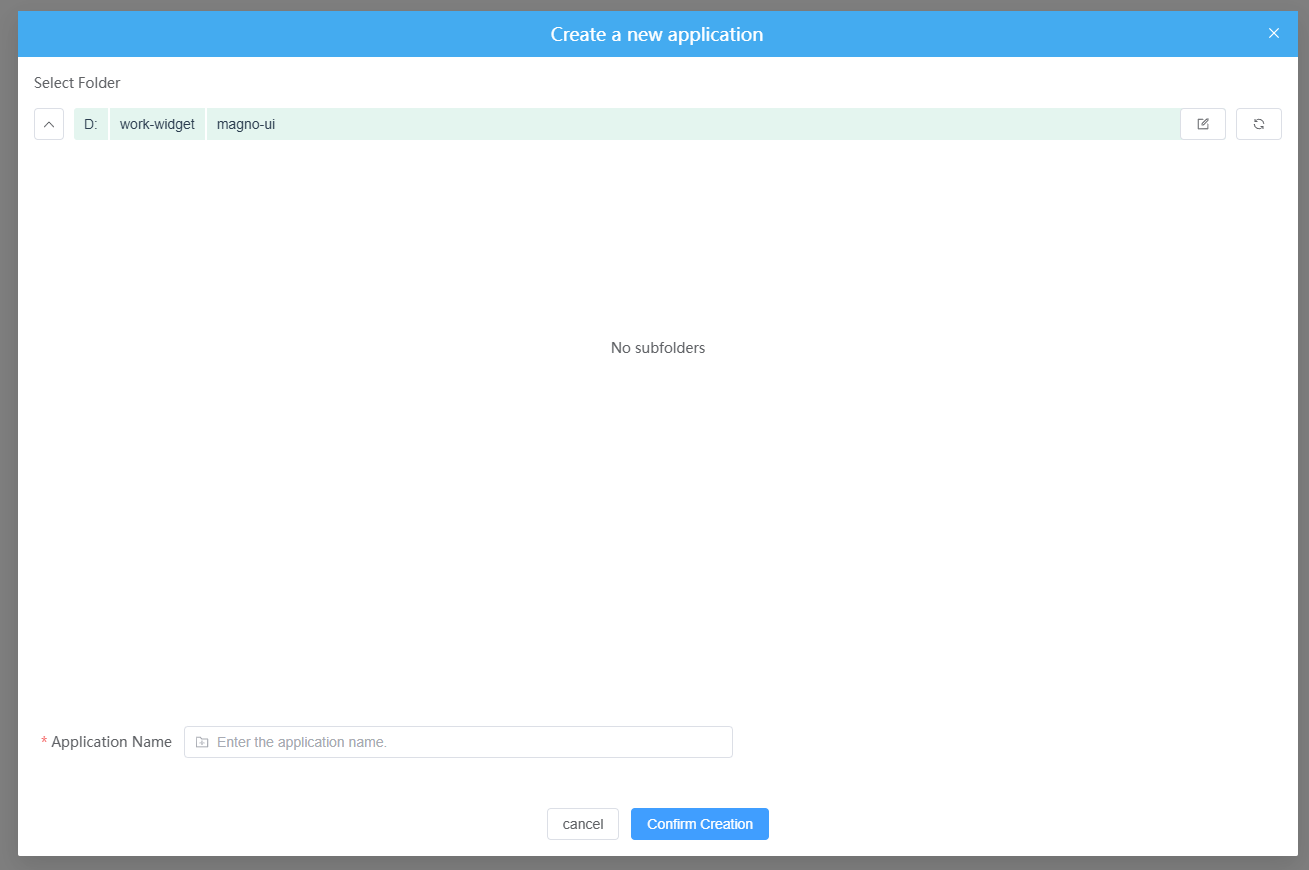
- Click Confirm Creation to complete the application creation and start initialization.
You can also click Import to import an existing application project package.
- After the application is initialized, the new application is displayed in the application list on the homepage, as shown in the following figure.
Figure 4 Application created

- The following figure shows the structure of the new application directory.
Figure 5 Application project directory
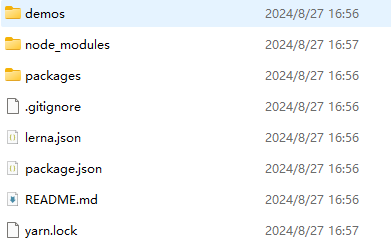
Table 1 Directory description Directory
Function
demos
Example of preset widgets.
packages
Stores widget packages.
READMD.md
Help document, which describes the commands for initializing projects and creating, previewing, uploading, and downloading widgets.
- After the application is initialized, the new application is displayed in the application list on the homepage, as shown in the following figure.
- Configure the application.
- The Scaffolding tool provides access to the widget development environment for debugging and release. To authenticate access, use OAuth 2.0 client mode.
- If you have created an authentication key and the corresponding information is available, click the button to check the key in the Operation column. The key information is downloaded to the local host as a file. You can read the client ID (client_id) and client secret (client_secret) from the file for application settings.
Figure 6 OAuth authentication

- If you have not created an authentication key, perform authentication by referring to Authentication. During OAuth authentication, set the authorization type to client credential when creating an authentication key. You are advised to select a user with System Administrator Profile.
- If you have created an authentication key and the corresponding information is available, click the button to check the key in the Operation column. The key information is downloaded to the local host as a file. You can read the client ID (client_id) and client secret (client_secret) from the file for application settings.
- On the homepage, click the new application. The widget management page is displayed.
Figure 7 Widget management page

- On the widget management page, click Set up, configure the development environment information, and click the confirm button.
Figure 8 Application settings page

Table 2 Parameters for setting an application Parameter
Description
Environment Address
Huawei Cloud Astro Zero development environment address.
Client ID
Client ID required for logging in to the development environment using the Scaffolding tool. For details about how to obtain the client ID, see 3.a.
Client Key
Client key required for logging in to the development environment using the Scaffolding tool. For details about how to obtain the client key, see 3.a.
Internet access agent
Configure this parameter if your network is restricted and you need to use a proxy server to access the development environment.
Proxy Address
Address of the proxy server.
This parameter is displayed only when the Internet access agent parameter is enabled.
Proxy Port
Port number of the proxy server
This parameter is displayed only when the Internet access agent parameter is enabled.
Proxy Authentication Username
It indicates the username for proxy authentication when a proxy server is used.
This parameter is displayed only when the Internet access agent parameter is enabled.
Proxy Authentication Password
It indicates the password for proxy authentication when a proxy server is used.
This parameter is displayed only when the Internet access agent parameter is enabled.
If the Error getting token error message is displayed during the application setting, check the following items:
- Determine whether a proxy is required when you access the environment from your network.
- When applying for OAuth authentication records, check whether the selected user has the system administrator profile (System Administrator Profile) and whether the selected authorization type is client mode.
- The Scaffolding tool provides access to the widget development environment for debugging and release. To authenticate access, use OAuth 2.0 client mode.
- Create a widget.
- On the widget management page, click the create button create a widget, set parameters, and click Create a new component.
Figure 9 Creating a widget
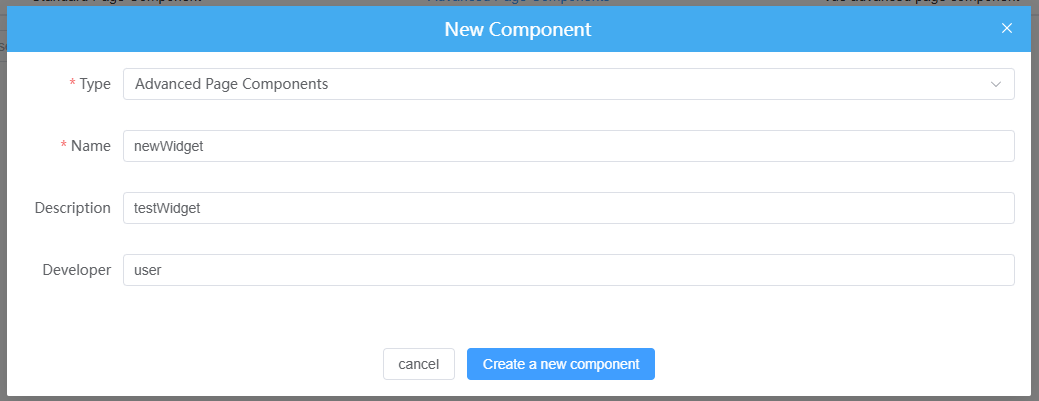
Table 3 Parameters for creating a widget Parameter
Description
Type
Type of the widget to be created. The options are as follows:- Advanced page widget: Used on advanced pages. This type of widget is stored in packages\advancedPageAssets in the local application project directory.
- Standard page widget: Used on standard pages. This type of widget is stored in packages\advancedPageAssets in the local application project directory.
- Vue advanced page widget: Used to develop the Vue single-file widget, which can be packaged into traditional widget packages for advanced pages. Unlike standard or advanced page widgets, it cannot be directly used on the platform. This type of widget is stored in packages\advancedPageAssets in the application project directory.
Name
Name of the new widget.
Description
Description of the widget.
Developer
Developer information.
- After the widget is created, the widget management page is displayed, as shown in the following figure.
Figure 10 Advanced page widget list
 For details about the buttons in the widget list, see Table 4.
Table 4 Buttons Button
Name
Function

Editing widgets
You can click this to open the widget editing page and develop widgets with the online editor.

Opening the local editor
You can click this to open a local editor (such as the Atom, Brackets, Visual Studio Code, IDEA, Notepad++, PyCharm, PhpStorm, RubyMine, Sublime Text and WebStorm editors) to develop widgets.

Starting debugging
You can click this to start debugging. A message is displayed, indicating that the debugging address is copied successfully and the debugging address of Widget1 is https://localhost:8001/widget.

Previewing widgets
You can click this to preview the GUI effect of a widget. When clicked, a new tab opens displaying the widget's DOM structure. This preview is similar to the effect after an advanced page is released. The page dynamically updates when the widget's DOM structure changes.

Configuring widgets
Configures the library resources on which the widget depends.

Compiling widgets
You can click this to compile a widget. Upon successful compilation, the path of the widget asset package is displayed.

Releasing widgets
You can click this to upload the local widget to the widget library in the environment. After the widget is released, you can view it in the widget library of the corresponding development environment.
In the packages > advancedPageAssets directory of the application, you can view the new widget newwidget. The following figure shows the directory structure.
Figure 11 Directory structure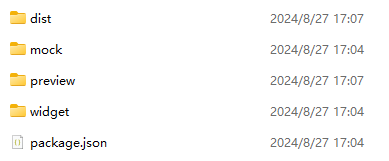
Table 5 Description of the widget directory Directory/File
Function
dist
This directory is created after you click the compile button and is used to store the compiled widget asset packages.
preview
This directory is created when you click the preview button and contains the code for the widget preview page.
widget
Widget source code package, which is used for widget development. For details about each file, see Developing Custom Widgets.
package.json
Metadata file of the current widget project package in the application.
- On the widget management page, click the create button create a widget, set parameters, and click Create a new component.
- Preview and release the widget.
After a widget is released, you can preview and release the widget.
- Preview: Click the preview button.
Figure 12 Preview effect

the dom of the widget displayed on the preview page is the element contained in the DOM structure of the new widget. The following figure shows the code.
Figure 13 Code structure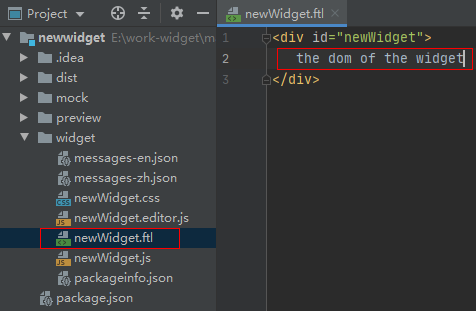
- Release: Click the release button. In the dialog box that is displayed, enter information such as the widget category. After the widget is published, you can use the published widget on an advanced page created in the development environment.
Figure 14 Setting parameters for releasing the widget
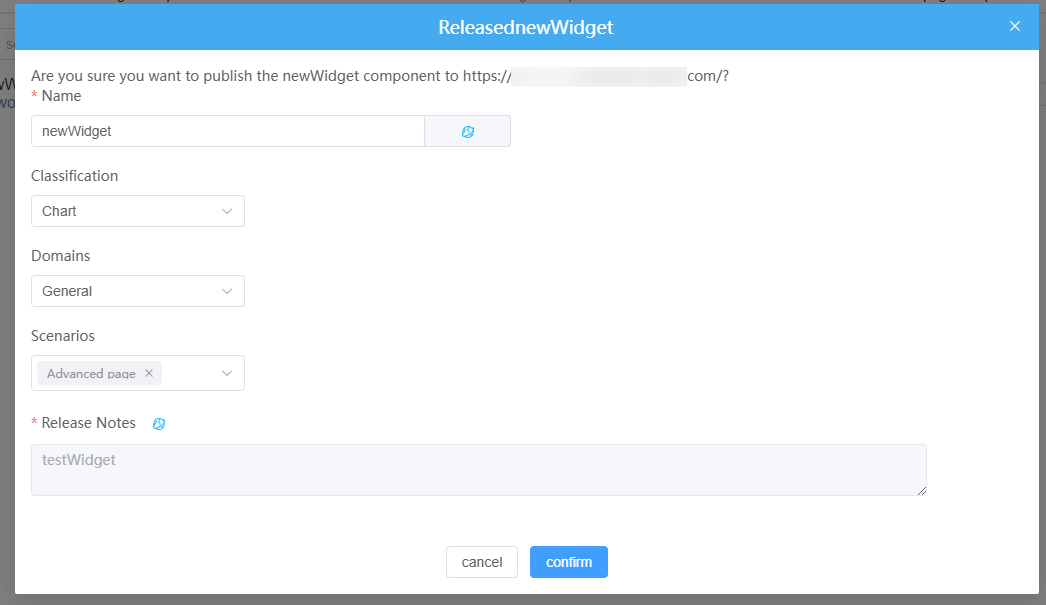
After the widget is released, you can use the custom widget on an advanced page.
Figure 15 Using the custom widget on an advanced page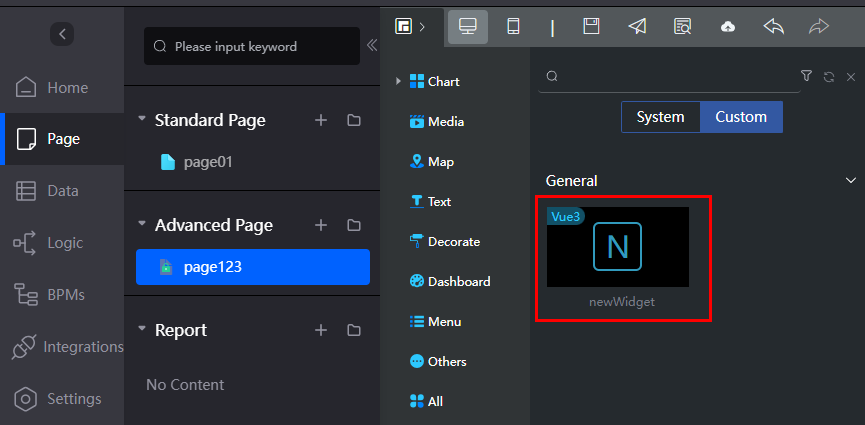
- During widget release, the selected category and domain become the widget's category and domain in the environment. In the development environment, view and use the custom widget within the corresponding category and domain.
- When developing the widget DOM structure, you can use the widget preview function, which dynamically updates DOM changes.
- If functions such as event-action and bridge are involved during widget development, you are advised to use the widget debugging function by referring to 6.
- Preview: Click the preview button.
- Debugging a widget
Developing a widget locally and then packing and uploading its asset package to the environment to check its display effect is inefficient. Instead, you can connect your local environment to the development environment to debug the widget online in real time.
Before debugging a widget, release it to the development environment widget library and drag it to the advanced page. If you have not performed related operations, perform operations by referring to 5.- On the widget management page of the Scaffolding tool, click
 (for example, newWidget) next to the widget you want to debug. This enables the widget's debugging function. A dialog box will appear, confirming that the debugging address has been copied. This means you have started widget debugging and have the debugging address ready.
Figure 16 Debugging address copied
- After obtaining the debugging address, set the local debugging capability for the widget.
- Configure the widget's local resource access root path by pasting the debugging path copied in 6.a (after starting widget debugging) into the text box and clicking Confirm.
After the configuration, the widget package configuration data in the local project folder will be read when the advanced page that uses the widget is previewed. In the local debugging settings dialog box, only widgets released via the Scaffolding tool and dragged to the advanced page are displayed.Figure 18 Configuring the debugging address

- On the advanced page that uses the widget, click
 and then
  to view the effect of the widget.
 - After the advanced page is released and previewed, you can modify the widget code in the local asset project for debugging.
On the widget management page of the Scaffolding tool, click
 to open the widget editing page, or click
  to open the local editor for development. Refresh the development environment and preview the new status for debugging and development.
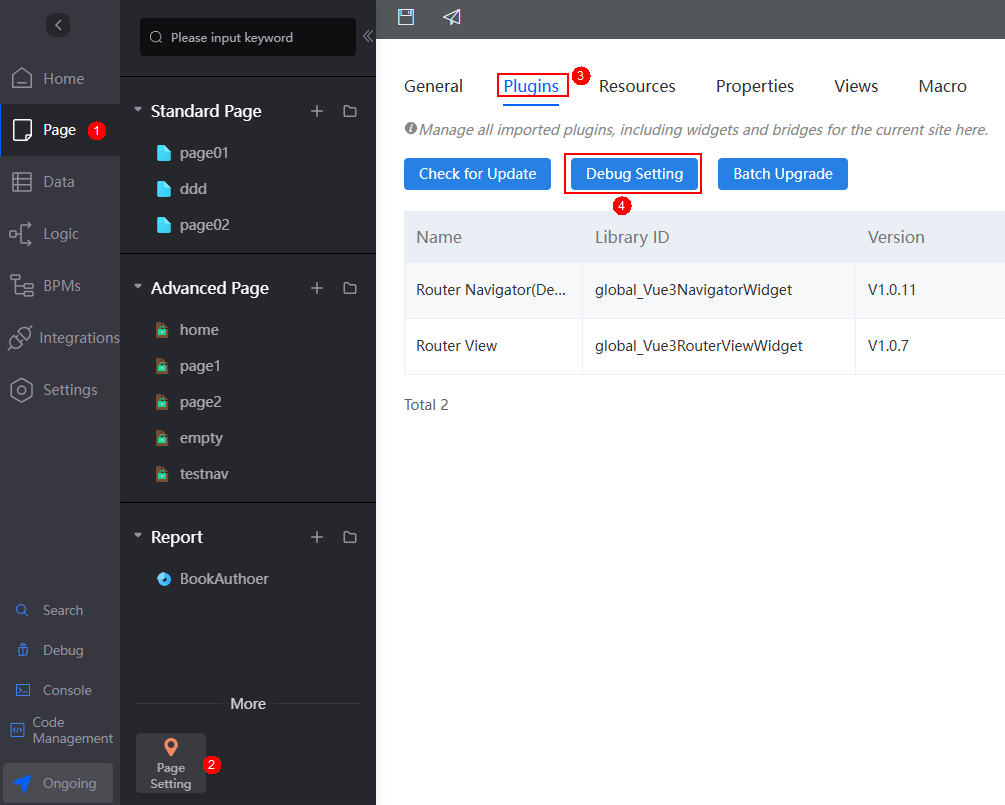
 - After the widget debugging is complete, click Debug Setting on the Page Setting > Plugins tab page. On the Debug Setting page, select the widget and click Clear Local Resource Access Root. The configuration data in the widget library of the corresponding version is read, manually disable the debugging function.
You can also set the validity period of the local path. For example, if you set the validity period to 2, the system clears all local resource access root paths and disables the debugging function two days later.Figure 19 Disabling the local debugging function

- Local widget development and debugging are complete. You can now release the widget to the environment for formal use.
On the widget management page of the Scaffolding tool, click
 next to the widget to upload its local asset to the environment's widget library.
If the widget package already exists in the widget library, it will be upgraded. To upgrade the widget, choose Page > Page Setting, click the Plugins tab, and click
 in the Operation column next to the widget to upgrade it on the site.
- On the widget management page of the Scaffolding tool, click
- Download a widget.
If you need to download a custom advanced widget from the development environment, you can either use the Scaffolding tool to download it, or go to Page Assets > Widgets to download it.
Currently, the Scaffolding tool supports only the download of custom widgets, but not the download of preset widgets.
Figure 20 Downloading a widget on the widget management page Figure 21 Selecting the widget to be downloaded
 Figure 22 Returning to the widget management page to preview widgets
- Set the widget and add library resources.
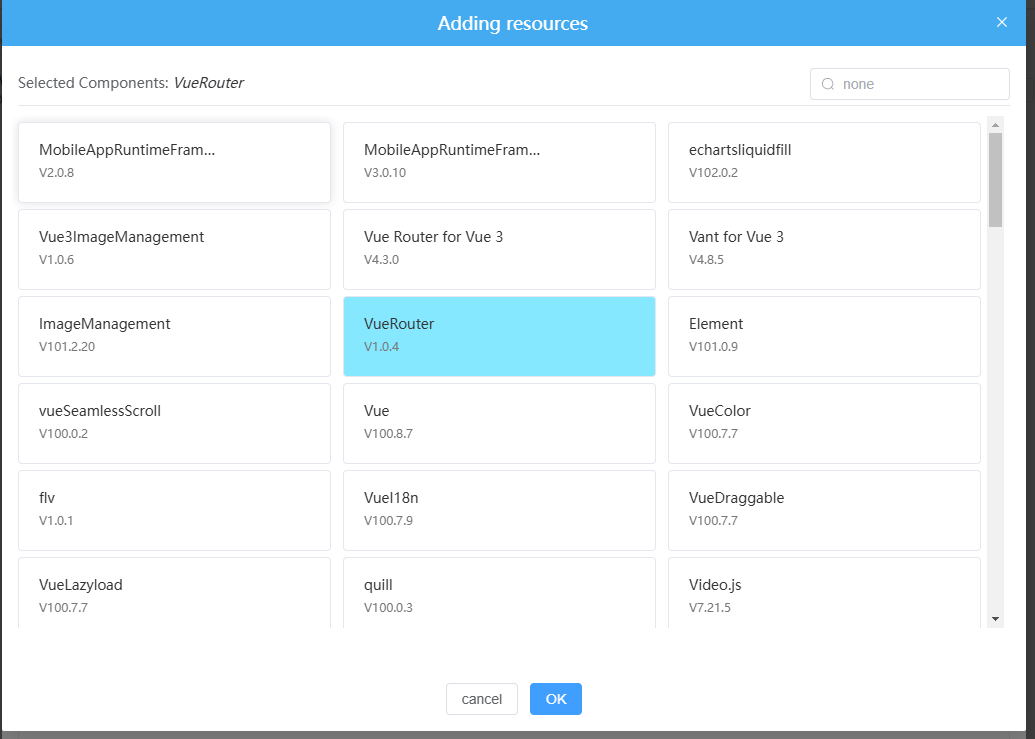
A library is required for a widget to run normally. During widget development, you can use the Scaffolding tool to configure the widget's dependency library in a local asset project. On the widget management page, click the setting button next to the target widget. Then, click Adding resources, select the required resource library, and click OK.
Figure 23 Adding resources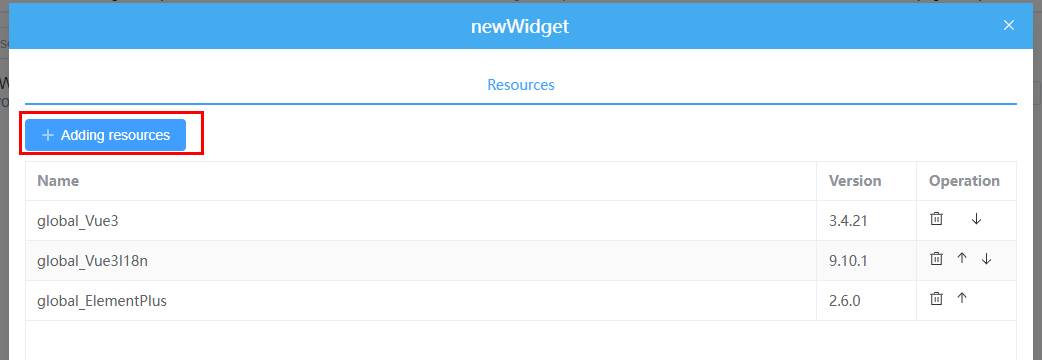 Figure 24 Adding required resources
Handling Exceptions
- When you run the magno command in the command prompt, a message is displayed, indicating that Magno is not recognized as an internal or external command, operable program, or batch file.
- Run the yarn global bin command in the command prompt to view the directory of the global command installed by using Yarn and switch to the directory.
- Search for the magno.cmd file to view the directory where this file is located.
- Add the directory where the magno.cmd file is located to the Path environment variable.
Choose Computer (for Windows 7)/This PC (for Windows 10+) > Properties > Advanced system settings, click Environment Variables, modify the Path variable, and add the directory of the magno.cmd file to the value.
- Open a new command prompt and run the magno command to check the execution result.
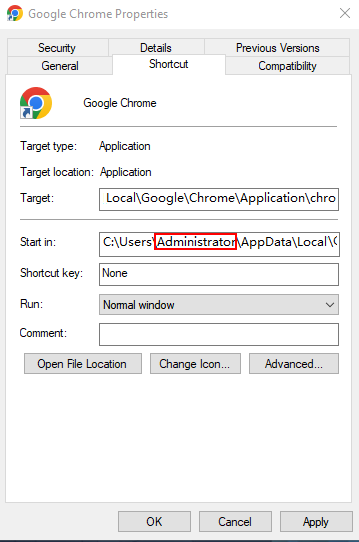
- When you run the magno ui command in the command prompt, the system displays a message indicating that Windows cannot find the file 'chrome.exe'. Check whether the file name is correct and try again.
Right-click Google Chrome and choose Properties from the shortcut menu. Check whether the path in the start position is correct. The Start in path is currently set to the pipe administrator's directory. However, since Scaffolding is installed under the local user, you need to change the Start in path to the location of chrome.exe under the local user.Figure 25 Properties page of Google Chrome
- If you install the Scaffolding tool on a Mac computer, after the installation, run the magno ui command in the command prompt. In normal cases, the URL of the operation UI is displayed. However, if the message magno: command not found or permission denied: magno is displayed, it is possible that you do not have the execution permissions. To add the execution permissions:
- Run the yarn global bin command in the command prompt to view the directory of the global command installed by using Yarn and switch to the directory.
- Run the chmod u+x magno command to add the execution permissions.
- Run the magno ui command again. The following information is displayed:
Starting GUI...
Ready on http://localhost:8080
- Open a new browser page on the Mac computer and enter the URL displayed in the previous step in the address box. The Magno project manager UI is displayed.
- If you run the magno command in the command prompt, and an error similar to that shown in Figure 26 is displayed.
- Run the where magno command in the command prompt to check the installation location of the magno command.
- Switch to the directory where the magno command is installed, open the magno.cmd file using an editor, and delete %~dp0\ from the last second line.
%~dp0\ in bold in the following example:
@IF EXIST "%~dp0\node.exe" (
  "%~dp0\node.exe"  "%~dp0\C:\Users\m00361589\AppData\Local\Yarn\Data\link\magno\bin\magno.js" %*
) ELSE (
  @SETLOCAL
  @SET PATHEXT=%PATHEXT:;.JS;=;%
  node "%~dp0\C:\Users\m00361589\AppData\Local\Yarn\Data\link\magno\bin\magno.js" %*
)
- Open a new command prompt and run the magno command to check the execution result.
- If you see the error message "spawn cmd ENOENT" when running the magno ui command, check whether the environment variable is correctly configured. For example, if the path C:\Windows\System32 is missing from the environment variable, locate the correct path for System32, add it to the environment variable, and then run the command again. This should resolve the error.
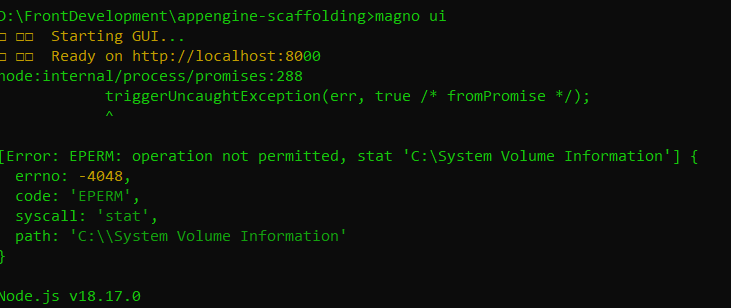
- When you run the magno ui command to open the GUI, if the loading does not respond for a long time when creating an application and selecting a folder, and the error message "operation not permitted" is displayed on the console, it may indicate an issue with environment variable configuration.
Figure 27 Error
- Search for the magno_config.json file in the C:\user\{username} directory and delete the file.
- Run the magno ui command in a new command prompt to open the GUI. Create an application, click
 next to the path, and enter an authorized drive path. Exercise caution when using drive C.
 - Press Enter, enter the application name, and confirm the creation.
Feedback
Was this page helpful?
Provide feedbackThank you very much for your feedback. We will continue working to improve the documentation.See the reply and handling status in My Cloud VOC.
For any further questions, feel free to contact us through the chatbot.
Chatbot

