Preparing the Environment
Helpful Links

To create a new project, use the downloaded SDK. To write code based on the sample project, use the SDK included in the project.
Preparing Tools
Eclipse: Download Eclipse 3.6.0 or later from the Eclipse official website.
JDK: Download Java Development Kit 1.8.111 or later from the Oracle official website.
Apache Maven: Download Apache Maven 3.0.3 or later from the Maven official website.
Obtaining a Topic ID and Consumer Group ID
Before accessing DMS using the SDK, create a Kafka queue and consumer group on the DMS console, and obtain the topic ID and consumer group ID.
- Log in to the management console.
- Choose Service List > Application > Distributed Message Service to launch the DMS console.
- In the navigation pane, choose Queue Manager.
- On the Queue Manager page, click Create Queue.
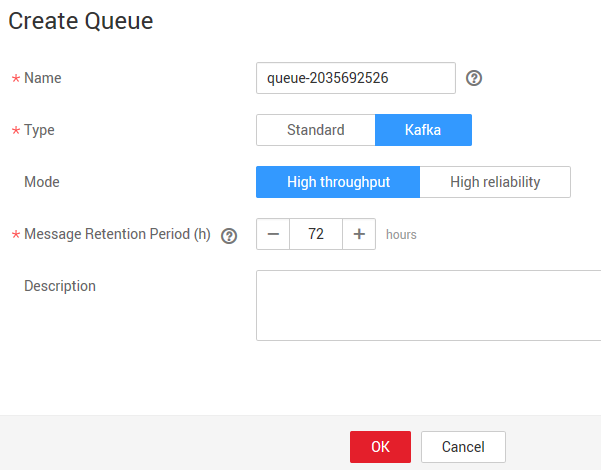
- Specify queue parameters.
Table 1 Parameter description Parameter
Description
Name
Name of the queue you want to create. The name must be unique.
When you create a queue, a default queue name is generated, which you can change if required. A queue name consists of 1 to 64 characters. Only letters, digits, underscores (_), and hyphens (-) are allowed.
The queue name cannot be modified after creation of the queue.
Type
Select Kafka queue.
Mode
Select either High throughput or High reliability.
Default value: High throughput.
High throughput: All message replicas are flushed to disk asynchronously. Select this mode when high message delivery performance is required.
High reliability: All message replicas are flushed to disk synchronously. Select this mode when high message delivery reliability is required.
Message Retention Period (h)
This parameter is available only for Kafka queues.
The number of hours for which messages will be preserved in a Kafka queue. Messages older than that period will be deleted. Deleted messages are not retrievable to consumer groups.
Value range: integers from 1 to 72
Default value: 72
Description (optional)
The description consists of a maximum of 160 characters and cannot contain angle brackets (< and >).
Figure 1 Creating a Kafka queue
- Click OK.
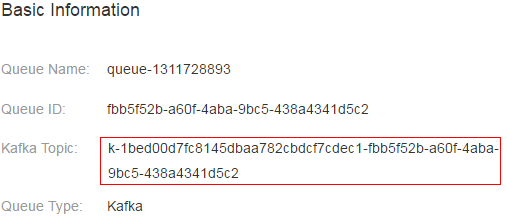
- Click the name of the queue. On the displayed queue details page, obtain the Kafka topic ID.
Figure 2 Obtaining the Kafka topic ID

- Click Create Consumer Group. The Create Consumer Group dialog box is displayed.
- Enter a consumer group name.
A default queue name is generated, which you can change if required. A consumer group name consists of 1 to 32 characters. Only letters, digits, underscores (_), and hyphens (-) are allowed. Consumer group names must be unique within the same queue.
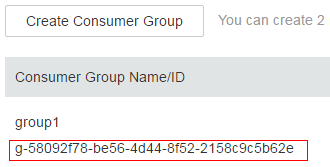
- Click OK. Obtain the ID of the consumer group in the consumer group list.
Figure 3 Obtaining the consumer group ID

Obtaining a Project ID
When calling APIs, you need to specify project_id in API requests. Obtain a project ID by performing the following procedure.
- Sign up and log in to the management console.
- Click the username and choose My Credentials from the drop-down list.
- On the My Credentials page, view project IDs in the project list.
Obtaining an AK/SK
- Sign up and log in to the management console.
- Click the username and choose My Credentials from the drop-down list.
- On the My Credentials page, click the Access Keys tab.
- Click Create Access Keys.
- Enter the password for login.
- Enter the verification code received by email or SMS message.
- Click OK.

Keep the key secure and do not disclose it to any unauthorized people.
- Download the credentials.csv file containing your AK and SK to a local computer.
Obtaining Region and Endpoint Information
Obtain the region and endpoint from Regions and Endpoints.
Creating an ECS

An Elastic Cloud Server (ECS) must be available to run the sample project.
Log in to the ECS console, create a Linux ECS, and bind an elastic IP address (EIP) to it. Record the EIP, username, and password. If you already created an ECS, skip this step.

EIPs are used to log in to ECSs and upload files.
Summary of Environment Information
|
Category |
Information |
Example |
|---|---|---|
|
ECS |
EIP |
- |
|
Username |
- |
|
|
Password |
- |
|
|
DMS |
Queue name |
- |
|
Queue ID |
- |
|
|
Queue type |
- |
|
|
Topic |
- |
|
|
Consumer group name |
- |
|
|
Consumer group ID |
- |
|
|
Access Keys |
Access key ID |
- |
|
Secrete access key (SK) |
- |
|
|
Project |
Region |
- |
|
Project name |
- |
|
|
Project ID |
- |
|
|
Region and endpoint |
Name |
- |
|
Endpoint |
- |
|
|
DNS |
DNS server IP Address |
- |
Feedback
Was this page helpful?
Provide feedbackThank you very much for your feedback. We will continue working to improve the documentation.See the reply and handling status in My Cloud VOC.
For any further questions, feel free to contact us through the chatbot.
Chatbot


