Interconnecting CodeArts with CAE
This section describes how to interconnect CodeArts with CAE.
Step 1: Use CodeArts to Create a Build Task for a Code Repository
Step 2: Create an Agency for Your Account
Step 3: Create a CodeArts Pipeline to Upgrade CAE Components
Step 1: Use CodeArts to Create a Build Task for a Code Repository
- Go to the CodeArts console and click Access Service in the upper right corner.
- Choose Services > Build.
Figure 1 Selecting build

- On the Build page, click Create Task. Set basic information by referring to the following table and click Next.
For details about the parameters for compiling a build task, see Defining a Build Task on GUI.
Table 1 Example Parameter
Example Value
Name
Enter cae-backend-swr.
Project
Select cae-test.
Code Source
Select Repo.
Repository
Select cae-backend.
Default Branch
Select master.
- Select the template for build. In this example, Java code is used. Therefore, select the Maven template and click Next.
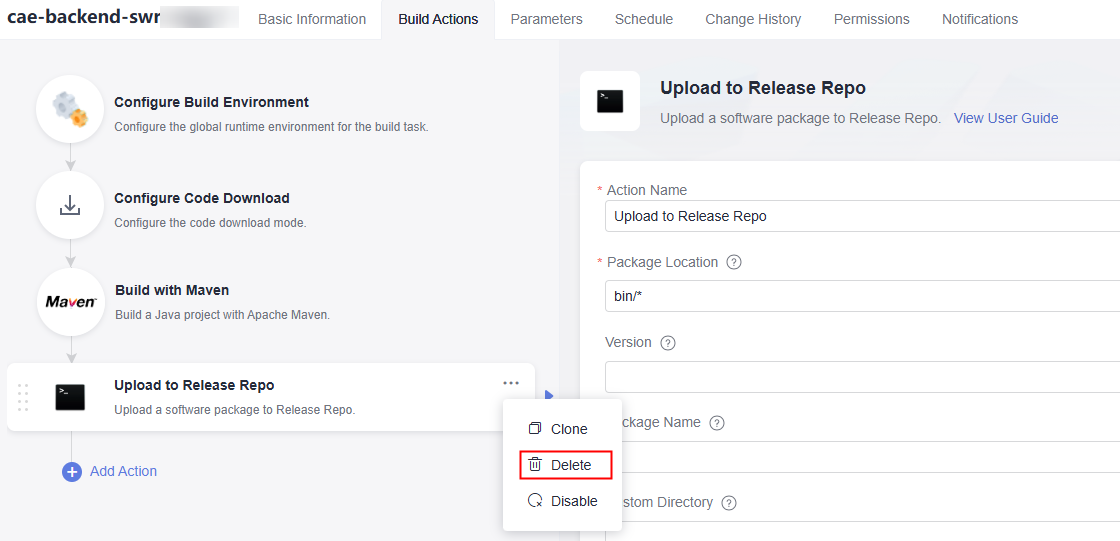
- On the Build Actions page, delete step Upload to Release Repo.
Figure 2 Deleting step Upload to Release Repo
- Click Add Action > Upload related > Build Image and Push to SWR > Add.
Figure 3 Adding step Build Image and Push to SWR

- On the Parameters page, configure Name, Type, and Default Value of the build parameter by referring to the following figure, and enable Runtime Settings.
org_name indicates the SWR organization to which the image is uploaded. image_name indicates the name of the image uploaded to SWR. image_tag indicates the image tag or image version.
Figure 4 Example custom parameters
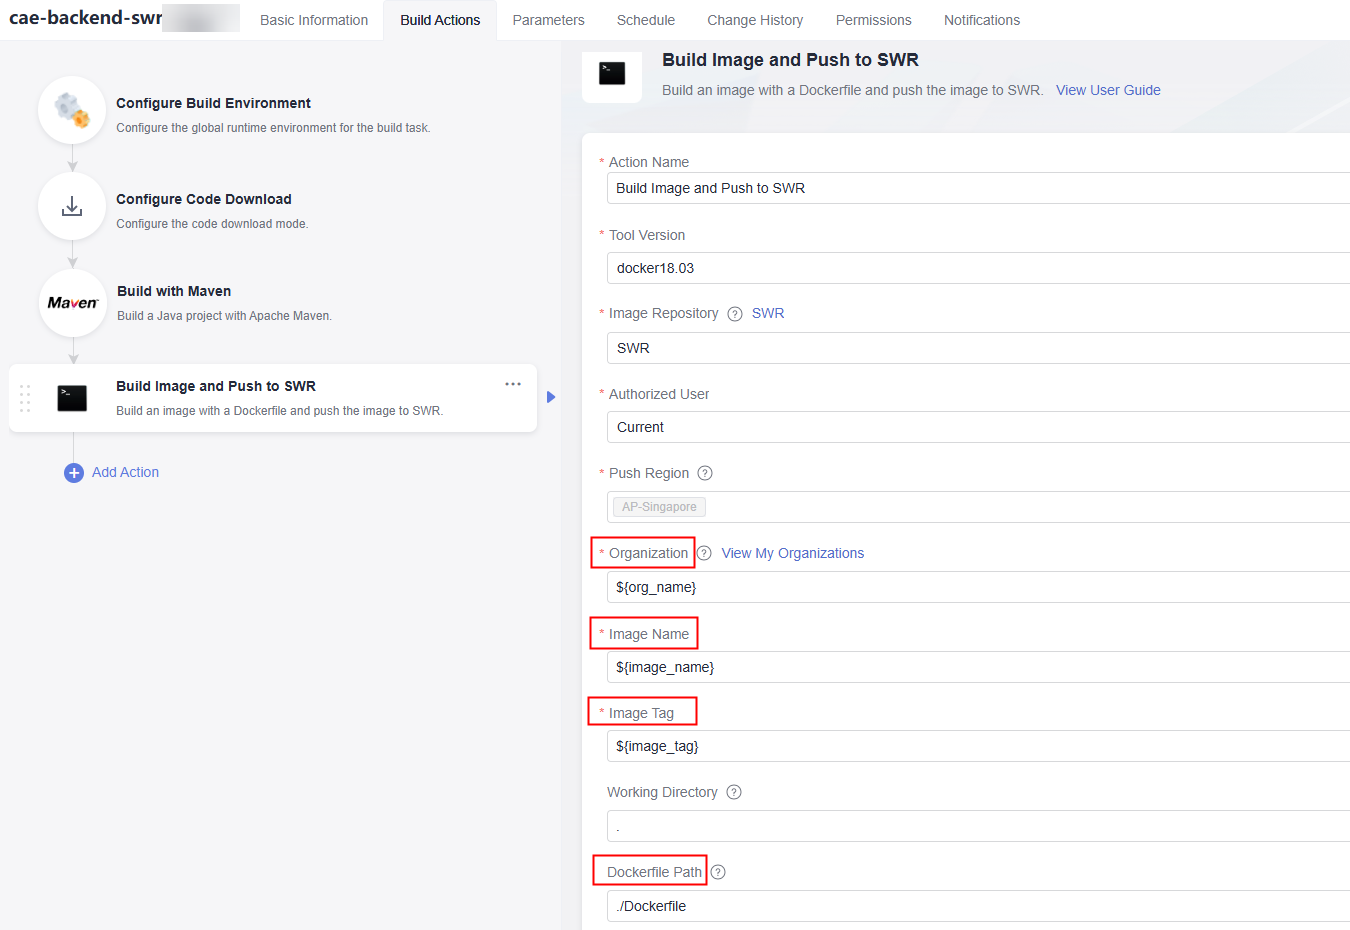
- Go to the Build Action page, and configure step Build Image and Push to SWR.
Set Organization, Image Name, and Image Tag. Use the default value of Working Directory and enter the path in the code repository in Dockerfile Path. In this example, the Dockerfile path is in the root directory of the code repository.Figure 5 Configuring step Build Image and Push to SWR
- Click Save and Execute in the upper right corner, confirm the runtime parameter, and click OK.
- On the Build History page, select the build task to view the build log.
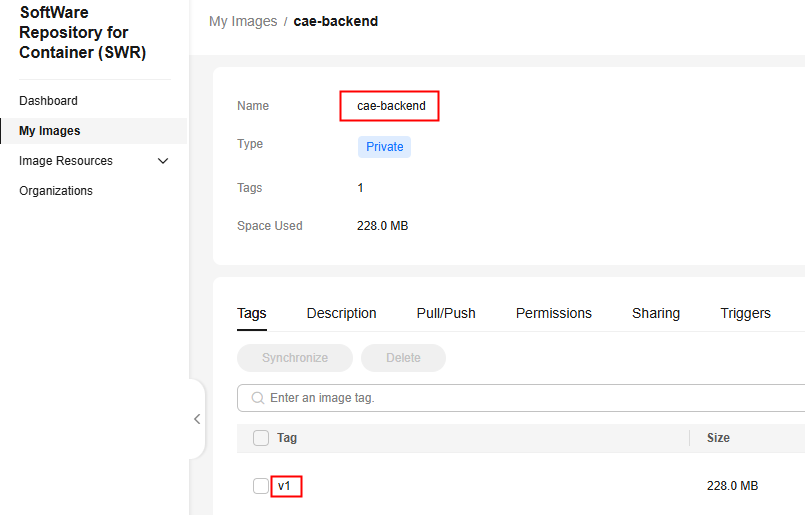
- Log in to SWR and choose My Images to confirm that the image is uploaded.
Figure 6 Viewing an image
Step 2: Create an Agency for Your Account
- Log in to IAM using an account with the permission to create agencies.
- Select a region in the upper part of the console. The region where the agency is created must be the same as the region where the CAE environment is located.
- In the navigation pane, choose Agencies.
- Click Create Agency. On the displayed page, enter an Agency Name, set agency type to Account, set the account for running the pipeline, set the Validity Period, and click OK. For details, see Creating an Agency.
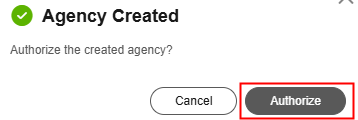
- In the displayed dialog box, click Authorize to authorize the created agency.
- On the displayed page, search for CAE Fullaccess, select it, and click Next > OK > Finish.
Step 3: Create a CodeArts Pipeline to Upgrade CAE Components
Create a CodeArts pipeline:
- Go to the CodeArts console and click Access Service in the upper right corner.
- Choose Services > Pipeline. On the Pipeline page, click Create Pipeline.
Figure 7 Selecting a pipeline

- On the Create Pipeline page, set the pipeline basic information by referring to the following table and click Next.
Table 2 Example Parameter
Example Value
Name
Enter swr_pipeline.
Project
Select cae-test.
Pipeline Source
Select Repo.
Orchestration Method
Select Graphical.
Repository
Select cae-backend.
Default Branch
Select master.
- Select Blank Template and click OK.
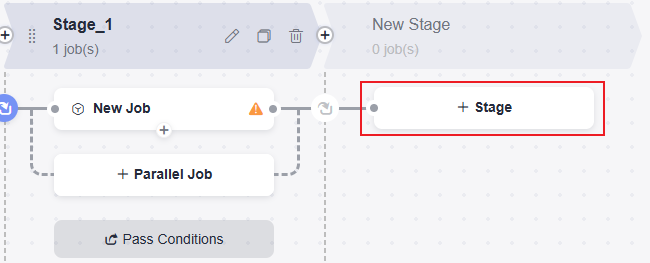
- On the Task Orchestration page, click Stage.
Figure 8 Creating a stage
- Click
 and change the names of stages 1 and 2 to Build and Deployment, respectively.
Figure 9 Editing the stage names
Create a Job in the Build Stage:
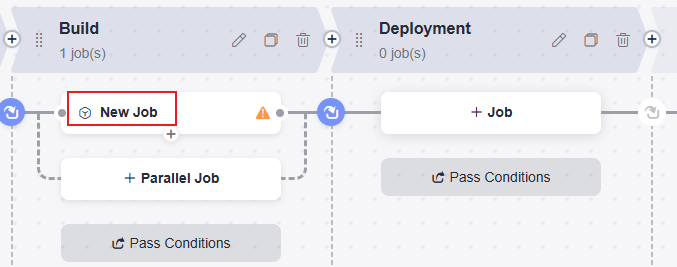
- In the Build stage, click New Job.
Figure 10 Creating a job
- On the New Job page, click the Build tab and click Add.
Figure 11 Adding a build job

- On the Build page, set parameters according to the following table and click OK.
Table 3 Example Parameter
Example Value
Name
Retain the default value Build.
Select Task
Select cae-backend-swr created in step 1.
Repository
Select cae-backend.
org_name
Enter servicestage-test.
image_name
Enter cae-backend.
image_tag
Enter v1.0.
- In the upper part of the console, click the Parameter Configuration tab. On the displayed Custom Parameters page, add custom parameters by referring to the following figure and enable Runtime Setting.
Figure 12 Adding custom parameters

Table 4 Description of custom parameters Parameter
Description
org_name
SWR organization to which the image is uploaded. Log in to the SWR console to view the organization.
image_name
Name of the image uploaded to SWR, for example, cae-backend.
image_tag
Image tag or version, for example, v1.0.
swr_address
SWR image repository address.
The format is swr.Region project name.myhuaweicloud.com. The region project name is region. For details, see Obtaining Values.
Create a Job in the Deployment Stage:
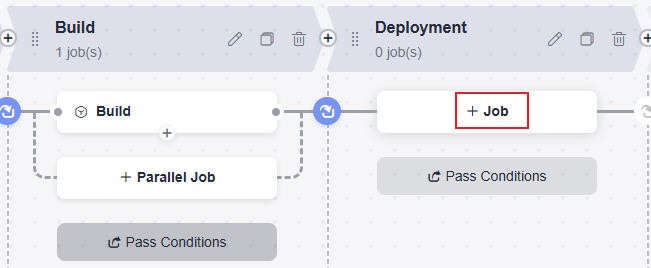
- In the Deployment stage, click Job.
Figure 13 Creating a job
- Search for CAE Cross-Account Deploy in the search box and add it.
Figure 14 Adding CAE Cross-Account Deploy

- Set parameters by referring to the following table and click OK.
Table 5 Example of CAE Cross-Account Deploy parameters Parameter
Example Value
Name
Enter a name. Example: CAE Release.
Deployment User
Select Current User.
Region
Select the region where CodeArts is to be deployed. The region must be the same as the region where CodeArts is configured.
Environment ID
Select the ID of the environment to which the component belongs.
Application ID
Select the ID of the application to which the component belongs.
Component ID
Select the ID of the component to be upgraded. You need to select a component that is deployed using the image in CAE.
Component Version
Enter the component version.
Code Source
Select Image.
Image Address
Address of the image uploaded to SWR. Enter ${swr_address}/${org_name}/${image_name}:${image_tag}.
After the current account is built, the image path is pushed to SWR of the current account. For details about how to share the SWR image with the delegated account, see Sharing a Private Image.
Specification-CPU
Select the specifications of the CPU to be deployed.
Specification-Memory
Select the specifications of the memory to be deployed.
- In the upper right corner of the Task Orchestration page, click Save and Execute. The Execution Configuration page is displayed.
- Confirm the configuration, select All Stages in the Execution Stages area, and click Execute.
- View the pipeline execution result.
- Log in to the CAE console and choose Components in the navigation pane on the left.
- Check the component status. If Upgraded is displayed in the Last Change Status/Time column, the component has been upgraded using the CodeArts pipeline.
Feedback
Was this page helpful?
Provide feedbackThank you very much for your feedback. We will continue working to improve the documentation.See the reply and handling status in My Cloud VOC.
For any further questions, feel free to contact us through the chatbot.
Chatbot


