هذه الصفحة غير متوفرة حاليًا بلغتك المحلية. نحن نعمل جاهدين على إضافة المزيد من اللغات. شاكرين تفهمك ودعمك المستمر لنا.
- What's New
- Function Overview
- Service Overview
-
Billing
- Billing Overview
- Billing Modes
- Billing Items
- Billing Examples
- Changing the Billing Mode
- Renewing Your Subscription
- Bills
- About Arrears
- Billing Termination
- Cost Management
-
Billing FAQs
- How Is SecMaster Billed?
- Can I Use SecMaster for Free?
- How Do I Change or Disable Auto Renewal for SecMaster?
- Will SecMaster Be Billed After It Expires?
- How Do I Renew SecMaster?
- Where Can I Unsubscribe from SecMaster?
- Where Can I View the Remaining Quotas of Security Data Collection and Security Data Packages?
- Can I Change the Billing Mode for SecMaster?
- Getting Started
-
User Guide
- Buying SecMaster
- Authorizing SecMaster
- Checking Security Overview
- Workspaces
- Viewing Purchased Resources
-
Security Governance
- Security Governance Overview
- Security Compliance Pack Description
- Authorizing SecMaster to Access Cloud Service Resources
- Subscribing to or Unsubscribing from a Compliance Pack
- Starting a Self-Assessment
- Viewing Security Compliance Overview
- Viewing Evaluation Results
- Viewing Policy Scanning Results
- Downloading a Compliance Report
- Security Situation
- Resource Manager
- Risk Prevention
- Threats
- Security Orchestration
-
Playbook Overview
- Ransomware Incident Response Solution
- Attack Link Analysis Alert Notification
- HSS Isolation and Killing of Malware
- Automatic Renaming of Alert Names
- Auto High-Risk Vulnerability Notification
- Automatic Notification of High-Risk Alerts
- Auto Blocking for High-risk Alerts
- Real-time Notification of Critical Organization and Management Operations
-
Settings
- Data Integration
-
Log Data Collection
- Data Collection Overview
- Data Collection Process
- Adding a Node
- Configuring a Component
- Adding a Connection
- Creating and Editing a Parser
- Adding and Editing a Collection Channel
- Verifying Log Collection
- Managing Connections
- Managing Parsers
- Managing Collection Channels
- Viewing Collection Nodes
- Managing Nodes and Components
- Partitioning a Disk
- Logstash Configuration Description
- Connector Rules
- Parser Rules
- Upgrading the Component Controller
- Customizing Directories
- Permissions Management
- Key Operations Recorded by CTS
-
Best Practices
-
Log Access and Transfer Operation Guide
- Solution Overview
- Resource Planning
- Process Flow
-
Procedure
- (Optional) Step 1: Buy an ECS
- (Optional) Step 2: Buy a Data Disk
- (Optional) Step 3: Attach a Data Disk
- Step 4: Create a Non-administrator IAM User
- Step 5: Configure Network Connection
- Step 6: Install the Component Controller (isap-agent)
- Step 7: Install the Log Collection Component (Logstash)
- (Optional) Step 8: Creating a Log Storage Pipeline
- Step 9: Configure a Connector
- (Optional) Step 10: Configure a Log Parser
- Step 11: Configure a Log Collection Channel
- Step 12: Verify Log Access and Transfer
- Credential Leakage Response Solution
-
Log Access and Transfer Operation Guide
-
API Reference
- Before You Start
- API Overview
- Calling APIs
-
API
- Alert Management
- Incident Management
- Indicator Management
- Playbook Management
- Alert Rule Management
- Playbook Version Management
- Playbook Rule Management
- Playbook Instance Management
- Playbook Approval Management
- Playbook Action Management
- Incident Relationship Management
- Data Class Management
- Workflow Management
- Data Space Management
- Pipelines
- Workspace Management
- Metering and Billing
- Metric Query
- Baseline Inspection
- Appendix
- FAQs
-
More Documents
-
User Guide (ME-Abu Dhabi Region)
- Service Overview
- Buying SecMaster
- Authorizing SecMaster
- Viewing Security Overview
- Workspaces
- Viewing Purchased Resources
-
Security Governance
- Security Governance Overview
- Security Compliance Pack Description
- Authorizing SecMaster to Access Cloud Service Resources
- Subscribing to or Unsubscribing from a Compliance Pack
- Starting a Self-Assessment
- Viewing Security Compliance Overview
- Viewing Evaluation Results
- Viewing Policy Scanning Results
- Downloading a Compliance Report
- Security Situation
- Resource Manager
- Risk Prevention
- Threat Operations
- Security Orchestration
-
Settings
- Data Integration
-
Log Data Collection
- Data Collection Overview
- Adding a Node
- Configuring a Component
- Adding a Connection
- Creating and Editing a Parser
- Adding and Editing a Collection Channel
- Managing Connections
- Managing Parsers
- Managing Collection Channels
- Viewing Collection Nodes
- Managing Nodes and Components
- Partitioning a Disk
- Logstash Configuration Description
- Connector Rules
- Parser Rules
- Upgrading the Component Controller
- Customizing Directories
- Permissions Management
- FAQs
- Change History
-
User Guide (Kuala Lumpur Region)
- Service Overview
- Authorizing SecMaster
- Security Overview
- Workspaces
- Viewing Purchased Resources
- Security Situation
- Resource Manager
-
Risk Prevention
-
Baseline Inspection
- Baseline Inspection Overview
- Creating a Custom Check Plan
- Starting an Immediate Baseline Check
- Viewing Check Results
- Handling Check Results
- Viewing Compliance Packs
- Creating a Custom Compliance Pack
- Importing and Exporting a Compliance Pack
- Viewing Check Items
- Creating a Custom Check Item
- Importing and Exporting Check Items
- Vulnerability Management
- Policy Management
-
Baseline Inspection
-
Threat Operations
- Incident Management
- Alert Management
- Indicator Management
- Intelligent Modeling
- Security Analysis
- Data Delivery
-
Security Orchestration
- Security Orchestration Overview
- Built-in Playbooks
- Security Orchestration Process
- (Optional) Configuring and Enabling a Workflow
- Configuring and Enabling a Playbook
- Operation Object Management
- Playbook Orchestration Management
- Layout Management
- Plug-in Management
- Settings
-
FAQs
-
Product Consulting
- Why Is There No Attack Data or Only A Small Amount of Attack Data?
- Where Does SecMaster Obtain Its Data From?
- What Are the Dependencies and Differences Between SecMaster and Other Security Services?
- What Are the Differences Between SecMaster and HSS?
- How Do I Update My Security Score?
- How Do I Handle a Brute-force Attack?
- Issues About Data Synchronization and Data Consistency
- About Data Collection Faults
-
Product Consulting
- Change History
-
User Guide (ME-Abu Dhabi Region)
- General Reference
Copied.
Delivering Logs to OBS
Scenarios
This topic walks you through how to deliver logs to an OBS bucket. The main steps are as follows:
Step 1: Create a Data Delivery Task
Limitations and Constraints
- When performing cross-account delivery, the data can only be delivered to the pipelines instead of cloud services of other accounts.
- If the new data delivery is cross-account, you need to log in to SecMaster using the destination account and perform authorization.
Step 1: Create a Data Delivery Task
- Log in to the management console.
- Click
in the upper part of the page and choose Security > SecMaster.
- In the navigation pane on the left, choose Workspaces > Management. In the workspace list, click the name of the target workspace.
Figure 1 Workspace management page
- In the navigation pane on the left, choose Threat Operations > Security Analysis. The security analysis page is displayed.
Figure 2 Accessing the Security Analysis tab page
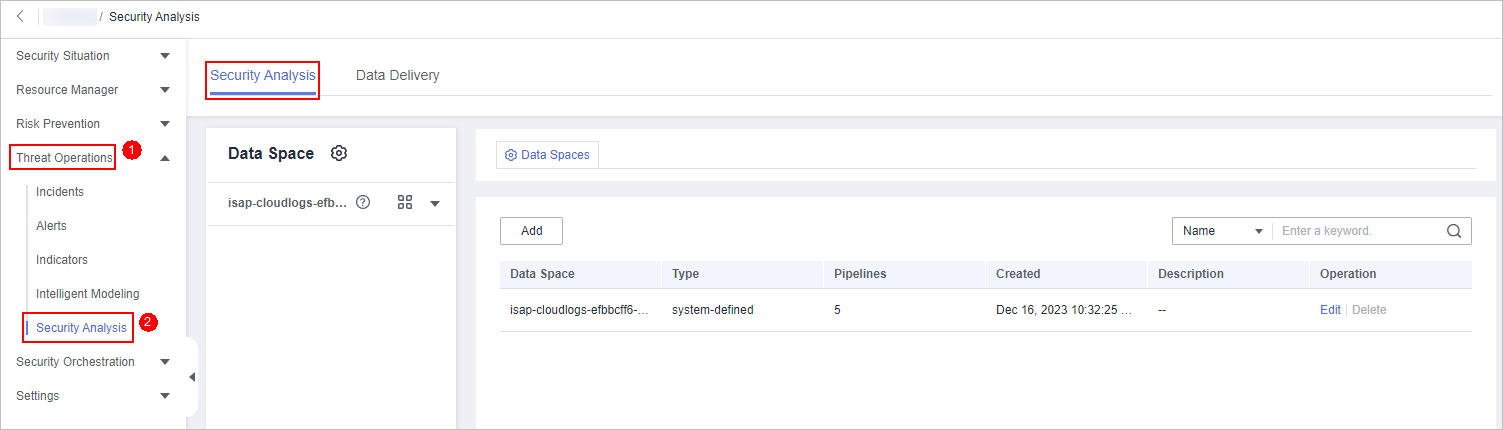
- In the data space navigation tree on the left, click the data space name to expand all pipelines. Next to the name of the target pipeline, click More > Deliver.
Figure 3 Accessing data delivery settings page
- (Optional) Confirm the authorization information, select Agree to authorize, and click OK.
Authorization is required first time you start a delivery to a specific destination type. If the destination type has been authorized, skip this step.
- On the Create Delivery panel, set data delivery parameters.
- Configure basic information.
Table 1 Basic Information Parameter
Description
Delivery Name
The name you specify for the delivery.
Resource Consumption
The value is generated by default. You do not need to configure it.
- Configure the data source.
In the Data Source Settings area, the details about the current pipeline are displayed. You do not need to set this parameter.
Table 2 Data source parameters Parameter
Description
Delivery Type
Delivery destination type. The default value is PIPE.
Region
Region where the current pipeline is located.
Workspaces
Workspace to which the current pipeline belongs.
Data Space
Data space to which the current pipeline belongs.
Pipeline
Name of the pipeline.
Data Read Policy
Data read policy of the current pipeline.
Read By
Identity of the data source reader.
- Configure the delivery destination.
- OBS: Deliver the pipeline data to OBS. For details about the parameter settings, see Table 3.
Note that the OBS bucket you use must have private, public read, or public read/write policy enabled. Currently, parallel file buckets are not supported.
Table 3 Data delivery destination - OBS Parameter
Description
Account Type
Account type for the data delivery destination. When you deliver data to OBS, only the Current account type can be selected.
Delivery Type
Delivery type. Select OBS in this case.
Bucket Name
Name of the destination OBS bucket.
Written To
The value is generated by default. You do not need to configure it.
- OBS: Deliver the pipeline data to OBS. For details about the parameter settings, see Table 3.
- Under Access Authorization, view the permissions granted in 6.
A delivery requires the read and write permissions to access your cloud resources. A delivery task cannot access your cloud resources unless the access is authorized by you.
- Configure basic information.
- Click OK.
Step 2: Authorize the Data Delivery
- Log in to the management console.
- Click
in the upper part of the page and choose Security > SecMaster.
- In the navigation pane on the left, choose Workspaces > Management. In the workspace list, click the name of the target workspace.
Figure 4 Workspace management page
- In the navigation pane on the left, choose Threat Operations > Security Analysis. On the Security Analysis page that is displayed, click the Data Delivery tab. The Data Delivery page is displayed.
- On the Data Delivery tab, click the Cross-Tenant Permissions tab. On the page displayed, click Accept in the Operation column of the target delivery task.
To accept authorization in batches, select all tasks to be authorized and click Accept in the upper left corner above the list.
Figure 5 Data delivery authorization
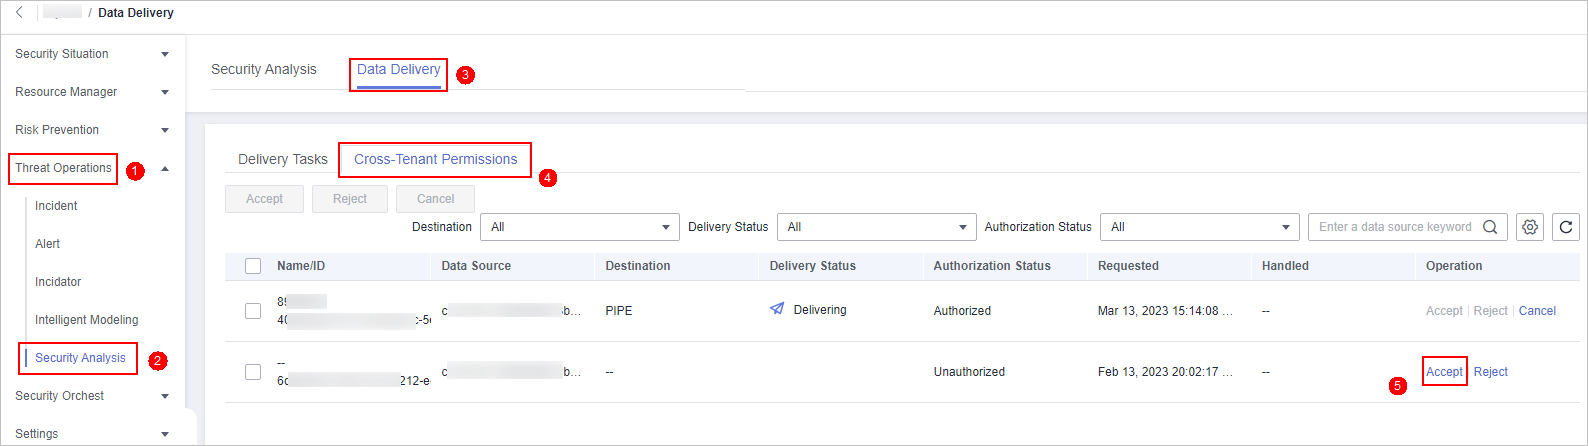
After the authorization is granted, the authorization status of the target delivery task is updated to Authorized. You can go to the delivery destination to view the delivery details.
Step 3: View the Delivered Data in OBS
- Log in to the management console.
- Click
in the upper left corner of the page and choose Storage > Object Storage Service. The bucket list page is displayed.
- On the bucket list page, click the name of the OBS bucket selected for data delivery. The details page of the target OBS bucket is displayed.
- On the OBS bucket details page, view the delivery log information.
Operations Related to Data Delivery Authorization
On the Cross-tenant Permissions tab page, you can select to Reject or Cancel the authorization.
Operation |
Method |
---|---|
Reject |
In the row containing the target delivery task, click Reject in the Operation column to reject the authorization. To reject authorization in batches, select all tasks to be rejected and click Reject in the upper left corner of the list. |
Cancel |
|
Feedback
Was this page helpful?
Provide feedbackThank you very much for your feedback. We will continue working to improve the documentation.See the reply and handling status in My Cloud VOC.
For any further questions, feel free to contact us through the chatbot.
Chatbot