
Adding a Secondary IPv4 CIDR Block to a VPC
Scenarios
Generally, the number of IP addresses in a VPC CIDR block determines how many cloud resources that can be deployed in the VPC. If there are no sufficient IP addresses in the VPC CIDR block, you can add a secondary IPv4 CIDR block to expand the VPC CIDR block and increase the number of IP addresses.
The IPv4 CIDR block you specify when you create a VPC is the primary one. The primary CIDR block cannot be changed after the VPC is created. If IP addresses in the primary CIDR block are insufficient, you can add a secondary CIDR block to the VPC. The secondary CIDR block can be used in the same way as the primary CIDR block.

If adding a secondary IPv4 CIDR block is supported in a region, the CIDR block of a VPC in this region cannot be modified on the console. You can call an API to modify the CIDR block of a VPC. For details, see section "Updating a VPC" in the Virtual Private Cloud API Reference.
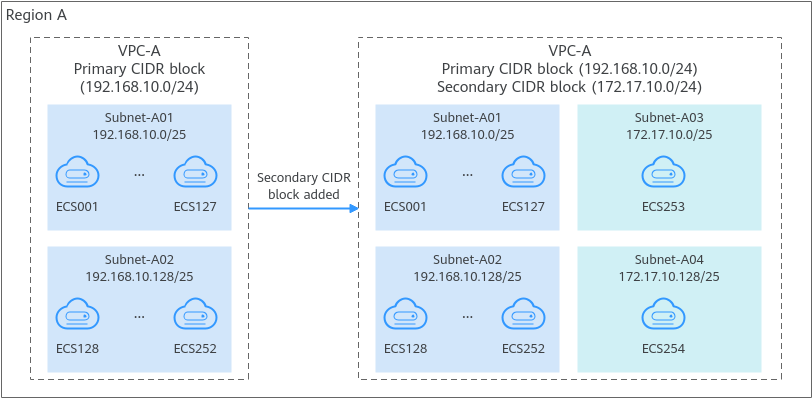
Configuration Example
Constraints
- You can allocate a subnet from either a primary or a secondary CIDR block of a VPC. A subnet cannot use both the primary and the secondary CIDR blocks.
Subnets in the same VPC can communicate with each other by default, even if some subnets are allocated from the primary CIDR block and some are from the secondary CIDR block of a VPC.
- If a subnet in a secondary CIDR block of your VPC is the same as or overlaps with the destination of an existing route in the VPC route table, the existing route does not take effect.
If you create a subnet in a secondary CIDR block of your VPC, a route (the destination is the subnet CIDR block and the next hop is Local) is automatically added to your VPC route table. This route allows communications within the VPC and has a higher priority than any other routes in the VPC route table. For example, if you create a subnet (100.20.0.0/16) from a secondary CIDR block of a VPC, the system will automatically generate a Local route with the destination of 100.20.0.0/16. If the VPC route table already has a route with the VPC peering connection as the next hop and 100.20.0.0/24 as the destination, the two destinations (100.20.0.0/16 and 100.20.0.0/24) overlap and traffic will be forwarded through the route of the subnet.
- The allowed secondary CIDR block size is between a /28 netmask and /3 netmask.
- Table 1 provides you with IP address ranges that cannot be used as secondary IPv4 CIDR blocks. For example, the CIDR block 192.168.0.0/16 has IP addresses from 192.168.0.0 to 192.168.255.255, indicating that none of the IP addresses can be included in a secondary IPv4 CIDR block, for example, 192.168.0.0/16, 192.168.31.0/24, 192.168.100.0/24, and 192.168.255.255/32.
Table 1 IP address ranges that cannot be used as secondary IPv4 CIDR blocks Type
CIDR Block
IP Address Range
Primary CIDR blocks and existing CIDR blocks
10.0.0.0/8
10.0.0.0-10.255.255.255
172.16.0.0/12
172.16.0.0-172.31.255.255
192.168.0.0/16
192.168.0.0-192.168.255.255
Reserved system CIDR blocks
100.64.0.0/10
100.64.0.0-100.127.255.255
214.0.0.0/7
214.0.0.0-215.255.255.255
198.18.0.0/15
198.18.0.0-198.19.255.255
169.254.0.0/16
169.254.0.0-169.254.255.255
Reserved public CIDR blocks
0.0.0.0/8
0.0.0.0-0.255.255.255
127.0.0.0/8
127.0.0.0-127.255.255.255
240.0.0.0/4
240.0.0.0-255.255.255.255
Adding a Secondary IPv4 CIDR Block
- Go to the VPC list page.
- In the VPC list, locate the target VPC and click Edit CIDR Block in the Operation column.
The Edit CIDR Block dialog box is displayed.
- Click Add Secondary IPv4 CIDR Block.
- Enter a secondary IPv4 CIDR block in the text box and click OK.
Deleting a Secondary IPv4 CIDR Block
- Go to the VPC list page.
- In the VPC list, locate the target VPC and click Edit CIDR Block in the Operation column.
The Edit CIDR Block dialog box is displayed.
- Locate the row that contains the secondary CIDR block to be deleted and click Delete in the Operation column.
- A secondary IPv4 CIDR block of a VPC can be deleted, but the primary CIDR block cannot be deleted.
- If you want to delete a secondary CIDR block that contains subnets, you need to delete the subnets first.
- Click OK.
Feedback
Was this page helpful?
Provide feedbackThank you very much for your feedback. We will continue working to improve the documentation.


