
Enabling Ranger OBS Path Authentication for Guardian
Scenarios
This section describes how to configure permission policies for OBS paths through Ranger after the storage-compute decoupling function is enabled and Guardian is connected to OBS. Ensure that the AccessLabel function has been enabled for OBS. For how to enable it, contact OBS O&M personnel. Once enabled, Guardian can provide temporary authentication credentials for components such as HDFS, Hive, Spark, Loader, and HetuEngine to access OBS in storage-compute decoupling scenarios.
To interconnect Guardian with OBS, do as follows:
Prerequisites
- Components such as Guardian, Ranger, and Hadoop have been installed in the cluster.
- If components such as Hadoop, HetuEngine, Hive, and Spark have been installed in an environment before installing Guardian, you need to download these component clients again and refresh the default clients for job submission on the MRS console.
- If Kerberos authentication is disabled for the cluster (in normal mode), choose Cluster > Services > Service name on MRS Manager. On the displayed Dashboard page, click More and select Enable Ranger in the upper right corner to enable Ranger authentication for the service.
Impact on the System
- Once you finish the configuration, you will need to either refresh the original client's configuration or reinstall the client.
- To submit a job on console, log in to the active OMS node as user omm and run the following command to refresh the cluster's built-in clients.
sh /opt/executor/bin/refresh-client-config.sh
Creating an OBS Parallel File System
- Log in to the OBS console.
- Choose Parallel File Systems > Create Parallel File System.
- Enter a file system name, for example, guardian-obs.
Use the enterprise project selected during MRS cluster creation and set other parameters as needed.
- Click Create Now.
Creating an Agency for a Regular Account
- Log in to the Huawei Cloud management console.
- In the service list, choose Management & Governance > Identity and Access Management.
- Choose Agencies. On the displayed page, click Create Agency.
- On the Create Agency page, set the following parameters and click Done:
- Agency Name: Enter an agency name, for example, agency-MRS-to-OBS.
- Agency Type: Select Account.
- Delegated Account: Enter your cloud account that you signed up for with your mobile number. It cannot be a federated user or an IAM user created using your cloud account.
- Validity Period: Select Unlimited.
- In the displayed dialog box, click Authorize. On the displayed page, click Create Policy. On the Create Policy page, set the following parameters and click Next:
- Policy Name: Enter a policy name, for example, guardian-policy.
- Policy View: Select JSON.
- Policy Content: Configure the parameter as follows:
{
    "Version": "1.1",
    "Statement": [
        {
            "Effect": "Allow",
            "Action": [
			"obs:bucket:GetBucketLocation",
			"obs:bucket:ListBucketMultipartUploads",
			"obs:object:GetObject",
			"obs:object:ModifyObjectMetaData",
			"obs:object:DeleteObject",
			"obs:object:ListMultipartUploadParts",
			"obs:bucket:HeadBucket",
			"obs:object:AbortMultipartUpload",
			"obs:bucket:ListBucket",
			"obs:object:PutObject",
			"obs:object:GetAccessLabel",
			"obs:object:DeleteAccessLabel",
			"obs:object:PutAccessLabel",
		        "obs:bucket:ListAllMyBuckets"
            ],
            "Resource": [
                "OBS:*:*:bucket:guardian-obs",
                "OBS:*:*:object:*"
            ]
        }
    ]
}
In the preceding configuration, Resource indicates all resources that can access the configured parallel file system. guardian-obs indicates the name of the OBS parallel file system created in Creating an OBS Parallel File System.
- Click Next. On the Select Policy/Role page, select the policy created in 5.
- Click Next, select All resources, click Show More, select Global resources, and click OK.
- View and record the agency ID. Figure 1 Viewing an agency ID

Creating a Cloud Service Agency and Binding It to a Cluster
- Log in to the Huawei Cloud management console.
- In the service list, choose Management & Governance > Identity and Access Management.
- Choose Agencies. On the displayed page, click Create Agency.
- Set Agency Name. For example, enter mrs_ecs_obs.
- Set Agency Type to Cloud service and select Elastic Cloud Server (ECS) and Bare Metal Server (BMS) to authorize ECS or BMS to access OBS. Figure 2 Creating an agency
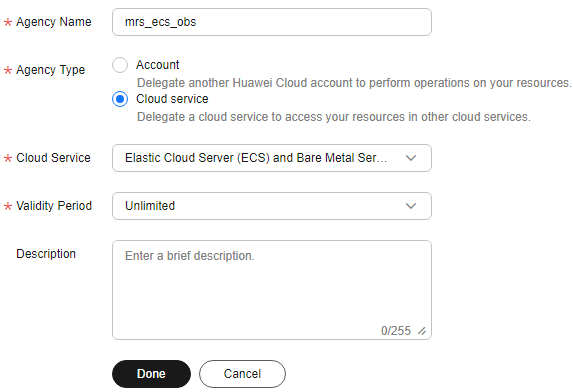
- Set Validity Period to Unlimited and click Done.
- In the displayed dialog box, click Authorize. On the displayed page, click Create Policy. On the Create Policy page, set the following parameters and click Next:
- Policy Name: Enter a policy name, for example, guardian-assume-policy.
- Policy View: Select JSON.
- Policy Content: Enter the following content. {Agency ID} indicates the ID recorded in 8.
{
    "Version": "1.1",
    "Statement": [
        {
            "Action": [
                "iam:agencies:assume"
            ],
            "Resource": {
                "uri": [
                    "/iam/agencies/{Agency ID}"
                ]
            },
            "Effect": "Allow"
        }
    ]
}
- Click Next. On the Select Policy/Role page, select the policy created in 7.
- Click Next, click Show More, select Global services, and click OK.
- In the displayed dialog box, click OK to start authorization. Click Finish after the message "Authorization successful." is displayed.
- Log in to the MRS console. In the navigation pane on the left, choose Active Clusters.
- Click the name of the target cluster to access its details page.
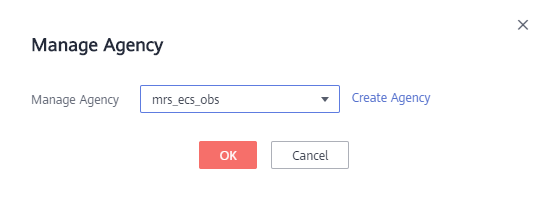
- On the Dashboard tab, click Synchronize next to IAM User Sync to synchronize IAM users.
- On the Dashboard tab, click Manage Agency next to Agency. In the displayed dialog box, select the agency you created, for example, mrs_ecs_obs, and click OK. Figure 3 Binding an agency
Granting Guardian Permissions to Access OBS
- Log in to MRS Manager by referring to Accessing MRS Manager. Choose Cluster > Services > Guardian, click Configurations and then All Configurations, search for and configure the following parameters.
Parameter
Description
Example Value
fs.obs.guardian.accesslabel.enabled
Whether to enable AccessLabel on OBS, which allows Guardian to connect to OBS.
- true: indicates that after OBS is connected, you can use Ranger to configure the permission policies of OBS paths. Ensure that the AccessLabel function has been enabled for OBS. If the function is not enabled, manually enable it. For details, contact OBS O&M personnel.
- false: indicates After OBS is interconnected, the permission policies of OBS paths cannot be configured using Ranger. You do not need to check whether the AccessLabel function is enabled for OBS.
Set this parameter to true.
true
fs.obs.guardian.enabled
Whether to enable Guardian.
- true: enables the Guardian.
- false: (default value) disables the Guardian.
true
fs.obs.delegation.token.providers
Delegation token generator. When fs.obs.guardian.enabled is set to true, com.huawei.mrs.dt.MRSDelegationTokenProvider and com.huawei.mrs.dt.GuardianDTProvider must be configured.
com.huawei.mrs.dt.MRSDelegationTokenProvider and com.huawei.mrs.dt.GuardianDTProvider
token.server.access.label.agency.name
Name of the specified IAM agency, which is the one created in Creating an Agency for a Regular Account.
agency-MRS-to-OBS
- Save the service configuration, choose More > Restart Configuration-Expired Instances on the FusionInsight Manager home page, and restart all service instances whose configurations have expired as prompted.
- To submit jobs on the MRS console, log in to the active OMS node as user omm and run the following command to refresh the built-in client configuration:
sh /opt/executor/bin/refresh-client-config.sh
- (Optional) If you need to update the client configurations of other installed cluster components, see Updating Client Configurations.
Enabling Cascading Authorization for Hive Tables
In versions earlier than MRS 3.5.0, only clusters with Kerberos authentication enabled support OBS cascading authorization.
- Log in to FusionInsight Manager by referring to Accessing MRS Manager. Choose Cluster > Services > Ranger > Configurations.
- Search for ranger.ext.authorization.cascade.enable in the search box and set its value to true to enable the cascading authorization.
- Click Save.
- Click Instance and select all RangerAdmin instances. Click More and select Restart Instance. Enter the password and click OK to restart all RangerAdmin instances.
Configuring a Recycle Bin Cleanup Policy
- Log in to the OBS console.
- In the navigation pane on the left, choose Resources > Parallel File Systems. On the displayed page, click the name of the file system created in Creating an OBS Parallel File System.
- Choose Data Management > Lifecycle Rules. On the displayed page, click Create to create a lifecycle rule for the /user/.Trash directory.

After the decoupled storage-compute solution is used, you must configure lifecycle rules for related directories. Otherwise, there is a risk of running out of storage space and incurring additional storage costs.
Table 1 Parameters for creating a lifecycle rule Parameter
Description
Example Value
Status
Whether to enable the lifecycle rule.
Enabled
Rule Name
Enter a rule name, which is used to identify different lifecycle configurations.
rule-test
Prefix
Prefix of the objects to which the lifecycle rule applies. Typically, the prefix of the recycle bin directory of MRS components is /user/.Trash.
user/.Trash
Transition to Infrequent Access After (Days)
Number of days after the last update of an object that it will be transitioned to infrequent access storage based on the rule. The minimum value is 30.
30 days
Transition to Archive After (Days)
Number of days after the last update of an object that it will be transitioned to archive based on the rule. If you are setting both this parameter and Transition to Infrequent Access After (Days), make sure this parameter value is at least 30 days greater than the value of Transition to Infrequent Access After (Days). If you are only setting this parameter, assign any value to it as needed.
31 days
Delete Files After (Days)
Number of days after the last update of an object that it will expire and be automatically deleted by OBS based on the rule. The value of this parameter must be greater than the values of the two transition parameters.
32 days
Delete Fragments Upon Expiration
Number of days of a fragment that it will expire and be automatically deleted by OBS based on the rule.
30 days
- Click OK.
To modify, disable, or enable a lifecycle rule, locate the rule and click Edit, Disable, or Enable in the Operation column, respectively.
Feedback
Was this page helpful?
Provide feedbackThank you very much for your feedback. We will continue working to improve the documentation.


