Scaling Up Master Node Specifications in an MRS Cluster
As users' increasing services lead to Core node scale-out and high CPU usage, Master node specifications cannot meet user requirements and need to be scaled up. This section describes how to scale up Master node specifications.
Prerequisites
- If Host Security Service (HSS) is enabled, you have disabled HSS monitoring on the MRS cluster before scaling up the Master node specifications.
- Ensure that sufficient specification resources are available throughout the steps in Scaling Up Master Node Specifications (Step-by-Step Upgrade).
Notes and Constraints
- Master nodes can be scaled up only in clusters with two or more Master nodes.
- The specifications of the Master node in a BMS cluster cannot be upgraded.
- The specifications of local disks cannot be upgraded.
- For MRS 1.8.2 or later to a version earlier than MRS 3.x or MRS 3.1.0 or later, see Scaling Up Master Node Specifications (One-Click Upgrade).
- For MRS 3.0.5 and a version earlier than MRS 1.8.2, see Scaling Up Master Node Specifications (Step-by-Step Upgrade).
- Do not perform other operations on the cluster during the scale-up.
- It is best to scale up the Master node specifications during off-peak hours to prevent any service interruptions.
Scaling Up Master Node Specifications (One-Click Upgrade)
- Log in to the MRS console.
- On the Active Clusters page, select a running cluster and click its name to switch to the cluster details page.
- On the Nodes tab page, select Scale Up Specifications in the Operation column of the Master node group. The Scale Up Master Node Specifications page is displayed.
- Select the target specifications and click Submit Order. The order has been submitted successfully.
The node specification scale-up takes some time. After the scale-up is successful, the cluster status changes to Running.
- A VM undergoing scale-up is stopped automatically and started again after the scale-up completes.
- Component memory is not automatically upgraded during node specifications scale-up due to differing usage requirements. Adjust the memory configuration manually as required.
Scaling Up Master Node Specifications (Step-by-Step Upgrade)
Preparing for Scaling Up Master Node Specifications
- Log in to the MRS console.
- In the navigation pane on the left, choose , select the cluster for which you want to scale up Master node specifications, and click its name to switch to the cluster details page.
- Ensure that the cluster status is Running.
- On the Nodes tab page, ensure that all nodes in the cluster are in the Running state.
- Log in to Manager and go to the cluster management page. For details, see Accessing MRS Manager.
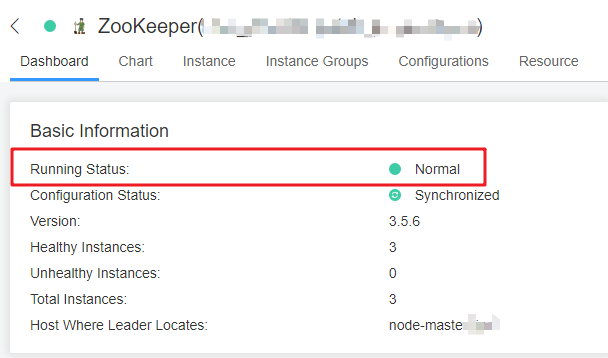
- Choose Cluster > Services > ZooKeeper > Dashboard and ensure that Running Status of the ZooKeeper service is Normal.
Figure 1 ZooKeeper service status

- Update service parameter settings as required. For details, see Modifying the Configuration Parameters of an MRS Cluster Component.
You need to perform this step only once before scaling up the standby Master node.
- Choose Cluster > Services > HDFS > Instances.
- Record the service IP address of NameNode (Standby). When upgrading the specifications of the active Master node, record the service IP address of NameNode (Active). Figure 2 shows the location of the service IP address.
- On the upper right of the MRS Manager page, check the number displayed next to the
 icon. If the number is 0, no tasks are running in the cluster.
 - Click Hosts. If the cluster is an analysis cluster, select the checkbox of the host that matches the NameNode service IP address recorded in Step 9. If the cluster is a streaming cluster, you do not need to distinguish between active and standby nodes. Simply choose hosts for the scale-up.
- Choose More > Stop All Instances and wait until all instances are stopped.
- When the node hosting MRS Manager is scaled up, MRS Manager may become temporarily inaccessible due to an active/standby switchover. This is a normal phenomenon. Try logging in to MRS Manager later. If the login attempt fails for a long time, contact O&M personnel for assistance.
- After all roles are stopped, the following alarms may be generated. After the scale-up of Master node specifications is complete and all roles are started, the alarms are automatically cleared.
- ALM-12006 Node Fault
- ALM-12010 Manager Heartbeat Interruption Between the Active and Standby Nodes
- ALM-12039 Active/Standby OMS Databases Not Synchronized
- ALM-14000 HDFS Service Unavailable
- ALM-14010 NameService Service Is Abnormal
- ALM-14012 JournalNode Is Out of Synchronization
- ALM-16004 Hive Service Unavailable
- ALM-18000 Yarn Service Unavailable
- ALM-19000 HBase Service Unavailable
- ALM-20002 Hue Service Unavailable
- ALM-27001 DBService Service Unavailable
- ALM-27003 DBService Heartbeat Interruption Between the Active and Standby Nodes
- ALM-27004 Data Inconsistency Between Active and Standby DBServices
- ALM-43001 Spark2x Service Unavailable
Scaling Up Master Node Specifications
- Log in to the MRS console.
- In the navigation pane on the left, choose , select the cluster for which you want to scale up Master node specifications, and click its name to switch to the cluster details page.
- On the Nodes tab page, select Scale Up Specifications in the Operation column of the Master node group.
- Select the target specifications and click Next.

Make sure the target specification resources are sufficient. If they are not, the active node cannot be scaled up.
- On the Confirm page that is displayed, confirm the target node specifications and fees and click OK.
- Ensure that all services on the standby Master node have been stopped. For operation details, refer to Step 1 to Step 12 in the Preparing for Scaling Up Master Node Specifications part. On the Scale Up Master Node Specifications page, select Are you sure you have stopped all services on the standby Master node? and If not all services are stopped before the scale-up, data saving failure or data damage may occur and click Submit Order.
- On the Warning page that is displayed, confirm again that all services on the standby Master node are stopped and click OK to start scaling up the specifications of the standby Master node.
The node specification scale-up takes some time. Please wait. After the scale-up is successful, the cluster status changes to Scaled-up-first. Otherwise, contact O&M personnel.
- After the standby Master node has been scaled up successfully, start all services and set parameters on the standby Master node by referring to Step 1 to Step 11 in the Operations After the Master Node Specifications Scale-up part.
- After the services on the standby Master node are started, perform an active/standby NameNode switchover. Perform this step only for an analysis cluster and skip this step for a streaming cluster.
- Access the NameNode web UI of the active and standby nodes separately. For details about how to access the NameNode web UI, see Step 11.
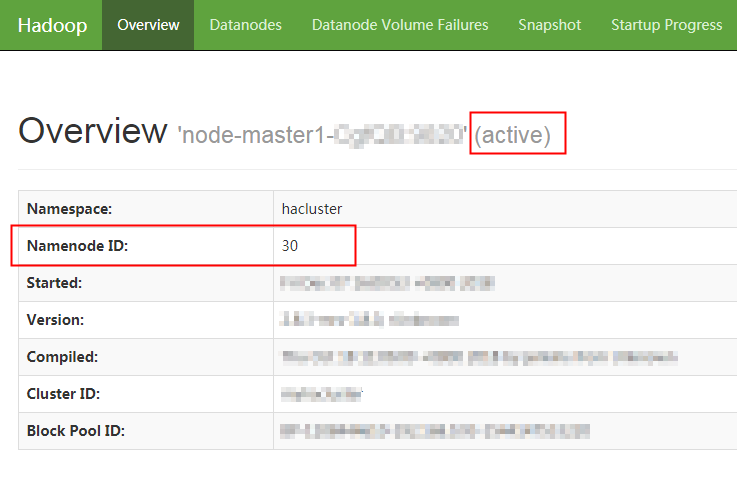
- In the navigation bar on the NameNode web UI, choose Overview and record the NameNode IDs of the active and standby nodes. Do not close the page after recording.
Figure 3 NameNode ID of the active node

- Log in to the ECS of any Master node and run the following command to configure environment variables:
source /opt/Bigdata/client/bigdata_env
- If the Kerberos authentication is enabled for the current cluster, run the following command to authenticate the user. If the Kerberos authentication is disabled for the current cluster, skip this step.
kinit MRS cluster user
For example, kinit admin.
- Run the following command to perform an active/standby NameNode switchover:
hdfs haadmin -failover <NameNode ID of the active node> <NameNode ID of the standby node>
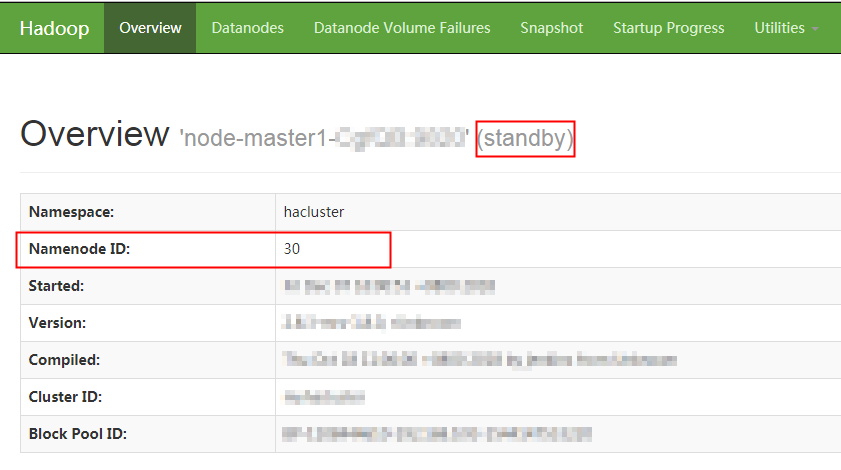
- Go to the NameNode web UI page that is not closed in 9.b and refresh the page. You can view that the active/standby NameNode switchover is complete.
Figure 4 NameNode

- Stop all services on the active Master node by referring to Step 1 to Step 12 in the Preparing for Scaling Up Master Node Specifications part.
- On the Scale Up Master Node Specifications page, select I confirm that all services on the standby Master node have been started. and I confirm that all services on the active Master node have been stopped, and click Submit.
- On the Confirm page that is displayed, confirm again that all services on the active Master node are stopped and click OK to start scaling up the specifications of the active Master node.
The node specification scale-up takes some time. Please wait. After the scale-up is successful, the cluster status changes to Scaled-up-success. Otherwise, contact O&M personnel.
- Start all services and set parameters on the active Master node by referring to Step 1 to Step 11 in the Operations After the Master Node Specifications Scale-up part.
- On the Scale Up Master Node Specifications page, select Are you sure you have started all services on the active Master node? and click OK to complete the scale-up.
Operations After the Master Node Specifications Scale-up
- Log in to FusionInsight Manager of the MRS cluster.
For details about how to log in to FusionInsight Manager, see Accessing MRS Manager.
- Click Hosts. Check basic information about the host that matches the NameNode service IP address recorded in Step 9 in the Preparing for Scaling Up Master Node Specifications part. If Running Status is Good, and Disk, Memory, and CPU have values, perform Step 9. If any of the preceding conditions is not met, go to the next step.
- Log in to the standby Master node remotely. For details, see Logging In to an MRS Cluster Node.
- Run the following command to switch to user omm:
su - omm
- Run the following command to start the Agent:
sh /opt/Bigdata/nodeagent/bin/start-agent.sh
- Run the following command to check whether the Agent is started successfully:
jps | grep NodeAgent
- Log in to Manager and go to the cluster management page. For details, see Accessing MRS Manager.
- Click Hosts. Check basic information about the host that matches the NameNode service IP address recorded in Step 9 in the Preparing for Scaling Up Master Node Specifications part and ensure that Running Status is Good and Disk, Memory, and CPU have values.
It may take up to 3 minutes for the host status to return to normal after the Agent starts successfully. If the host status remains abnormal for an extended period, contact O&M personnel.
- On the MRS Manager page, click Hosts and select the checkbox of the host that matches the NameNode service IP address recorded in Step 9 in the Preparing for Scaling Up Master Node Specifications part.
- Choose More > Start All Instances and wait until all instances are started.
- Access the NameNode web UI and check the NameNode startup status.
- On FusionInsight Manager, choose Cluster > Services > HDFS > Dashboard.
- In the HDFS Summary column, click NameNode of the active or standby node that has been scaled up on the right of NameNode Web UI.
- Go to the NameNode Web UI page, choose Startup Progress in the navigation bar. After ensuring that Percent Complete is displayed as 100%, go to the next step, as shown in Figure 5.
Perform Step 11 for an analysis cluster and skip this step for a streaming cluster.
Feedback
Was this page helpful?
Provide feedbackThank you very much for your feedback. We will continue working to improve the documentation.


