Enabling Ransomware Prevention
Scenarios
Ransomware prevention can detect and defend against known and unknown ransomware in real time. You are advised to enable it for every server.
- Linux: The agent version is 3.2.10 or later.
- Windows: The agent version is 4.0.22 or later.
If the agent version of a server is not one of the preceding versions, or ransomware prevention has been disabled, you can perform the operations in this section to enable it.

If you find suspicious files on a server after enabling ransomware prevention, submit a service ticket to contact technical support and check whether the files are the honeypots deployed by HSS. Honeypot files are used to detect ransomware attacks. They do not affect your services, do not contain any malicious content, and cannot be manually deleted.
Step 1: Creating a Protection Policy
Before enabling ransomware prevention, create a ransomware protection policy and configure honeypot protection directories, protected file types, and protection actions.
- Log in to the HSS console.Log in to the management console.
- Click
 in the upper left corner and select a region or project.
 - Choose Server Protection > Ransomware Prevention.
- (Optional) If you have enabled the enterprise project function, select an enterprise project from the Enterprise Project drop-down list in the upper part of the page to view its data.
- Click the Policies tab and click Add Policy.
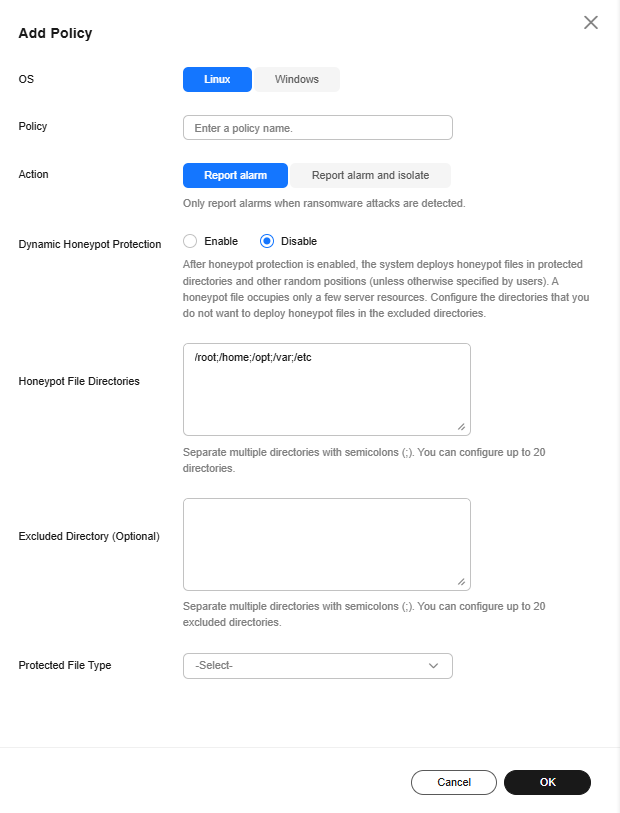
- Configure policy parameters. For more information, see Table 1.
Figure 1 Protection policy parameters

Table 1 Protection policy parameters Parameter
Description
Example Value
OS
Server OS.
Linux
Policy
Policy name.
Anti_Ransomware
Action
How an event is handled.
- Report alarm and isolate: If a ransomware attack is detected, an alarm will be generated, and the process that attempts to encrypt files will be blocked.
- Report alarm: If a ransomware attack is detected, only an alarm will be reported.
Report alarm and isolate
Dynamic Honeypot Protection
A honeypot is a file that simulates actual service files. It can induce attackers and capture ransomware encryption behaviors in real time.
Generally, dynamic and static honeypots are used together for comprehensive protection.
After honeypot protection is enabled, the system will deploy honeypot files in honeypot directories and other random locations. (Honeypot files will not be deployed in the excluded directories specified by users). The honeypot files deployed in random locations are automatically deleted every 12 hours and then randomly deployed again. A honeypot file occupies a few server resources. You can configure excluded directories, and the honeypot files will not be deployed in them.
Dynamic honeypots are more flexible and can better detect ransomware attacks.
This parameter is mandatory only for Linux servers.
Enabled
Honeypot File Directories
Static honeypots are deployed in specified directories. You can add important service directories or data directories as protected directories. Honeypot files will be deployed in these specified directories (excluding their subdirectories). They can distract attackers and slow down their attacks on real resources.
Separate multiple directories with semicolons (;). You can configure up to 20 directories.
This parameter is mandatory for Linux servers and optional for Windows servers.
- Linux: /root;/home;/opt;/var;/etc
- Windows: C:\software
Excluded Directory (Optional)
Directory that does not need to be protected by honeypot files.
Separate multiple directories with semicolons (;). You can configure up to 20 excluded directories.
- Linux: /bin;/boot;/lib;/lib32;/lib64;/lost+found;/proc;/run;/sbin;/selinux;/srv;/sys;/usr/bin;/usr/local/bin;/usr/local/sbin;/usr/sbin;/var/lib/container;/var/lib/kubelet;/var/lib/ntp/proc
- Windows: C:\software\test
Protected File Type
Types of files to be protected.
More than 70 file formats can be protected, including databases, containers, code, certificate keys, and backups.
This parameter is mandatory only for Linux servers.
Select all
(Optional) Process Whitelist
Paths of the process files that can be automatically ignored during the detection, which can be obtained from alarms.
This parameter is mandatory only for Windows servers.
-
AI Ransomware Prevention
It monitors all server files, detects ransomware attack characteristics (including the characteristics of ransomware letters and encryption behaviors) in real time, and determines whether the server is under a ransomware attack.
Suspicious events are further checked by the graph engine through comprehensive source tracing analysis to determine whether they are ransomware attacks. For details about graph engine detection, see the description of related policies in Policy Management Overview.
To use the graph engine, you need to enable it and the HIPS policy as well. For details, see Configuring Policies.
To use AI ransomware prevention, your Windows agent version must be 4.0.28 or later.

- Click OK.
If the added protection policy is displayed in the protection policy list, the policy has been added.
Step 2: Enabling Ransomware Prevention
After a protection policy is created, you can enable ransomware prevention by referring to this section.
- On the Ransomware Prevention page, click the Protected Servers tab.
- In the Ransomware Prevention Status column of a server, click Enable.
You can also select multiple servers and click Enable Ransomware Prevention above the server list.
Figure 2 Enabling
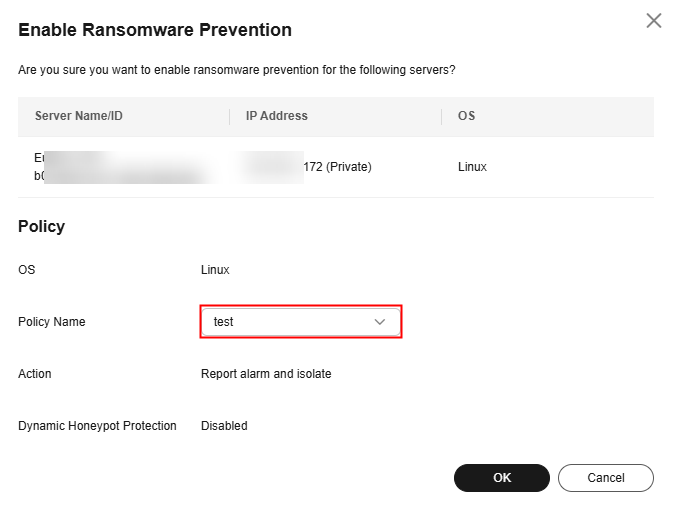
- In the Enable Ransomware Prevention dialog box, confirm the server information and select a protection policy.
Figure 3 Enabling ransomware prevention

- Click OK.
If the Ransomware Prevention Status of the server changes to Enabled, ransomware protection is enabled successfully. For details about the ransomware prevention status, see Table 2.
Table 2 Protection status description Ransomware prevention status
Description
Protected
Ransomware prevention has been enabled.
Disabled
Ransomware prevention is not enabled.
Enabling
Ransomware prevention is being enabled.
Disabling
Ransomware prevention is being disabled.
Protection failed
Ransomware prevention failed. Rectify the fault by referring to Ransomware Protection Exception.
Protection degraded
Honeypot files failed to be deployed in some protected directories. As a result, the protection is degraded. Check whether the System group has full control permissions on the protected directories.
Follow-up Operations
So far, no tools can defend against all ransomware. You are advised to enable backup for servers, so that their data can be restored in a timely manner in the case of a ransomware attack. For details, see Enabling Backup.
Feedback
Was this page helpful?
Provide feedbackThank you very much for your feedback. We will continue working to improve the documentation.


