
Using Custom Images
Scenario
You can use DLI's Spark or Flink basic images and a Dockerfile to package the dependencies (files, JAR files, or software) required to run jobs into a custom image. You can then publish the image to SWR and select it in the DLI job editing page to run jobs. You can embed private capabilities into custom images to enhance the functions and performance of jobs.

Restrictions
- Only containerized queues are supported.
- Only JAR jobs (Spark and Flink Jar jobs) are supported.
Procedure for Creating a Custom Image
The following describes how to package TensorFlow into an image to generate a custom image with TensorFlow installed. Then, you can use the image to run jobs in DLI.
- Prepare the container environment.
For details, see "Step 1: Install the Container Engine" in Uploading an Image Through a Container Engine Client.
- Log in to the prepared container environment as user root and run a command to obtain the basic image.
This section uses a Spark basic image as an example to describe how to download it to the prepared container environment using Wget.
wget Image download address in Downloading a Basic Image
For example, to download the basic image of Spark 2.4.5, run the following command:wget https://uquery-image.obs.xxx.com:443/1.0.0/spark-2.4.5-1.0.0-x86_64.tar.gz
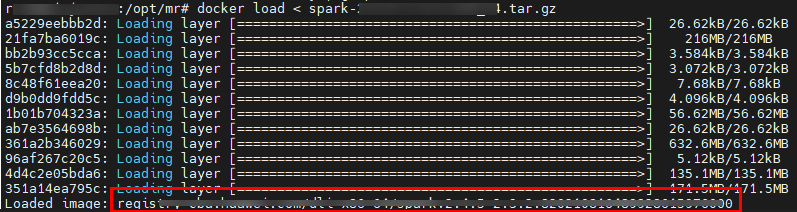
- Load a custom image from local storage.
docker load < Name of the basic image package you have downloaded
For example, run the following command to load the Spark 2.4.5 basic image:docker load < spark-2.4.5-1.0.0-x86_64.tar.gz
Note the basic image loading address following Loaded image: as shown in Figure 1. This address will be used in subsequent steps. - Access SWR.
- Log in to the SWR console.
- In the navigation pane on the left, choose Dashboard and click Generate Login Command in the upper right corner. On the displayed page, click
 to copy the login command.
 - Run the login command on the VM where the container engine is installed.
- Create an organization. If an organization has been created, skip this step.
- Log in to the SWR console.
- In the navigation pane on the left, choose Organization Management. On the displayed page, click Create Organization in the upper right corner.
- Enter the organization name and click OK.
- Add a tag to the loaded basic image.
docker tag 3Image loading address [Image repository address]/[Organization name]/[Image name:Version]
- [Image repository address]: The domain name at the end of the login command in 4 is the image repository address, which can be obtained on the SWR console.
- [Organization name]: Name of the organization created in 5
- [Image name:Version]: Customized name and version of the image.
The following is an example:docker tag registry-cbu.huawei.com/dli-x86_64/spark:2.4.5-2.3.3 swr.xxx/testdli0617/spark:2.4.5.test
- Upload the basic image to the image repository.
docker push [Image repository address]/[Organization name]/[Image name:Version]
Set [Image repository address]/[Organization name]/[Image name:Version] the same as those in 6.
The following is an example:docker push swr.xxx/testdli0617/spark:2.4.5.test
- Write a Dockerfile.
vi Dockerfile
Pack TensorFlow into the image as follows:
ARG BASE_IMG=spark:latest

FROM ${BASE_IMG} as builder
USER root
RUN set -ex && \
    mkdir -p /root/.pip && \  //Configure the available repository address of pip.
    echo "[global]" >> /root/.pip/pip.conf && \   //Configure the Huawei image source.
    echo "index-url = https://mirrors.huaweicloud.com/repository/pypi/simple" >> /root/.pip/pip.conf && \   //Configure the Huawei image source.
    RUN pip3 install --user --no-cache-dir tensorflow==1.13.1

FROM ${BASE_IMG}
USER root
COPY --from=builder --chown=omm:ficommon /root/.local /home/omm/.local  //Copy the content in the temporary image builder that incorporates the algorithm package to the basic image.
USER omm
The following steps are included:
- Set the available repository address of pip.
- Use pip3 to install the TensorFlow algorithm package.
- Copy the content in the temporary image builder where the algorithm package is installed to the basic image (this step is to reduce the image size) to generate the final custom image.
- Use Dockerfile to generate a custom image.
Format of the image packaging command:
docker build -t [Custom organization name]/[Custom image name]: [Image version] --build-arg BASE_IMG= [DLI basic image path] -f Dockerfile
The basic image path is [Image repository address]/[Organization name]/[Image name:Version] in 6.
The following is an example:docker build -t mydli/spark:2.4 --build-arg BASE_IMG=swr.xxx/testdli0617/spark:2.4.5.test -f Dockerfile .
- Add a tag to the custom image.
docker tag [Organization name]/[Image name]:[Image version][Image repository address]/[Organization name]/[Image name:version] in 9
The following is an example:docker tag mydli/spark:2.4 swr.xxx/testdli0617/spark:2.4.5.tensorflow
- Upload the custom image.
docker push [Image repository address]/[Organization name]/[Image name:Version]
Set [Image repository address]/[Organization name]/[Image name:Version] the same as those in 10.
The following is an example:docker push swr.xxx/testdli0617/spark:2.4.5.tensorflow
- When submitting a Spark or Flink JAR job in DLI, select a custom image.
- Open the Spark job or Flink job editing page on the management console, select the uploaded and shared image from the custom image list, and run the job.
If you select a non- shared image, the system displays a message indicating that the image is not authorized. You can use the image only after it is authorized. Click Authorize as prompted as shown in Figure 3. Configure other job execution parameters and execute the job.Figure 2 Selecting a custom image on the DLI Spark job editing page
 Figure 4 Selecting a custom image on the DLI Flink Jar job editing page
- Specify the image parameter in job parameters on API to use a custom image to run a job.
For details about Spark jobs, see Creating a Batch Processing Job. For details about Flink Jar jobs, see Creating a Flink Jar Job.
- Open the Spark job or Flink job editing page on the management console, select the uploaded and shared image from the custom image list, and run the job.

Feedback
Was this page helpful?
Provide feedbackThank you very much for your feedback. We will continue working to improve the documentation.


