
Adding a Target Host to a Host Cluster
This section describes how to add a target host to a host cluster.
Prerequisites
- A host cluster is available, and you have the permission to add hosts to the cluster.
- A host that meets the following requirements is available.
- A public IP address has been bound.
- A host is configured.
- If you need to monitor a host, you need to create an agency for the host. For details, see Creating an Agency.

This configuration has been completed for Huawei Cloud ECSs (Linux) by default. You do not need to configure it again. However, you need to configure it for Windows ECSs.
Adding a Target Host
- Go to the Basic Resources page.
- Click the name of the desired cluster to go to the Target Hosts tab page.
- Click Add Host and select Adding IP for Add Hosts by.
- Select Direct Connection for Host Connection Mode and add a target host. Enter the following information and click OK.
Table 1 Parameters of the target host (Linux) Parameter
Mandatory
Description
Host Name
Yes
Enter a user-defined target host name.
Enter 3 to 128 characters. Use digits, letters, hyphens (-), underscores (_), and periods (.).
IP
Yes
Enter the public IP address bound to the target host. IPv4 or IPv6 address is supported.
OS
Yes
The default value is the OS of the current host cluster and cannot be changed.
Configure the target host by referring to Configuring a Linux Host to ensure successful connectivity verification.
Authorization
Yes
Select a password or key for authentication as required.
- If you select Password, the Username and Password are displayed. Take ECS as an example. Enter the ECS username and password.
- If you select Key, the Username and Key are displayed. For details about how to generate and obtain a key, see Obtaining the Linux key.
SSH Port
Yes
Port 22 is recommended. You may customize the port number.
Table 2 Parameters of the target host (Windows) Parameter
Mandatory
Description
Host Name
Yes
Enter a user-defined target host name.
Enter 3 to 128 characters. Use digits, letters, hyphens (-), underscores (_), and periods (.).
IP
Yes
Enter the public IP address bound to the target host. IPv4 or IPv6 address is supported.
OS
Yes
The default value is the OS of the current host cluster and cannot be changed.
Configure the target host by referring to Configuring the Host Running Windows to ensure successful connectivity verification.
Authorization
Yes
Windows proxies support only password authentication. Take ECS as an example. Enter the ECS username and password.
Winrm Port
Yes
Port 5986 is recommended. You may customize the port number.
- Select Proxy for Host Connection Mode and add a proxy host and a target host. Enter the following information and click OK.
- Add a proxy host.
Table 3 Parameters of the proxy host (Linux) Parameter
Mandatory
Description
Host Name
Yes
Enter a user-defined proxy host name.
Enter 3 to 128 characters. Use digits, letters, hyphens (-), underscores (_), and periods (.).
IP
Yes
Enter the public IP address bound to the proxy host. IPv4 or IPv6 address is supported.
OS
Yes
The default value is the OS of the current host cluster and cannot be changed.
Configure the target host by referring to Configuring a Linux Host to ensure successful connectivity verification.
Authorization
Yes
Select a password or key for authentication as required.
- If you select Password, the Username and Password are displayed. Take ECS as an example. Enter the ECS username and password.
- If you select Key, the Username and Key are displayed. For details about how to generate and obtain a key, see Obtaining the Linux key.
SSH Port
Yes
Port 22 is recommended. You may customize the port number.
Table 4 Parameters of the proxy host (Windows) Parameter
Mandatory
Description
Host Name
Yes
Enter a user-defined proxy host name.
Enter 3 to 128 characters. Use digits, letters, hyphens (-), underscores (_), and periods (.).
IP
Yes
Enter the public IP address bound to the proxy host. IPv4 or IPv6 address is supported.
OS
Yes
The default value is the OS of the current host cluster and cannot be changed.
Configure the target host by referring to Configuring the Host Running Windows to ensure successful connectivity verification.
Authorization
Yes
Windows proxies support only password authentication. Take ECS as an example. Enter the ECS username and password.
Winrm Port
Yes
Port 5986 is recommended. You may customize the port number.
- Add a target host.
Table 5 Parameters of the target host (Linux) Parameter
Mandatory
Description
Host Name
Yes
Enter a user-defined target host name.
Enter 3 to 128 characters. Use digits, letters, hyphens (-), underscores (_), and periods (.).
Proxy Host
Yes
Select the target proxy host as the network proxy of the target host that cannot connect to the public network.
IP
Yes
Enter the IP address of the target host. IPv4 or IPv6 address is supported.
OS
Yes
The default value is the OS of the current host cluster and cannot be changed.
Configure the target host by referring to Configuring a Linux Host to ensure successful connectivity verification.
Authorization
Yes
Select a password or key for authentication as required.
- If you select Password, the Username and Password are displayed. Take ECS as an example. Enter the ECS username and password.
- If you select Key, the Username and Key are displayed. For details about how to generate and obtain a key, see Obtaining the Linux key.
SSH Port
Yes
Port 22 is recommended. You may customize the port number.
Table 6 Parameters of the target host (Windows) Parameter
Mandatory
Description
Host Name
Yes
Enter a user-defined target host name.
Enter 3 to 128 characters. Use digits, letters, hyphens (-), underscores (_), and periods (.).
Proxy Host
Yes
Select the target proxy host as the network proxy of the target host that cannot connect to the public network.
IP
Yes
Enter the IP address of the target host. IPv4 or IPv6 address is supported.
OS
Yes
The default value is the OS of the current host cluster and cannot be changed.
Windows: Configure the target host by referring to Configuring the Host Running Windows to ensure successful connectivity verification.
Authorization
Yes
Windows proxies support only password authentication. Take ECS as an example. Enter the ECS username and password.
Proxy Forwarding Port
Yes
Set this port to the listening port specified during Configuring a Windows Proxy. Port 54 is recommended. You can also use a custom port.
- Add a proxy host.
- To add your Huawei Cloud ECS as the target host or proxy host, click Add Host, and select Importing ECS for Add Hosts by.
The prerequisites for importing the purchased ECS are as follows:
- The ECS is running.
- The ECS and host cluster have the same OS.
- Proxy host has a public IP (proxy mode) when using official resource pool.
- The ECS has been imported as a target host. It cannot be imported as a proxy host.
- In the proxy mode, you need to configure the proxy host before using the target host.
- Verify the host connectivity.
After the host is added, the system automatically verifies the connectivity. If the connectivity verification fails, click Failed and rectify the fault based on the failure cause displayed in the dialog box or click View Solution.
Configuring a Linux Host
To ensure that the connectivity verification of the Linux host is successful, ensure that Python is installed on the Linux host and the SELinux mechanism is enabled. The target host must meet the following requirements:
- Install Python Install Python version 2.6 or later. If Python earlier than 2.6 has been installed, run the following commands to install the following modules on the host:
- Ubuntu
sudo apt install python-minimal python-simplejson
- CentOS or EulerOS
sudo yum install python-minimal python-simplejson
ln -s /usr/bin/python2 /usr/bin/python
Before using Advanced Packaging Tool (APT) or Yellowdog Updater Modified (yum), ensure that an available source has been configured.
- Ubuntu
- Enable SELinux and install libselinux-python
- Run the following command to check the SELinux status:
/usr/sbin/sestatus
Mode corresponding to the value of SELinux:
SELinux=disabled: disabled.
SELinux=enforcing: forcible mode, indicating that all behavior that violates the security policy are prohibited.
SELinux=permissive: indicates that all behavior that violates security policies are not prohibited but are recorded in logs.
- If SELinux is set to disabled, SELinux is disabled on the host. In this case, perform the following steps to change the SELinux status.
- Run the following command to edit the config file of the SELinux:
vi /etc/selinux/config
- Modify the SELinux parameters based on the site requirements.
SELinux=enforcing: forcible mode, indicating that all behavior that violates the security policy are prohibited.
SELinux=permissive: indicates that all behavior that violates security policies are not prohibited but are recorded in logs.
- After the modification, press Esc to exit. Run the following command to save the file and exit.
wq
- Create the hidden file .autorelabel in the root directory, run the following command, and restart the Linux host.
touch /.autorelabel
- Run the following command to edit the config file of the SELinux:
- Run the following commands to install libselinux-python:
- Ubuntu
sudo apt install libselinux-python
- CentOS or EulerOS
sudo yum install libselinux-python
- Ubuntu
- Run the following command to check the SELinux status:
Configuring the Host Running Windows
To configure a host running Windows 10, Windows Server 2016 or Windows Server 2019 as a target host, see the configuration method of Windows Server 2012. For details about how to obtain the script, see Windows2016ConfigureRemotingForAnsible.zip.
For details about automatic configuration of a target host running Windows 7, see the configuration method of Windows 2012 and obtain the script.
To use an automatic configuration script to add a host running Windows Server 2012 as an authorized host, perform the following steps:
- Before configuring the script, check whether you have completed security settings by referring to Configuring a Security Group.
- Obtain the automatic configuration script.
- Download Windows2012ConfigureRemotingForAnsible.zip.
- Decompress Windows2012ConfigureRemotingForAnsible.zip to obtain script Windows2012ConfigureRemotingForAnsible.ps1.
- Configure the host.
Log in to the host, open PowerShell, access the directory where script Windows2012ConfigureRemotingForAnsible.ps1 is stored, and run the following command:
.\Windows2012ConfigureRemotingForAnsible.ps1
The output is as follows.

The system may display a message indicating that the file cannot be loaded and a digital signature is required.

This error occurs because the script cannot be executed in default mode of PowerShell. If this happens, run the following command in PowerShell to change the execution policy to unrestricted:
set-executionpolicy unrestricted
Enter Y to confirm the change.

- View the configuration.
Run the following command in PowerShell:
winrm e winrm/config/listener
If the output contains HTTPS and Hostname is not left blank, the listening is successful. The Windows Server 2012 deployment environment is automatically configured.
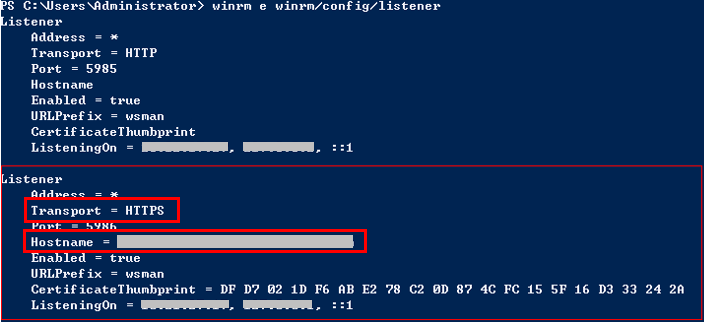
If Hostname is left blank in the command output, the host does not have IIS or signature certificate information. In this case, run the following script:
# Configure WinRM.
winrm enumerate winrm/config/listener
winrm quickconfig
winrm set winrm/config/service/auth '@{Basic="true"}'
winrm set winrm/config/service/auth '@{CredSSP="true"}'
winrm set winrm/config/service '@{AllowUnencrypted="true"}'
# Install IIS.
Import-Module servermanager
Add-windowsfeature Web-Server,Web-WebServer,Web-Common-Http,Web-Static-Content,Web-Default-Doc,Web-Dir-Browsing,Web-Http-Errors,Web-App-Dev,Web-ASP,Web-ISAPI-Ext,Web-Health,Web-Http-Logging,Web-Log-Libraries,Web-Request-Monitor,Web-Security,Web-Filtering,Web-Stat-Compression,Web-Mgmt-Tools
# Create a self-signed certificate.
New-SelfSignedCertificate -CertStoreLocation Cert:\LocalMachine\My\ -DnsName 'windows-deploy-connect'
# View the self-signed certificate.
ls Cert:\LocalMachine\My
# Add a secure connection using the created self-signed certificate.
$windows_test_key=(Get-ChildItem -Path Cert:\LocalMachine\My | Where-Object {$_.Subject -match "windows-deploy-connect"}).Thumbprint
cmd /c "winrm set winrm/config/Listener?Address=*+Transport=HTTPS @{Enabled=`"true`";Port=`"5986`";Hostname=`"windows-deploy-connect`";CertificateThumbprint=`"$windows_test_key`"}"
To manually add a host running Windows Server 2012 as an authorized host, perform the following steps:
- Change the PowerShell execution policy to unrestricted.
Open PowerShell as an administrator and run the following command:
set-executionpolicy unrestricted
The output is as follows.

Enter Y to confirm the change.
- Configure Windows remote management (WinRM).
- Run the following commands in PowerShell:
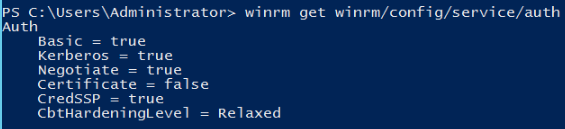
winrm enumerate winrm/config/listener winrm quickconfig winrm set winrm/config/service/auth '@{Basic="true"}' winrm set winrm/config/service/auth '@{CredSSP="true"}' winrm set winrm/config/service '@{AllowUnencrypted="true"}' - Run the following command to check whether the configuration is successful:
winrm get winrm/config/service/auth
If the values of Basic, Kerberos, and CredSSP are all true, the configuration is successful.
- Run the following commands in PowerShell:
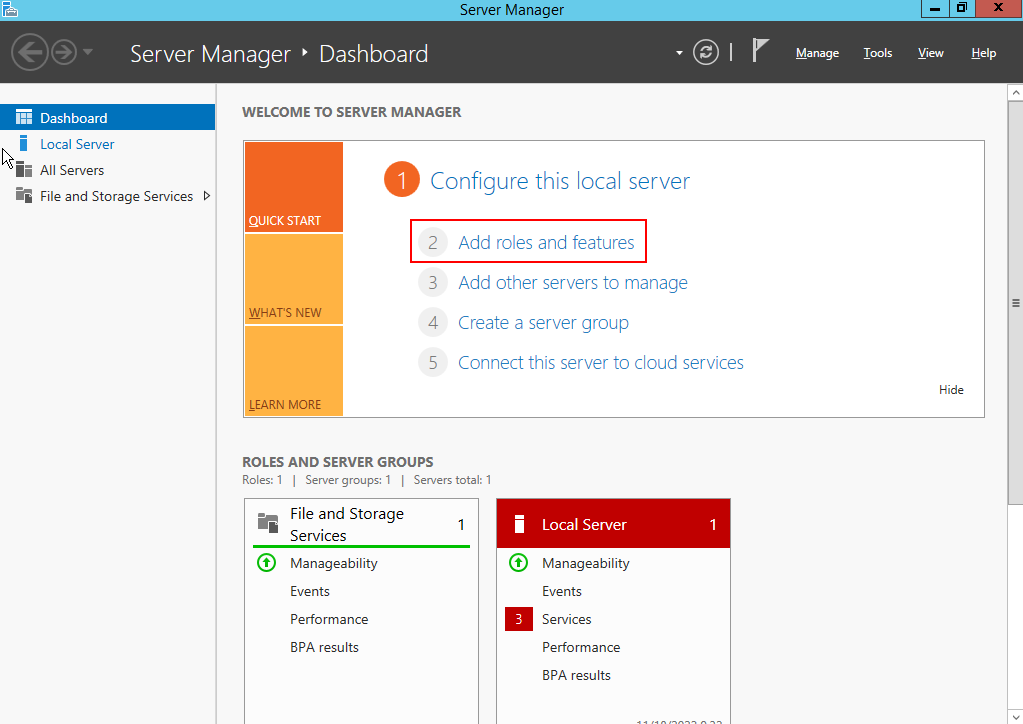
- Install the certificate.
- Open Server Manager, and start IIS.
- Click , as shown in the following figure.
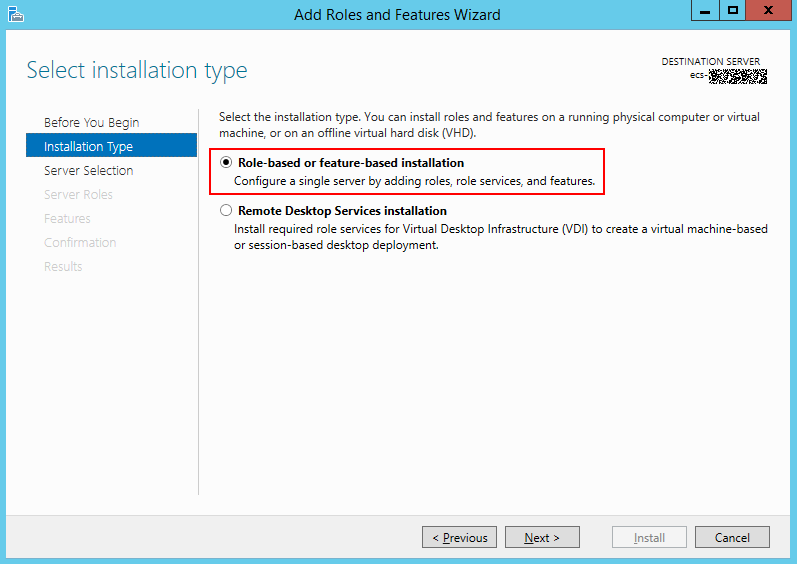
- On the Installation Type page, select the first option and click Next.
- Go to the Server Roles page and select Web Server (IIS).
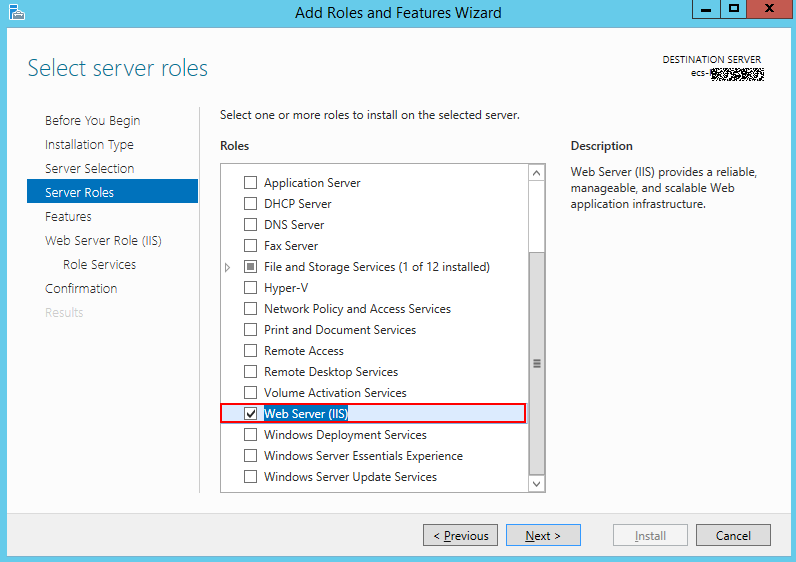
- Go to the Features page, select .NET Framework 4.5, and click .
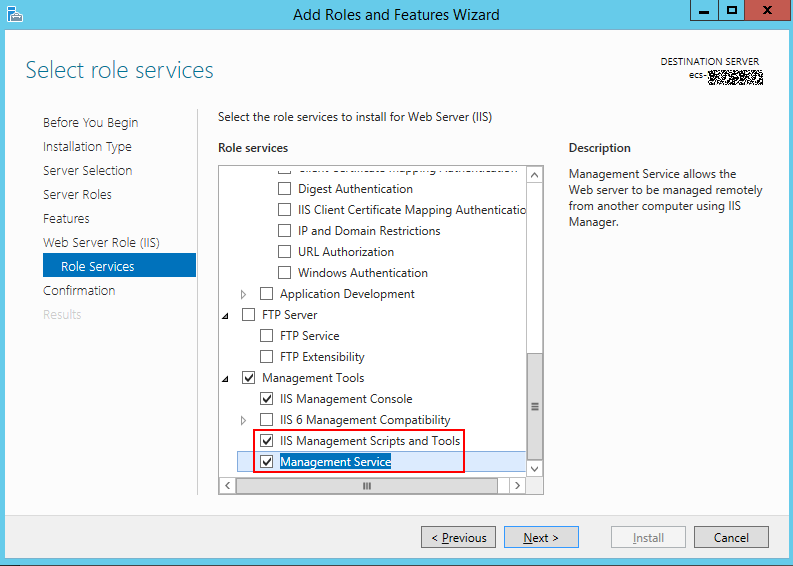
- Go to the Role Services page, select IIS Management Scripts and Tools and Management Service, and click to complete the installation.
- Add a certificate.
- Press Windows+R to open the Run dialog box, enter the inetmgr command for opening the IIS management window, and click OK.
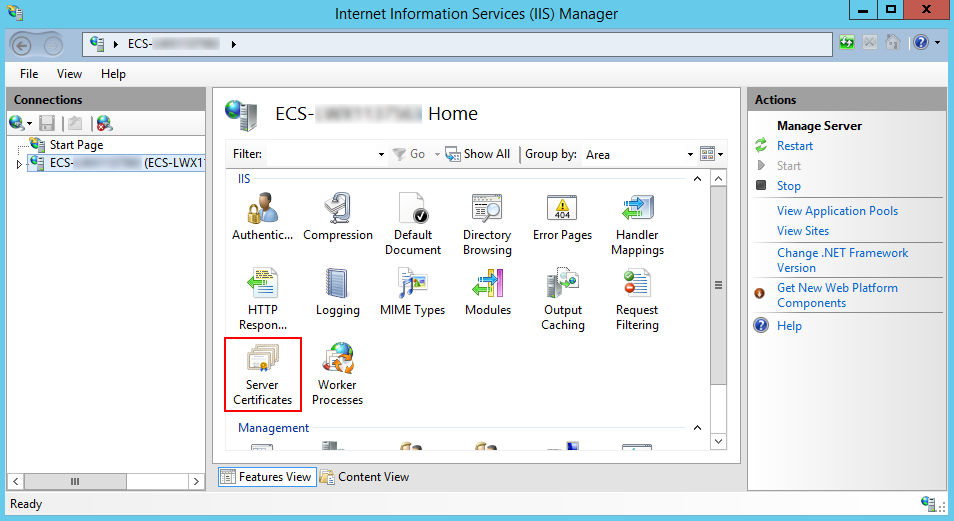
- Open IIS Manager, and double-click Server Certificates.
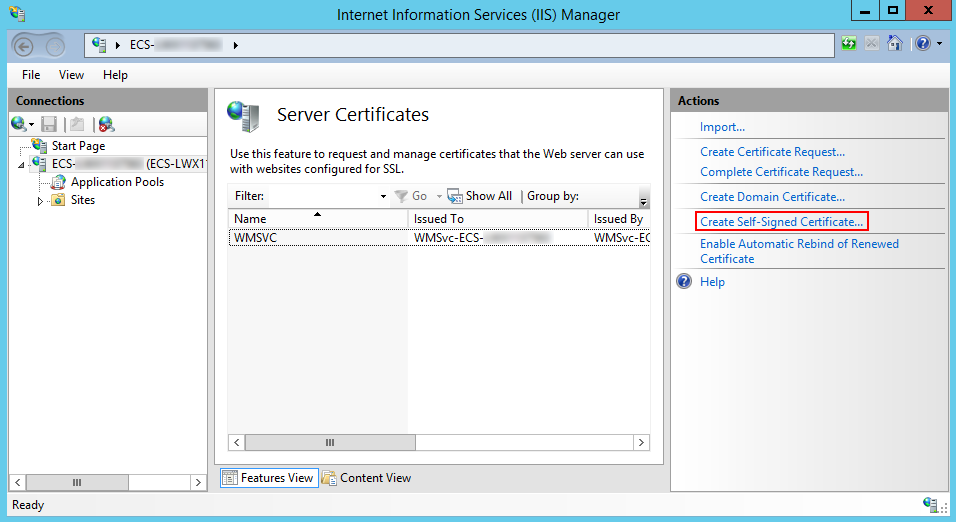
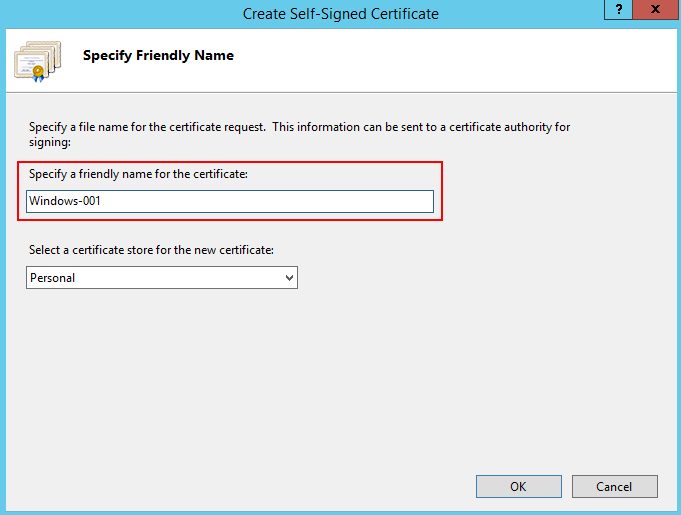
- On the Server Certificates page, click Create Self-Signed Certificate.
- In the Specify Friendly Name dialog box, enter the certificate name and click OK.
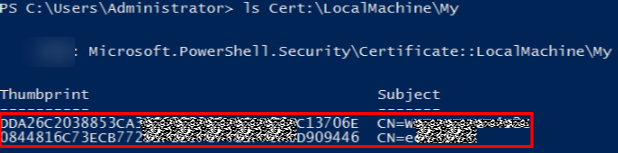
- Run the following command to view the certificate in PowerShell:
ls Cert:\LocalMachine\My
If the following two columns of data are displayed, the certificate is added.
- Use the certificate to listen to the HTTPS port and configure a secure connection.
The commands are in the following format:
winrm create winrm/config/Listener?Address=*+Transport=HTTPS @{Port="User-defined port; default: 5986";Hostname="Certificate domain name";CertificateThumbprint="Certificate key value"} - Hostname is the value in the Subject column in the preceding step.
- CertificateThumbprint is the value behind "CN=" next to the Thumbprint column in the preceding step. Every two characters are separated by a space.
Enter the following commands in the command prompt, as shown in the following figure.
winrm create winrm/config/Listener?Address=*+Transport=HTTPS @{Port="5986";Hostname="XXXXXXXXXXXXXXXX";CertificateThumbprint="DF D7 02 1D F6 AB E2 78 C2 0D 87 4C FC 15 5F 16 D3 33 24 2A"} Run the command in the command prompt and separate every two characters in the value of Thumbprint with a space. Otherwise, the connectivity verification may fail. If the characters are not separated by spaces, delete the signatures and add them again.
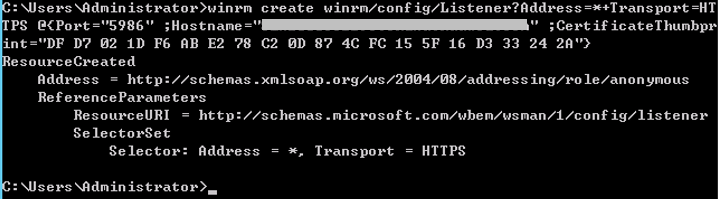
If the system displays a message indicating that the service cannot create the resource because it already exists, run the following command to delete the resource and perform this step again:
winrm delete winrm/config/Listener?Address=*+Transport=HTTPS
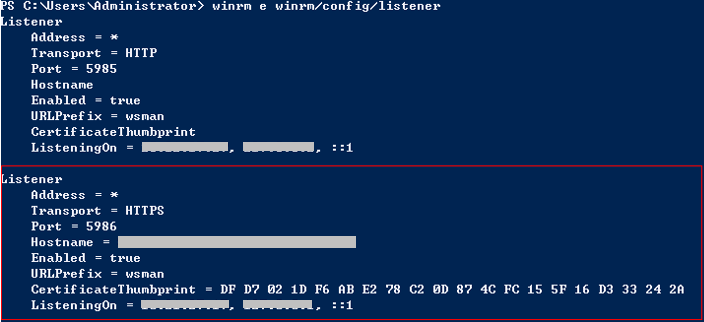
- Run the following command to check whether the listening is successful in PowerShell:
winrm e winrm/config/listener
If the output contains HTTPS, the listening is successful.
- Before verifying the connectivity, check whether you have completed security settings by referring to Configuring a Security Group.
Obtaining the Linux Key
- Check whether the key exists on the host.
Log in to the host and run the following command to switch to user root:
sudo su root
Run the following command to view the key file:
ls ~/.ssh
- If a message is displayed indicating that the directory does not exist or the ~/.ssh directory does not contain the id_rsa file, generate a key.
- If the id_rsa file exists in the ~/.ssh directory, use the existing key file or generate a new one.
- Generate a key. Perform the following steps:
- Generate a key.
ssh-keygen -t rsa
- When the following information is displayed, press Enter.

- When the following information is displayed, press Enter. By default, no password is set. (Setting the password will fail the key verification of CodeArts Deploy.)

- When the following information is displayed, press Enter.

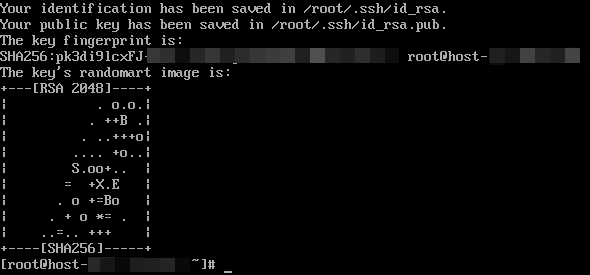
- If the following information is displayed, the key has been generated:
- Run the following command to check the key file generated in the .ssh directory. The id_rsa and id_rsa.pub files store the generated private key and public key, respectively.
ls ~/.ssh

- Generate a key.
- Check information about the key generated. Run the following command:
cat ~/.ssh/id_rsa
- If the key prefix is -----BEGIN RSA PRIVATE KEY-----, the key is correct. Copy the key and save it to the local PC. Enter the key when adding a host or proxy.
- If the key prefix is -----BEGIN OPENSSH PRIVATE KEY-----, the key is incorrect. Run the following command to generate a new key:
ssh-keygen -m PEM -t rsa
- Authorize the key.
Run the following command to add the public key to the authorized_keys file of the host:
cat ~/.ssh/id_rsa.pub >> ~/.ssh/authorized_keys
- To perform operations on the authorized_keys file, you must have the permission to operate the id_rsa and id_rsa.pub files.
- When the key is used for connectivity verification, the username must be the name of the user who operates the authorized_keys file.
- Do not copy unnecessary spaces when manually copying the key. Otherwise, the connectivity verification may fail.
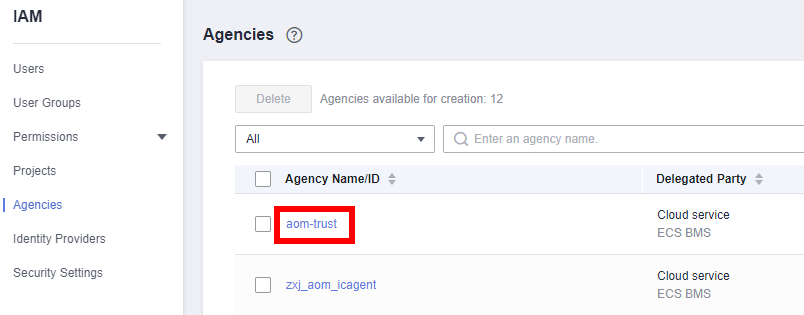
Creating an Agency
- Log in to the Console.
- Move the cursor to the username in the upper right corner, as shown in the following figure, and click Identity and Access Management.
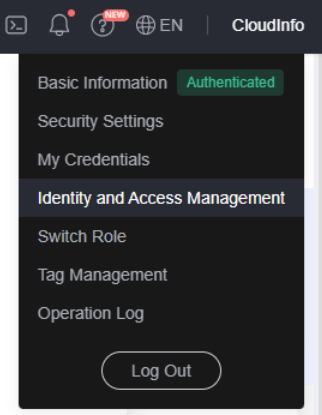
- Click Agencies in the navigation tree on the left. The Agencies page is displayed.
- Click Create Agency in the upper right corner. The Create Agency page is displayed.
- Set the parameters by referring to Table 1.
Table 7 Agency parameters Name
Description
Example
Agency Name
Name of the agency. Mandatory.
aom_ecm_trust
Agency Type
Select Cloud service.
-
Cloud Service
Select Elastic Cloud Server (ECS) and Bare Metal Server (BMS) from the drop-down list.
-
Validity Period
Select Unlimited.
-
Description
This parameter is optional. Provides supplementary information about the agency.
-
- Click Done. The Authorize Agency page is displayed.
- Enter APM in the search box in the upper right corner and select APM Administrator in the search result.

- Click OK and the agency is successfully created.
Selecting an Agency
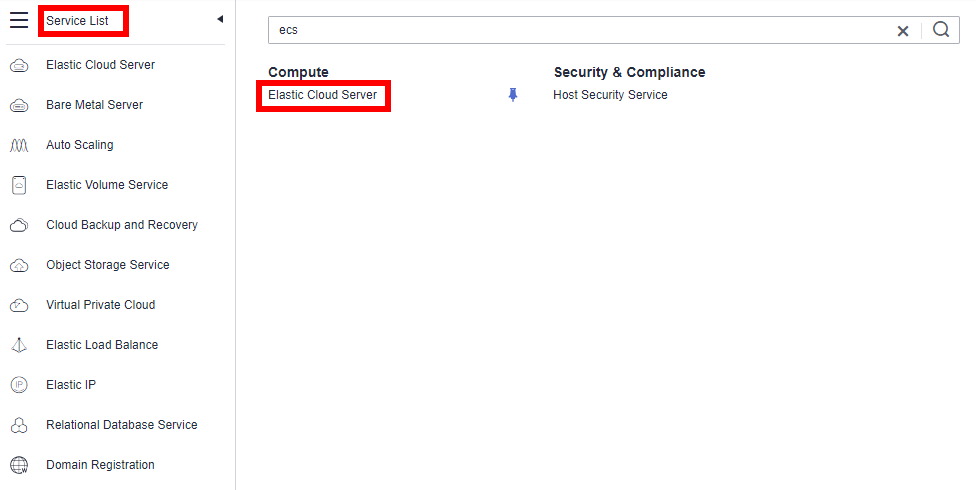
- In the navigation pane, choose Services List > Elastic Cloud Server.
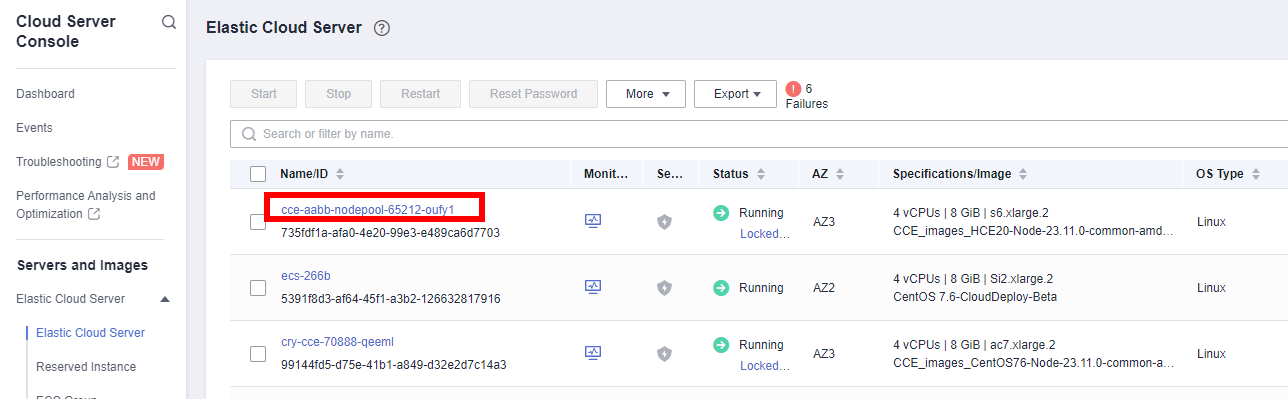
- Click the name of the ECS for which AOM monitoring is to be enabled. The ECS parameter configuration page is displayed, as shown in the following figure. By default, the search box searches for and filters data by name.
- Click the ID of the agency to be delegated, as shown in the following figure.
- Click
 . The configuration takes effect after confirmation, as shown in the following figure.
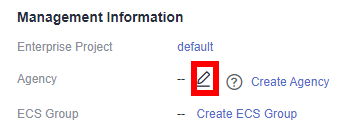
Feedback
Was this page helpful?
Provide feedbackThank you very much for your feedback. We will continue working to improve the documentation.


