Database Deployed on Another Cloud
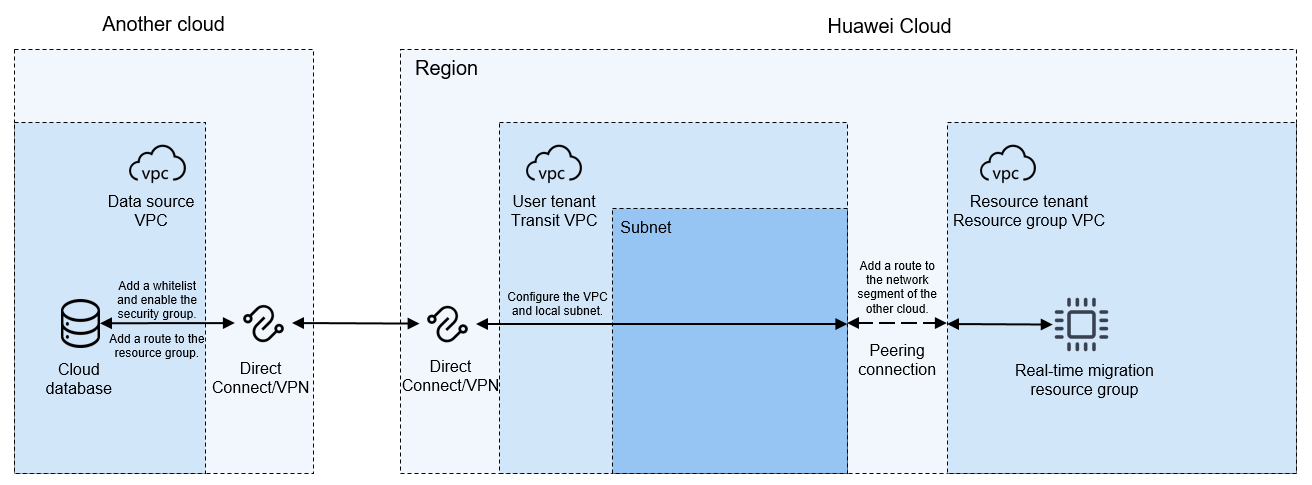
Before configuring a real-time synchronization task, ensure that the source and destination databases can communicate with the real-time compute resource group that you want to use to run the real-time synchronization task. You can choose a proper network solution based on the network environments of the databases.
This section describes how to enable network communications when the database is deployed on another cloud.

Notes and Constraints
- The migration resource group uses a private network segment that cannot overlap with the network segment of the data source. Otherwise, the network cannot be connected.
- The migration resource group does not have a public network segment and can only connect to the private network of the data source.
Prerequisites
You have purchased a migration resource group. For details, see Buying a DataArts Migration Resource Group Incremental Package.
Network Configuration Process
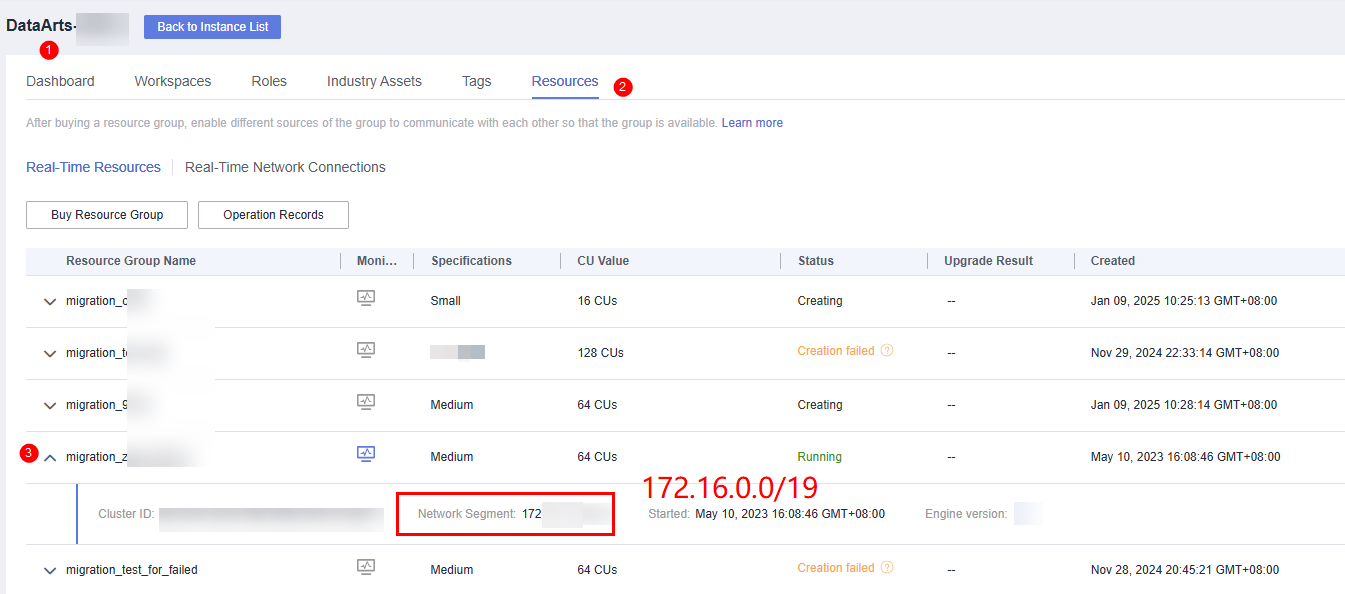
- Obtain the VPC network segment of the real-time migration resource group.
The real-time resource group is created under the resource tenant of the user account and uses the VPC network segment of the resource tenant.
Log in to the DataArts Studio console, access an instance, and click the Resources tab. On the Real-Time Resources page, expand the target migration resource group to view its VPC network segment.
Figure 2 Obtaining the migration resource group network segment
- Create and configure a transit VPC and subnet.
Create a VPC and subnet as the transit VPC. For details, see . If you already have an available VPC, skip this step.
- Buy and configure a Direct Connect connection or VPN on Huawei Cloud.
To connect another cloud computing environment and Huawei Cloud computing environment, you can enable Direct Connect or VPN.
- For details about how to buy and configure a Direct Connect connection, see . When creating a virtual gateway, select the transit VPC created in step 2 and add the VPC network segment of the real-time migration resource group in addition to the subnet of the transit VPC for the local subnet.
- For details about how to buy and configure a VPN, see . When creating a VPN gateway, select the transit VPC created in step 2 and add the VPC network segment of the real-time migration resource group in addition to the subnet of the transit VPC for the local subnet.
- Buy a Direct Connect connection or VPN on another cloud.
For details, see the documentation on its official website.
- Add a route to the network of the database on another cloud.
Add a route to the route table of the network of the databases on another cloud. Set the destination to the VPC network segment of the migration resource group, and set the next hop to the Direct Connect connection or the VPN peer gateway created in step 3.
- Configure a whitelist and security group rules for the database of another cloud.
- Allow access to the database on another cloud from the VPC network segment of the resource group. The method of configuring a whitelist varies depending on the database vendor. For details, see the official documentation of each database.
- In addition, if a security group has been configured for the database on another cloud, you need to add an inbound rule to allow the VPC network segment of the resource group to access the database listening port.

The ports used by different data sources vary. Configure the ports for security group rules by referring to .
- Create a real-time network connection.
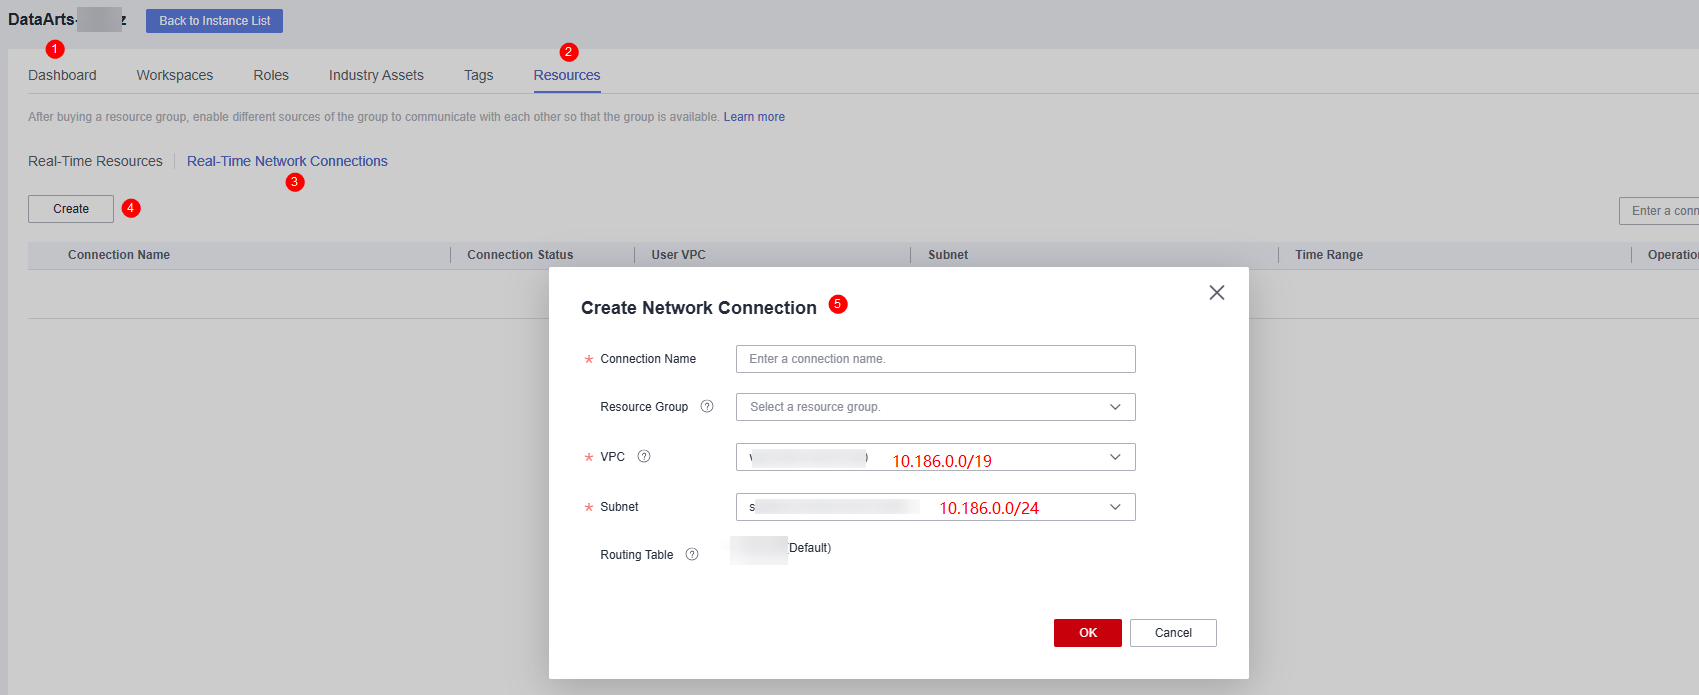
To connect the transit VPC to the real-time migration resource group VPC, you can create a VPC peering connection between the two VPCs using the resource management function provided of DataArts Studio.
Log in to the DataArts Studio console, access an instance, and click the Resources tab.
Figure 3 Creating a network connection
On the Real-Time Network Connections tab page, click Create. In the displayed Create Network Connection dialog box, set required parameters.
Table 1 Parameters for creating a network connection Parameter
Description
Connection Name
Name of the network connection
Only letters, digits, and underscores (_) are allowed.
Resource Group
Migration resource group that can communicate with the specified VPC.
If you do not select a migration resource group, you can bind migration resource groups to the connection after the connection is created by clicking More in the Operation column and selecting Bind Resource Group.
VPC
VPC that can communicate with the migration resource group
In this solution, the migration resource group network segment and the transit VPC are connected through a VPC peering connection. Therefore, you must select the VPC and subnet of the transit VPC.
Subnet
Subnet of the transit VPC
Routing Table
Routing table associated with the subnet. When the connection is bound to a migration resource group, routing information of the migration resource group is added to the routing table. You do not need to set this parameter.
When the connection is bound to a migration resource group, a route to the migration resource group VPC network segment is added to the routing table. The route connects the migration resource group network segment to the transit VPC.
- Add a route to the data source network segment for the real-time network connection (VPC peering connection).
Locate the real-time network connection created in step 7, click More in the Operation column and select Add Route. In the displayed dialog box, enter the private network address of the database of the on-premises IDC.
Figure 4 Adding route 1 Figure 5 Adding route 2
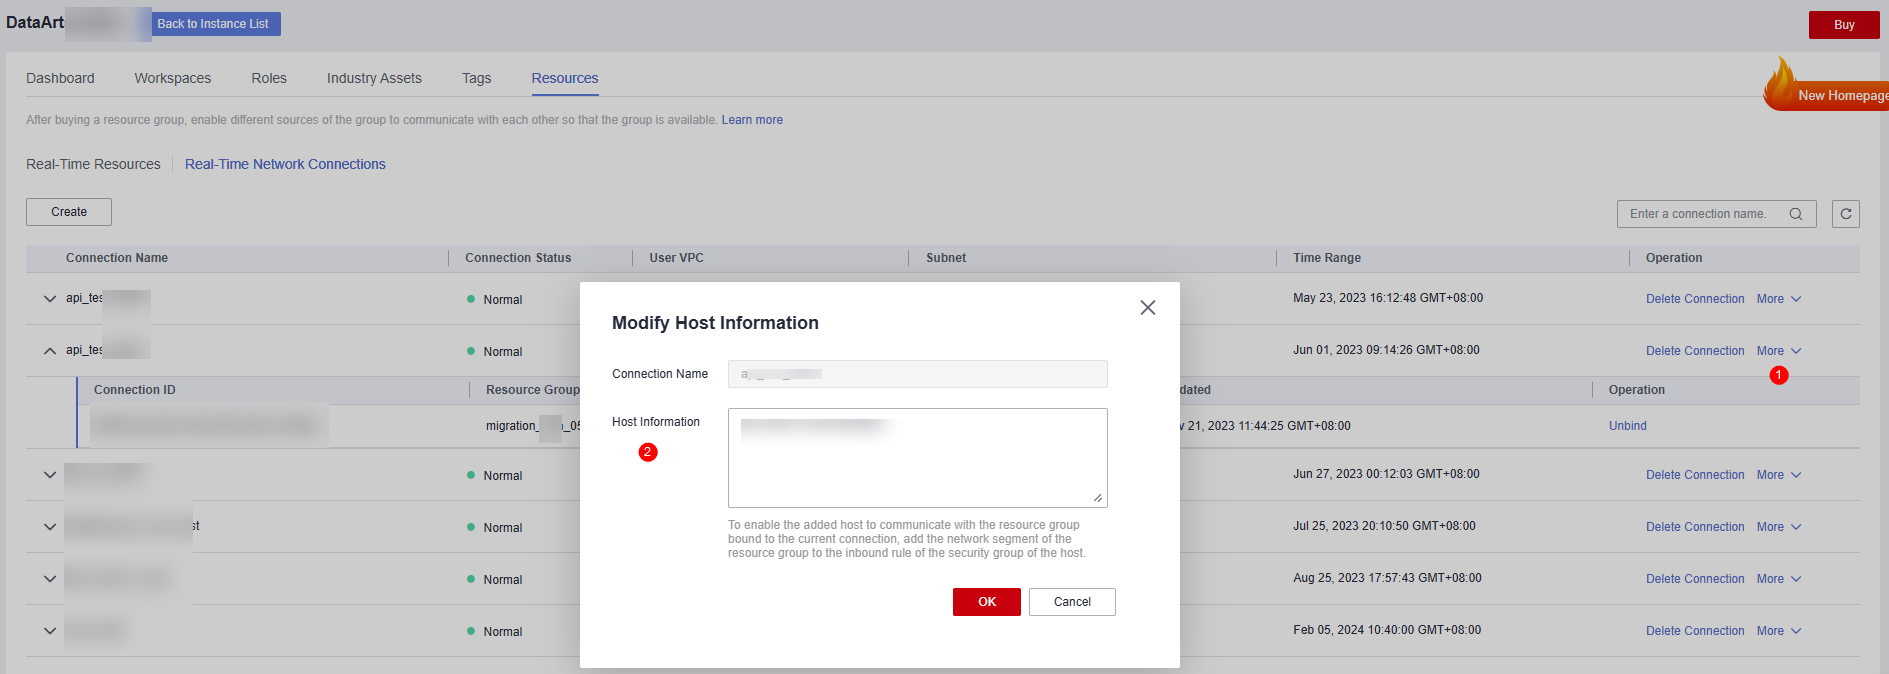
- (Optional) For MRS data sources, perform the following extra operations to enable network communications:
After creating a real-time network connection and binding it to a migration resource group, click More in the Operation column and select Modify Host Information. In the displayed dialog box, enter the IP addresses and domain names of all nodes in the MRS cluster as prompted.
Figure 6 Modifying host information

To obtain the IP addresses and domain names of the nodes in an MRS cluster, perform the following steps:
- Open the MRS page, access the MRS cluster, click the Nodes tab, and expand all node groups to view the IP address and name (domain name) of each node.
Add the IP addresses (1 in the figure) and domain names (2 in the figure) of all nodes and separate them by pressing Enter.
Figure 7 Obtaining the IP addresses and domain names of the nodes in the MRS cluster
- Log in to an MRS cluster node by referring to and run the cat /etc/hosts command to list the IP addresses and domain names of all nodes.
- Open the MRS page, access the MRS cluster, click the Nodes tab, and expand all node groups to view the IP address and name (domain name) of each node.
- Test the network connectivity.
In a DataArts Studio workspace, create a data connection and a real-time migration job, and select the corresponding data connection and migration resource group to test the connectivity. For details, see Creating a Real-Time Migration Job.
Feedback
Was this page helpful?
Provide feedbackThank you very much for your feedback. We will continue working to improve the documentation.


