Configuring Network Policies to Restrict Pod Access
Network policies are designed by Kubernetes to restrict pod access. Like a firewall at the application layer, network policies enhance network security. The capabilities supported by network policies depend on the capabilities of the network add-ons of the cluster.
By default, if a namespace does not have any policy, pods in the namespace accept traffic from any source and send traffic to any destination.
The following selectors are available for network policies:
- namespaceSelector: selects particular namespaces for which all pods should be allowed as ingress sources or egress destinations.
- podSelector: selects particular pods in the same namespace as the network policy which should be allowed as ingress sources or egress destinations.
- IPBlock: selects particular CIDR blocks to allow as ingress sources or egress destinations.
Notes and Constraints
- Only clusters that use the tunnel network model support network policies. There are two types of network policies:
- Ingress: All versions support this type.
- Egress: The cluster must be of v1.23 or later.
- Network isolation is not supported for IPv6 addresses.
Using Ingress Rules Through YAML
- Scenario 1: Controlled by a preset network policy, a pod can only be accessed by pods with specific labels.
Figure 1 podSelector

The pod labeled with role=db only permits access to its port 6379 from pods labeled with role=frontend. To achieve this, take the following steps:
- Create the access-demo1.yaml file.
vim access-demo1.yaml
File content:
apiVersion: networking.k8s.io/v1
kind: NetworkPolicy
metadata:
  name: access-demo1
  namespace: default
spec:
  podSelector:                  # The rule takes effect for pods with the role=db label.
    matchLabels:
      role: db
  ingress:                      # This is an ingress rule.
  - from:
    - podSelector:              # Only allows the access of the pods labeled with role=frontend.
        matchLabels:
          role: frontend
    ports:                      # Only TCP can be used to access port 6379.
    - protocol: TCP
      port: 6379
- Run the following command to create the network policy defined in the access-demo1.yaml file:
kubectl apply -f access-demo1.yaml
Expected output:
networkpolicy.networking.k8s.io/access-demo1 created
- Create the access-demo1.yaml file.
- Scenario 2: Controlled by a preset network policy, a pod can only be accessed by pods in a specific namespace.
Figure 2 namespaceSelector

The pod labeled with role=db only permits access to its port 6379 from pods in the namespace labeled with project=myproject. To achieve this, take the following steps:
- Create the access-demo2.yaml file.
vim access-demo2.yaml
File content:
apiVersion: networking.k8s.io/v1 kind: NetworkPolicy metadata: name: access-demo2 spec: podSelector: # The rule takes effect for pods with the role=db label. matchLabels: role: db ingress: # This is an ingress rule. - from: - namespaceSelector: # Only allows the access of the pods in the namespace labeled with project=myproject. matchLabels: project: myproject ports: # Only TCP can be used to access port 6379. - protocol: TCP port: 6379 - Run the following command to create the network policy defined in the access-demo2.yaml file:
kubectl apply -f access-demo2.yaml
Expected output:
networkpolicy.networking.k8s.io/access-demo2 created
- Create the access-demo2.yaml file.
Using Egress Rules Through YAML

Clusters of v1.23 or later that use a tunnel network support egress rules.
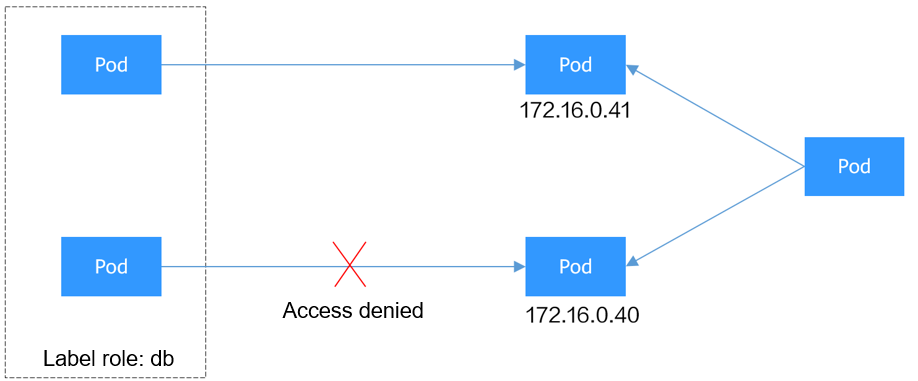
- Scenario 1: Controlled by a preset network policy, pods can only access specific addresses.
Figure 3 IPBlock

The pods labeled role=db only allow access to 172.16.0.0/16, excluding 172.16.0.40/32. To achieve this, take the following steps:
- Create the access-demo3.yaml file.
vim access-demo3.yaml
File content:
apiVersion: networking.k8s.io/v1 kind: NetworkPolicy metadata: name: access-demo3 namespace: default spec: policyTypes: # This policy type must be specified for egress rules. - Egress podSelector: # The rule takes effect for pods with the role=db label. matchLabels: role: db egress: # This is an egress rule. - to: - ipBlock: cidr: 172.16.0.0/16 # Allows access to this CIDR block in the outbound direction. except: - 172.16.0.40/32 # Blocks access to this CIDR block. This CIDR block is in the allowed CIDR block. - Run the following command to create the network policy defined in the access-demo3.yaml file:
kubectl apply -f access-demo3.yaml
Expected output:
networkpolicy.networking.k8s.io/access-demo3 created
- Create the access-demo3.yaml file.
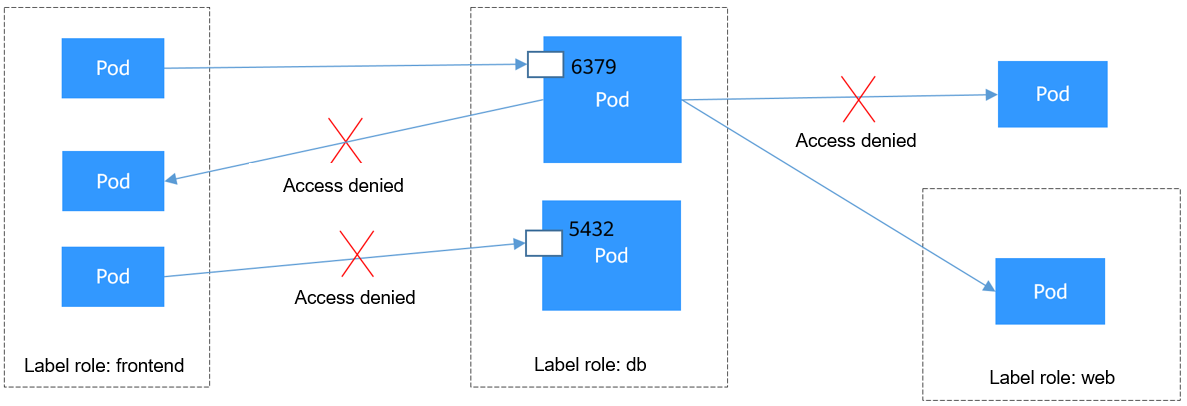
- Scenario 2: Controlled by a preset network policy, a pod can only be accessed by pods with specific labels, while this pod itself can only access specific pods.
Figure 4 Using both ingress and egress

The pod labeled with role=db only permits access to its port 6379 from pods labeled with role=frontend, and this pod can only access the pods labeled with role=web. You can use the same rule to configure both ingress and egress in a network policy. To achieve this, take the following steps:
- Create the access-demo4.yaml file.
vim access-demo4.yaml
File content:
apiVersion: networking.k8s.io/v1 kind: NetworkPolicy metadata: name: access-demo4 namespace: default spec: policyTypes: - Ingress - Egress podSelector: # The rule takes effect for pods with the role=db label. matchLabels: role: db ingress: # This is an ingress rule. - from: - podSelector: # Only allows the access of the pods labeled with role=frontend. matchLabels: role: frontend ports: # Only TCP can be used to access port 6379. - protocol: TCP port: 6379 egress: # This is an egress rule. - to: - podSelector: # The rule takes effect for pods with the role=web label. matchLabels: role: web - Run the following command to create the network policy defined the access-demo4.yaml file:
kubectl apply -f access-demo4.yaml
Expected output:
networkpolicy.networking.k8s.io/access-demo4 created
- Create the access-demo4.yaml file.
Creating a Network Policy on the Console
- Log in to the CCE console and click the cluster name to access the cluster console.
- Choose Policies in the navigation pane, click the Network Policies tab, and click Create Network Policy in the upper right corner.
- Policy Name: Specify a network policy name.
- Namespace: Select a namespace in which the network policy is applied.
- Selector: Enter a label, select the pod to be associated, and click Add. You can also click Reference Workload Label to use the label of an existing workload.
- Inbound Rule: Click
 to add an inbound rule. For details about parameter settings, see Table 1.

Table 1 Adding an inbound rule Parameter
Description
Protocol & Port
Select the protocol type and port. Currently, TCP and UDP are supported.
Source Namespace
Select a namespace whose objects can be accessed. If this parameter is not specified, the object belongs to the same namespace as the current policy.
Source Pod Label
Allow accessing the pods with this label. If this parameter is not specified, all pods in the namespace can be accessed.
- Outbound Rule: Click
 to add an outbound rule. For details about parameter settings, see Table 2.

Table 2 Adding an outbound rule Parameter
Description
Protocol & Port
Select the protocol type and port. Currently, TCP and UDP are supported. If this parameter is not specified, the protocol type is not limited.
Destination CIDR Block
Allow requests to be routed to a specified CIDR block (and not to the exception CIDR blocks). Separate the destination and exception CIDR blocks using a vertical bar (|). If there are multiple exception CIDR blocks, separate them using commas (,). For example, 172.17.0.0/16|172.17.1.0/24,172.17.2.0/24 indicates that 172.17.0.0/16 is accessible, but 172.17.1.0/24 and 172.17.2.0/24 are inaccessible.
Destination Namespace
Select a namespace whose objects can be accessed. If this parameter is not specified, the object belongs to the same namespace as the current policy.
Destination Pod Label
Allow accessing the pods with this label. If this parameter is not specified, all pods in the namespace can be accessed.
- Click OK.
Feedback
Was this page helpful?
Provide feedbackThank you very much for your feedback. We will continue working to improve the documentation.


