
Enabling an Alert Model
SecMaster uses models to scan log data in pipelines. If the data is not within the model range, an alert will be generated. After data access, you can enable alert models for automated threat detection.
SecMaster provides the following built-in templates to create and enable alert models:
Application-WAF Key Attack Alert, Host-Virtual Machine Lateral Connection, Network-High-Risk Port Exposure to the Outside, Network-Login Brute Force Alarm, Host-Suspected External Connection, Network-Source IP Attacking Multiple Targets, Network-Command Injection Alert, Network-Malicious External Communications, Host-Reverse Shell, Host-Malware, Application-distributed URL Traversal Attack, Application-Source IP Conducting URL Traversal, Host-High-risk Command Detection, Application-Source IP Brute-Forcing Domain Names, Host-Brute Force Crack Success, Host-Abnormal Shell, Host-Weak Password, Host-Remote Login, and Host-Rootkit Events.
Creating an Alert Model
- Log in to the management console.
- Click
 in the upper left corner of the page and choose Security & Compliance > SecMaster.
 - In the navigation pane, choose Workspaces > Management. In the workspace list, click the name of the target workspace.
Figure 1 Workspace management page

- In the navigation tree on the left, choose . On the Intelligent Modeling page that is displayed, click the Model Templates tab. The Model Template page is displayed.
Figure 2 Model Templates tab page

- In the model template list, click Details in the Operation column of the target model template. The template details page is displayed on the right.
Figure 3 Model template details

- On the details page, click Create Model in the lower right corner. The page for creating an alert model is displayed.
- On the Create Alarm Model page, configure basic information.
- Pipeline Name: Select an execution pipeline for the alert model.
Table 1 Available pipelines Alert Template
Execution Pipeline
Application-WAF Key Attack Alert
sec-waf-attack
Host-Virtual Machine Lateral Connection
sec-hss-log
Network-High-Risk Port Exposure to the Outside
sec-nip-attack
Network-Login Brute Force Alarm
sec-nip-attack
Host-Suspected External Connection
sec-hss-log
Network-Source IP Attacking Multiple Targets
sec-nip-attack
Network-Command Injection Alert
sec-nip-attack
Network-Malicious External Communications
sec-nip-attack
Host-Reverse Shell
sec-hss-alarm
Host-Malware
sec-hss-alarm
Application-Distributed URL Traversal Attack
sec-waf-access
Application-Source IP Conducting URL Traversal
sec-waf-access
Host-High-risk Command Detection
sec-hss-alarm
Application-Source IP Brute-Forcing Domain Names
sec-waf-attack
Host-Brute Force Crack Success
sec-hss-alarm
Host-Abnormal Shell
sec-hss-alarm
Host-Weak Password
sec-hss-alarm
Host-Remote Login
sec-hss-alarm
Host-Rootkit Events
sec-hss-alarm
- Retain default values of other parameters.
Figure 4 Basic Settings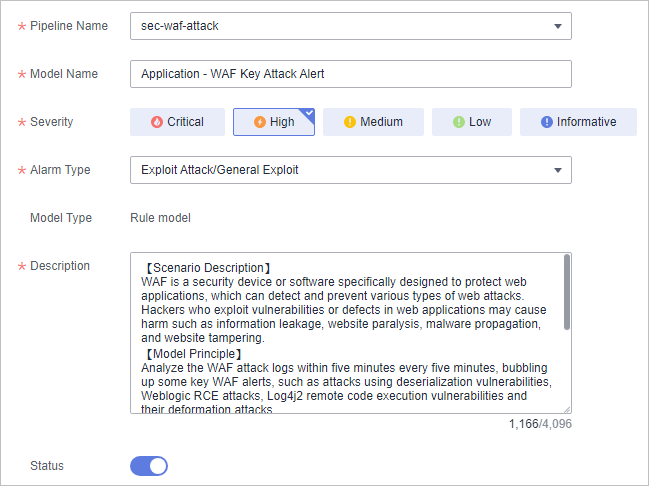
- Pipeline Name: Select an execution pipeline for the alert model.
- After the setting is complete, click Next in the lower right corner of the page. The page for setting the model logic is displayed.
- Set the model logic. You are advised to retain the default value.
For details, see Creating an Alert Model.
- After completing the basic settings, click Next in the lower right corner of the page.
- After confirming that the model is correct, click OK in the lower right corner of the page.
- Repeat 5 to 11 to create alert models with other templates.
Enabling an Alert Model
- In the navigation pane on the left, choose Threat Operations > Intelligent Modeling.
Figure 5 Available Models
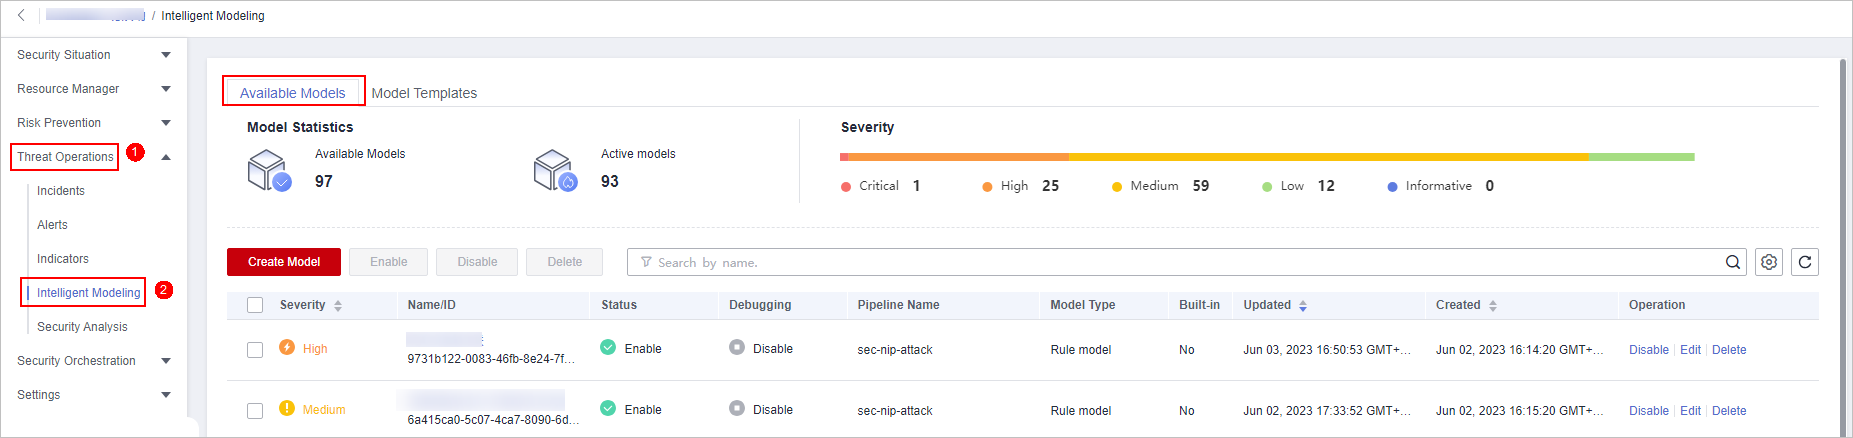
- To enable models in batches, select all models you want to enable and click Enable in the upper left corner of the list.
- If the model status changes to Enabled, the model is successfully started.
Feedback
Was this page helpful?
Provide feedbackThank you very much for your feedback. We will continue working to improve the documentation.


