
Configuring Auto Scaling for an MRS Cluster
In big data application scenarios, especially real-time data analysis and processing, the number of cluster nodes needs to be dynamically adjusted according to data volume changes to provide proper resources. The auto scaling function of MRS enables clusters to be automatically scaled out or in based on cluster load.
- Auto scaling rules: You can increase or decrease Task nodes based on real-time cluster loads. Auto scaling will be triggered when the data volume changes but there may be some delays.
- Resource plan (setting the task node quantity based on the time range): If the data volume changes periodically, you can create resource plans to resize the cluster before the data volume changes, thereby avoiding delays in increasing or decreasing resources.
You can configure either auto scaling rules or resource plans or both of them to trigger the auto scaling. This section describes how to configure auto scaling rules for MRS clusters based on service scenarios.
You can get started by reading the following topics:
- Creating a Cluster and Configuring Task Nodes
- Scenario 1: Using Auto Scaling Rules Alone
- Scenario 2: Using Resource Plans Alone
- Scenario 3: Using Auto Scaling Rules and Resource Plans Together
Creating a Cluster and Configuring Task Nodes

- The following steps use a Hadoop analysis cluster of MRS 3.1.0 as an example to describe how to quickly purchase a cluster.
- Only task node groups support auto scaling. Check whether a task node exists in the current cluster before configuring auto scaling.
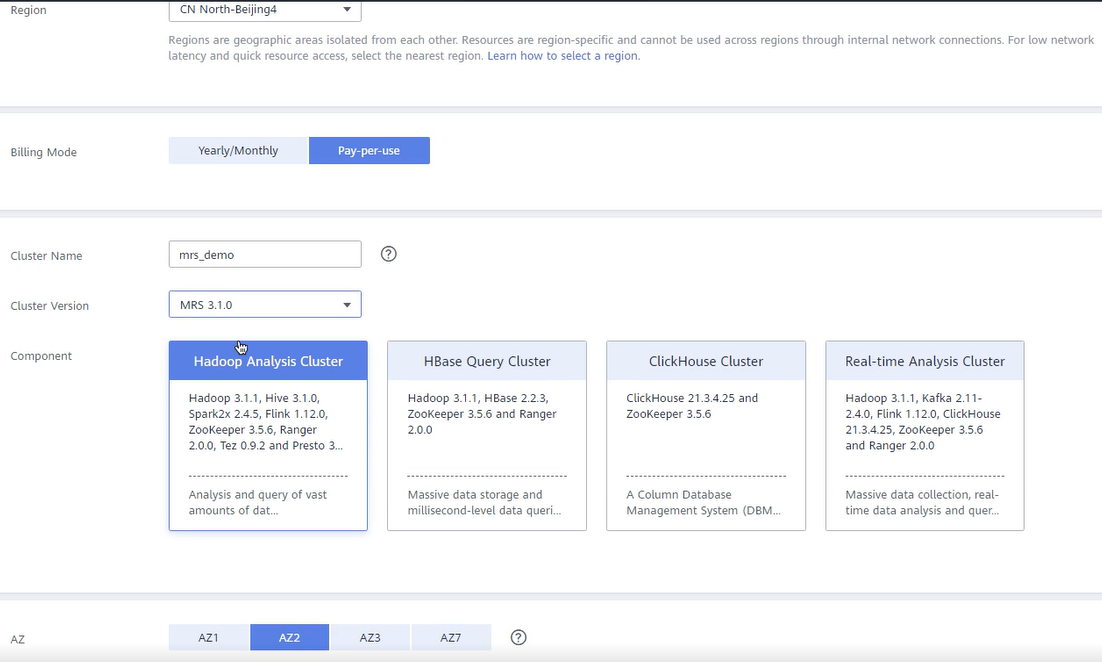
- Log in to the Huawei Cloud management console and choose Analytics > MapReduce Service. Click Buy Cluster, configure the parameters on the Quick Config tab page, and click Buy Now.
Table 1 Parameters (for reference only) Parameter
Value
Region
Select the region based on service requirements.
Billing Mode
Pay-per-use
Cluster Name
MRS_demo
Cluster Version
MRS 3.1.0
Component
Hadoop Analysis Cluster
AZ
AZ2
VPC
vpc-gggg
Subnet
subnet-64db
Enterprise Project
default
Kerberos Authentication
Disabled
Username
root/admin
Password
Set the password for logging in to the cluster management page and ECS node, for example, Test!@12345.
Confirm Password
Enter the password again.
Secure Communications
Select Enable.
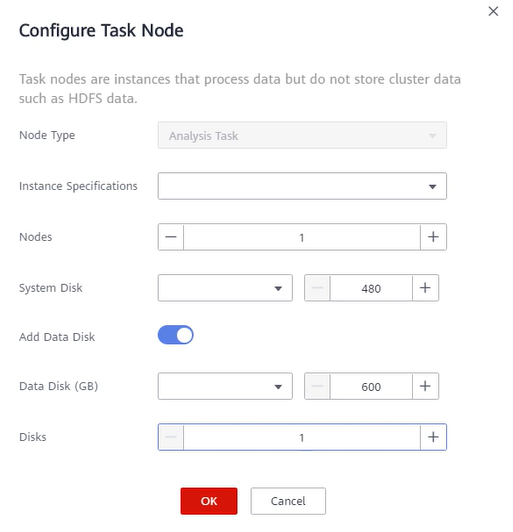
- Click the created cluster and click Nodes to check whether there is a Task node in the cluster.
- If yes, no further action is required.
- If no, go to 3.
- Configure a task node.
Scenario 1: Using Auto Scaling Rules Alone
The following is an example of the service scenario:
The number of nodes needs to be dynamically adjusted based on the Yarn resource usage. When the memory available for Yarn is less than 20%, five nodes need to be added. When the memory available for Yarn is greater than 70%, five nodes need to be reduced. The number of nodes in a task node group ranges from 1 to 10.
- Create a cluster and configure task nodes by referring to Creating a Cluster and Configuring Task Nodes.
- On the MRS console, choose Clusters > Active Clusters and click the name of the target cluster to access its details page.
- Click Nodes and click Auto Scaling in the Operation column of the task node group.
- On the Auto Scaling page, click
 to enable auto scaling and set Node Range to 1-10.
- Configure scale-out rules.
- Select Scale-out in the Auto Scaling Rule area.
- Click Add Rule next to Scale-out.
- On the Add Rule page, set the related parameters.
- Rule Name: Retain the default value, for example, default-expand-2.
- If: Select YARNMemoryAvailablePercentage and Less than from the drop-down lists, and set the percentage to 20% (for details about related metrics, see Table 2).
- Last For: Set it to 1 five-minute periods.
- Add: Set it to 5 nodes.
- Cooldown Period: Set it to 20 minutes.
- Click OK.
- Configure scale-in rules.
- Select Scale-in in the Auto Scaling Rule area.
- Click Add Rule next to Scale-in.
- On the Add Rule page, set the related parameters.
- Rule Name: Retain the default value, for example, default-shrink-2.
- If: Select YARNMemoryAvailablePercentage and Greater than from the drop-down lists, and set the percentage to 70% (for details about related indicators, see Table 2).
- Last For: Set it to 1 five-minute periods.
- Terminate: Set it to 5 nodes.
- Cooldown Period: Set it to 20 minutes.
- Click OK.

- Select I agree to authorize MRS to scale out or in nodes based on the above rule.
- Click OK.
Scenario 2: Using Resource Plans Alone
The following is an example of the service scenario:
The number of nodes needs to be increased or decreased periodically. 10 nodes are required from 10:00 to 22:00 due to heavy service traffic, and five nodes are required in other time segments.
- Create a cluster and configure task nodes by referring to Creating a Cluster and Configuring Task Nodes.
- On the MRS console, choose Clusters > Active Clusters and click the name of the target cluster to access its details page.
- Click Nodes and click Auto Scaling in the Operation column of the task node group.
- On the Auto Scaling page, enable auto scaling and configure Node Range.
- Auto Scaling: Enable.
- Node Range: 5-5.
- Click Configure Node Range for Specified Time Range under Default Range and set related parameters.
- Time Period: 10:00-22:00.
- Node Range: 10-10.

- Select I agree to authorize MRS to scale out or in nodes based on the above rule.
- Click OK.
Scenario 3: Using Auto Scaling Rules and Resource Plans Together
The following is an example of configuring both auto scaling rules and resource plans.
The following is an example of the service scenario:
Even though the service data volume for real-time processing changes regularly from 7:00 to 13:00 every day, it is still unstable. Assume that during 7:00 to 13:00, the number of required task nodes ranges from 5 to 8, and in other time ranges, the number of required task nodes ranges from 2 to 4 based on the number of tasks running on Yarn.
- Create a cluster and configure task nodes by referring to Creating a Cluster and Configuring Task Nodes.
- On the MRS console, choose Clusters > Active Clusters and click the name of the target cluster to access its details page.
- Click Nodes and click Auto Scaling in the Operation column of the task node group.
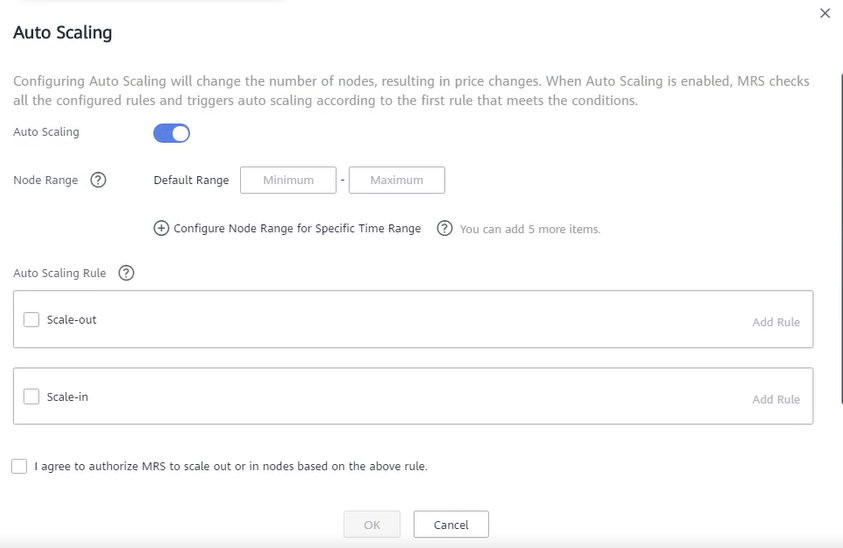
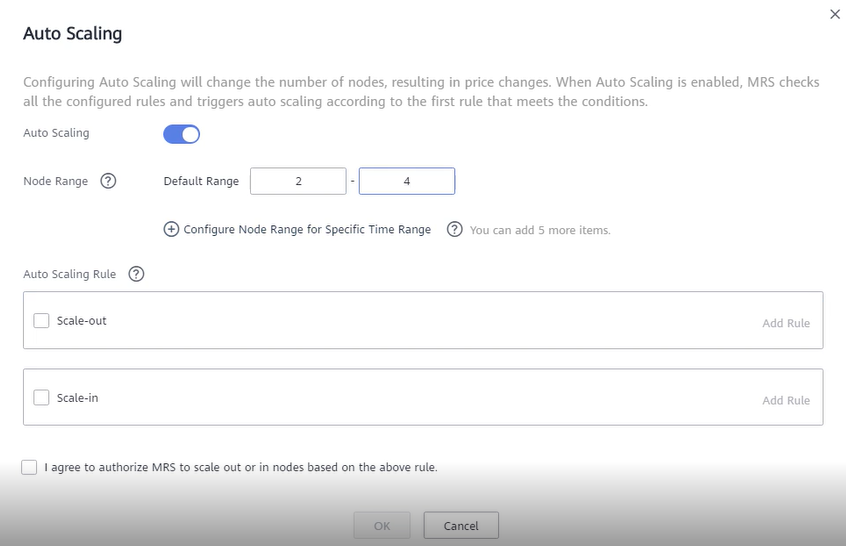
- On the Auto Scaling page, enable auto scaling, and set Node Range to 2-4.
Figure 1 Configuring auto scaling
- Configure a resource plan.
- Click Configure Node Range for Specific Time Range under Default Range.
- Configure the Time Range and Node Range parameters.
Figure 2 Auto scaling
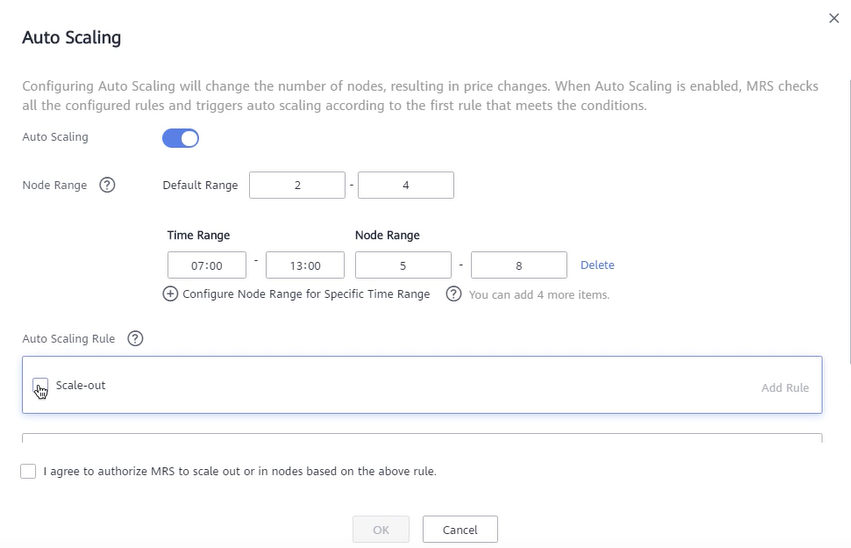
Time Range: Set it to 07:00-13:00.
Node Range: Set it to 5-8.
- Configure an auto scaling rule.
- Select Scale-out.
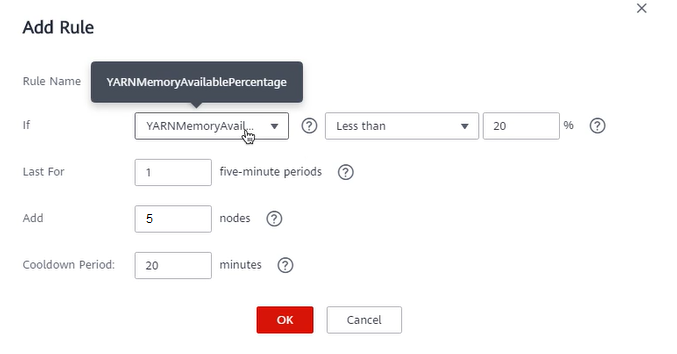
- Click Add Rule on the right.
Figure 3 Adding a rule
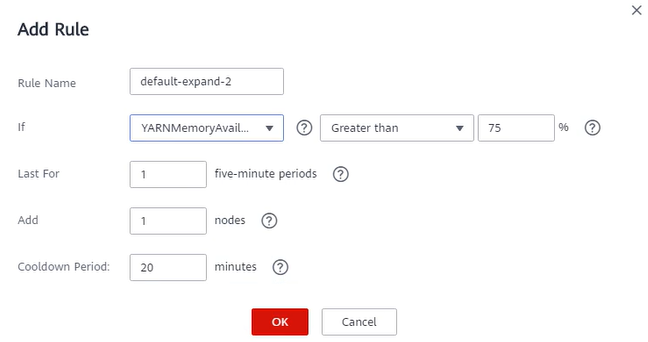
Rule Name: default-expand-2.
If: Select the rule objects and constraints from the drop-down list boxes, for example, YARNAppRunning is greater than 75.
Last For: Set it to 1 five-minute periods.
Add: Set it to 1 node.
Cooldown Period: Set it to 20 minutes.
- Click OK.
- Select I agree to authorize MRS to scale out or in nodes based on the above rule.
- Click OK.
Reference Information
- Hybrid clusters support all metrics of analysis and streaming clusters.
- The accuracy of different value types in Table 2 is as follows:
- Integer: integer
- Percentage: 0.01
- Ratio: 0.01
|
Cluster Type |
Metric |
Value Type |
Description |
|---|---|---|---|
|
Streaming cluster |
StormSlotAvailable |
Integer |
Number of available Storm slots. Value range: 0 to 2147483646. |
|
StormSlotAvailablePercentage |
Percentage |
Percentage of available Storm slots, that is, the proportion of the available slots to total slots. Value range: 0 to 100. |
|
|
StormSlotUsed |
Integer |
Number of used Storm slots. Value range: 0 to 2147483646. |
|
|
StormSlotUsedPercentage |
Percentage |
Percentage of the used Storm slots, that is, the proportion of the used slots to total slots. Value range: 0 to 100. |
|
|
StormSupervisorMemAverageUsage |
Integer |
Average memory usage of the Supervisor process of Storm. Value range: 0 to 2147483646. |
|
|
StormSupervisorMemAverageUsagePercentage |
Percentage |
Average percentage of the used memory of the Supervisor process of Storm to the total memory of the system. Value range: 0 to 100. |
|
|
StormSupervisorCPUAverageUsagePercentage |
Percentage |
Average percentage of the used CPUs of the Supervisor process of Storm to the total CPUs. Value range: 0 to 6,000. |
|
|
Analysis cluster |
YARNAppPending |
Integer |
Number of pending tasks on Yarn. Value range: 0 to 2147483646. |
|
YARNAppPendingRatio |
Ratio |
Ratio of pending tasks on Yarn, that is, the ratio of pending tasks to running tasks on Yarn. Value range: 0 to 2147483646. |
|
|
YARNAppRunning |
Integer |
Number of running tasks on Yarn. Value range: 0 to 2147483646. |
|
|
YARNContainerAllocated |
Integer |
Number of containers allocated to YARN. Value range: 0 to 2147483646. |
|
|
YARNContainerPending |
Integer |
Number of pending containers on Yarn. Value range: 0 to 2147483646. |
|
|
YARNContainerPendingRatio |
Ratio |
Ratio of pending containers on Yarn, that is, the ratio of pending containers to running containers on Yarn. Value range: 0 to 2147483646. |
|
|
YARNCPUAllocated |
Integer |
Number of virtual CPUs (vCPUs) allocated to Yarn. Value range: 0 to 2147483646. |
|
|
YARNCPUAvailable |
Integer |
Number of available vCPUs on Yarn. Value range: 0 to 2147483646. |
|
|
YARNCPUAvailablePercentage |
Percentage |
Percentage of available vCPUs on Yarn, that is, the proportion of available vCPUs to total vCPUs. Value range: 0 to 100. |
|
|
YARNCPUPending |
Integer |
Number of pending vCPUs on Yarn. Value range: 0 to 2147483646. |
|
|
YARNMemoryAllocated |
Integer |
Memory allocated to Yarn. The unit is MB. Value range: 0 to 2147483646. |
|
|
YARNMemoryAvailable |
Integer |
Available memory on Yarn. The unit is MB. Value range: 0 to 2147483646. |
|
|
YARNMemoryAvailablePercentage |
Percentage |
Percentage of available memory on Yarn, that is, the proportion of available memory to total memory on Yarn. Value range: 0 to 100. |
|
|
YARNMemoryPending |
Integer |
Pending memory on Yarn. Value range: 0 to 2147483646. |
|
Parameter |
Description |
|---|---|
|
Time range |
Start time and end time of a resource plan are accurate to minutes, with the value ranging from 00:00 to 23:59. For example, if a resource plan starts at 8:00 and ends at 10:00, set this parameter to 8:00-10:00. The end time must be at least 30 minutes later than the start time. |
|
Node range |
The number of nodes in a resource plan ranges from 0 to 500. In the time range specified in the resource plan, if the number of task nodes is less than the specified minimum number of nodes, it will be increased to the specified minimum value of the node range at a time. If the number of task nodes is greater than the maximum number of nodes specified in the resource plan, the auto scaling function reduces the number of task nodes to the maximum value of the node range at a time. The minimum number of nodes must be less than or equal to the maximum number of nodes. |
Feedback
Was this page helpful?
Provide feedbackThank you very much for your feedback. We will continue working to improve the documentation.


