
Step 2: Create a RocketMQ Instance
Your RocketMQ instance will be deployed in physical isolation and exclusively used by you. You can customize the computing capabilities and storage space of an instance based on service requirements.
Prerequisites
Before creating a RocketMQ instance, ensure that a VPC and a security group are available. If no VPC or security group is available, create them by referring to Step 1: Prepare the Environment.
Procedure
- Go to the Buy Instance page.
- Select a billing mode.
- Select a region closest to your application to reduce latency and accelerate access.
- Select a project from the drop-down list.
- Select one AZ or at least three AZs.
- Configure the following instance parameters:
- Instance Name: Enter a name for the instance.
- Enterprise Project: Select an enterprise project based on service requirements.
- Specifications: Select Default or Custom.
If you select Default and the version is 4.8.0, specify the flavor, number of brokers, and broker storage space to be supported by the RocketMQ instance based on the site requirements.
- Instance Type: Currently, only cluster instances are supported.
- CPU Architecture: Currently, only x86 architecture is supported.
- Broker Flavor: Select the required flavor.
- Brokers: Select the required number of brokers.
- Storage Space per Broker: Specify the disk type and storage space of each broker.
The disk type can be high I/O or ultra-high I/O. For details on how to select a disk type, see Disk Types and Disk Performance.
Figure 1 Default specifications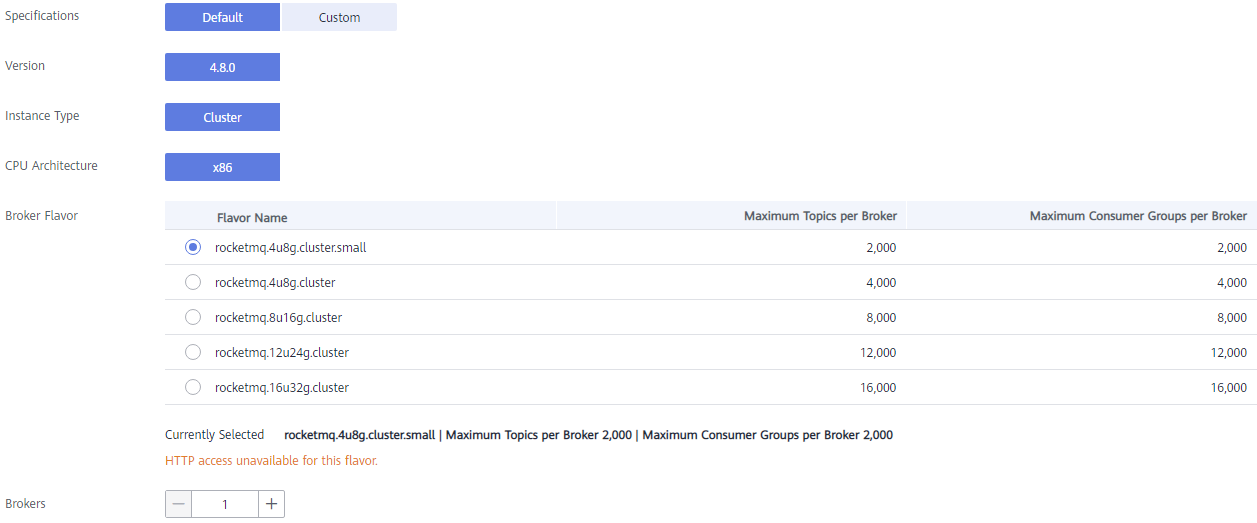
If you select Custom, the system calculates the number of brokers and broker storage space for different flavors based on your specified number of topics, peak creation TPS, peak retrieval TPS, average message size, and number of messages created every day. You can select one of the recommended flavors as required.
Figure 2 Specification calculation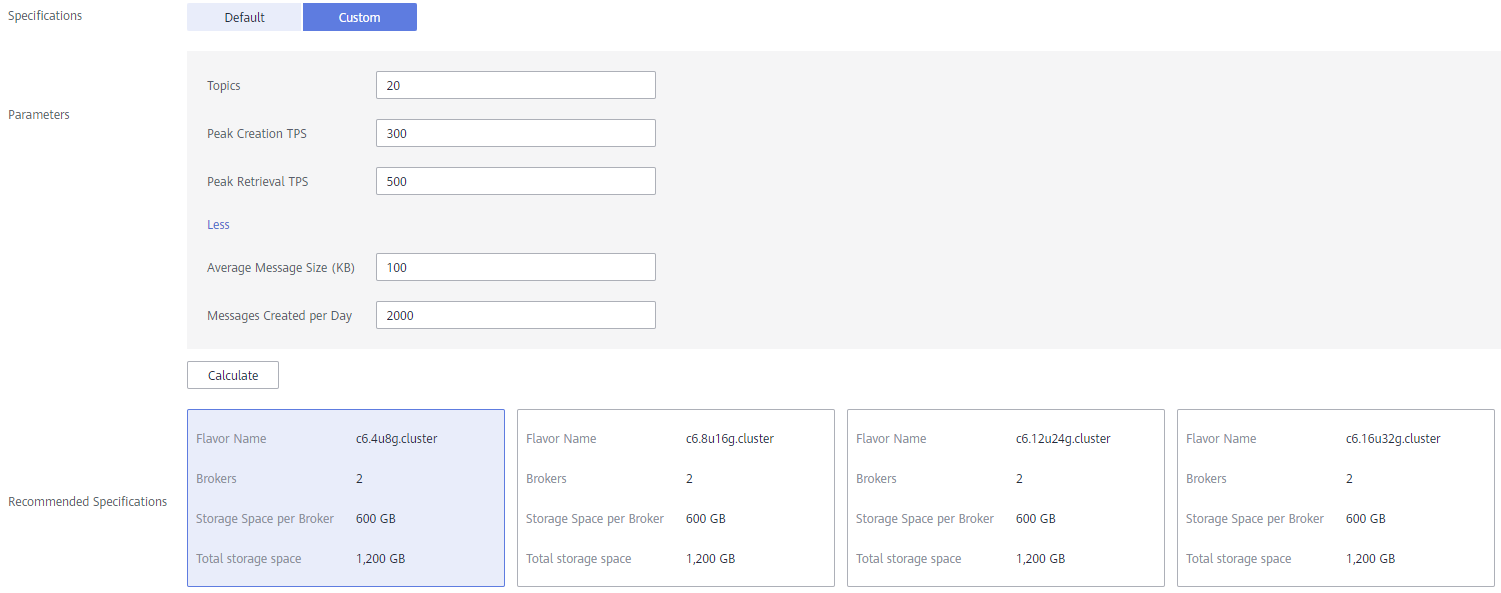
- Configure the instance network parameters.
- Select a VPC and a subnet.
A VPC provides an isolated virtual network for your RocketMQ instances. You can configure and manage the network.

After the RocketMQ instance is created, its VPC and subnet cannot be changed.
- Select a security group.
A security group is a set of rules for accessing a RocketMQ instance.
- Select a VPC and a subnet.
- Select the required duration.
This parameter is displayed only if the billing mode is yearly/monthly.
- Click More Settings to configure more parameters.
- Configure public access.
Public access is disabled by default. You can enable it or keep it disabled as required.
After public access is enabled, configure an IPv4 EIP for each broker.
Figure 3 Configuring public access
- Configure SSL.
This parameter indicates whether to enable SSL authentication when a client connects to the RocketMQ instance. After SSL is enabled, data will be encrypted before transmission for higher security, but performance will be degraded.
This setting cannot be changed after the instance is created. If you want to use a different SSL setting after the instance is created, you must create another instance.
- Specify tags.
Tags are used to identify cloud resources. When you have many cloud resources of the same type, you can use tags to classify cloud resources by dimension (for example, by usage, owner, or environment).
- If you have created predefined tags, select a predefined pair of tag key and value. You can click View predefined tags to go to the Tag Management Service (TMS) console and view or create tags.
- You can also create new tags by entering Tag key and Tag value.
Up to 20 tags can be added to each RocketMQ instance.
- Enter a description of the instance.
- Configure public access.
- Click Buy.
- Confirm the instance information and submit the request.
- Return to the instance list and check whether the RocketMQ instance has been created.
It takes 3 to 15 minutes to create an instance. During this period, the instance status is Creating.
- If the instance is created successfully, its status changes to Running.
- If the instance fails to be created, view Instance Creation Failures. Delete the instance and create another one. If the instance creation fails again, contact customer service.
Feedback
Was this page helpful?
Provide feedbackThank you very much for your feedback. We will continue working to improve the documentation.


