Deploying an Application in a CCE Cluster Using a Helm Chart
Helm is a package manager that streamlines the deployment, upgrade, and management of Kubernetes applications. Helm uses charts, which are a packaging format that defines Kubernetes resources, to package all components deployed by Kubernetes. This includes application code, dependencies, configuration files, and deployment instructions. By doing so, Helm enables the distribution and deployment of complex Kubernetes applications in a more efficient, consistent manner. Moreover, Helm facilitates application upgrade and rollback, simplifying application lifecycle management.
This section describes how to deploy a WordPress workload using Helm.

Procedure
|
Step |
Description |
|---|---|
|
Sign up for a HUAWEI ID. |
|
|
Obtain the required permissions for your account when you use the CCE service in the current region for the first time. |
|
|
Create a CCE cluster to provide Kubernetes services. |
|
|
Create a node in the cluster to run your containerized applications. |
|
|
Before using Helm charts, access the cluster on a VM using kubectl. |
|
|
Install Helm on the VM with kubectl installed. |
|
|
Create a WordPress workload in the cluster using the Helm installation command and create a Service for the workload for Internet access. |
|
|
Access the WordPress website from the Internet to start your blog. |
|
|
To avoid additional charges, delete the cluster resources promptly if you no longer require them after practice. |
Preparations
- Before you start, sign up for a HUAWEI ID. For details, see Signing up for a HUAWEI ID and Enabling Huawei Cloud Services.
Step 1: Enable CCE and Perform Authorization
When you first log in to the CCE console, CCE automatically requests permissions to access related cloud services (compute, storage, networking, and monitoring) in the region where the cluster is deployed. If you have authorized CCE in the deployment region, skip this step.
- Log in to the CCE console using your HUAWEI ID.
- Click
 in the upper left corner and select a region.
 - If this is your first login to the CCE console in the selected region, the Authorization Statement dialog box will appear. Read it carefully and click OK.
After you agree to delegate permissions, CCE uses IAM to create an agency named cce_admin_trust. This agency is granted Tenant Administrator permissions for the resources of other cloud services (excluding IAM). These permissions are required for CCE to access dependent cloud services and are only valid for the current region. You can view the authorization records in each region by navigating to the IAM console, choosing Agencies in the navigation pane, and clicking cce_admin_trust. For more details, see Cloud Service Agency.
To ensure CCE can run normally, do not delete or modify the cce_admin_trust agency, as CCE requires Tenant Administrator permissions.

CCE has updated the cce_admin_trust agency permissions to enhance security while accommodating dependencies on other cloud services. The new permissions no longer include Tenant Administrator permissions. This update is only available in certain regions. If your clusters are of v1.21 or later, a message will appear on the console asking you to re-grant permissions. After re-granting, the cce_admin_trust agency will be updated to include only the necessary cloud service permissions, with the Tenant Administrator permissions removed.
When creating the cce_admin_trust agency, CCE creates a custom policy named CCE admin policies. Do not delete this policy.
Step 2: Create a Cluster
- Log in to the CCE console and click Buy Cluster.
- Configure basic cluster parameters.
This example describes only mandatory parameters. You can keep default settings for most other parameters. For details, see Buying a CCE Standard/Turbo Cluster.
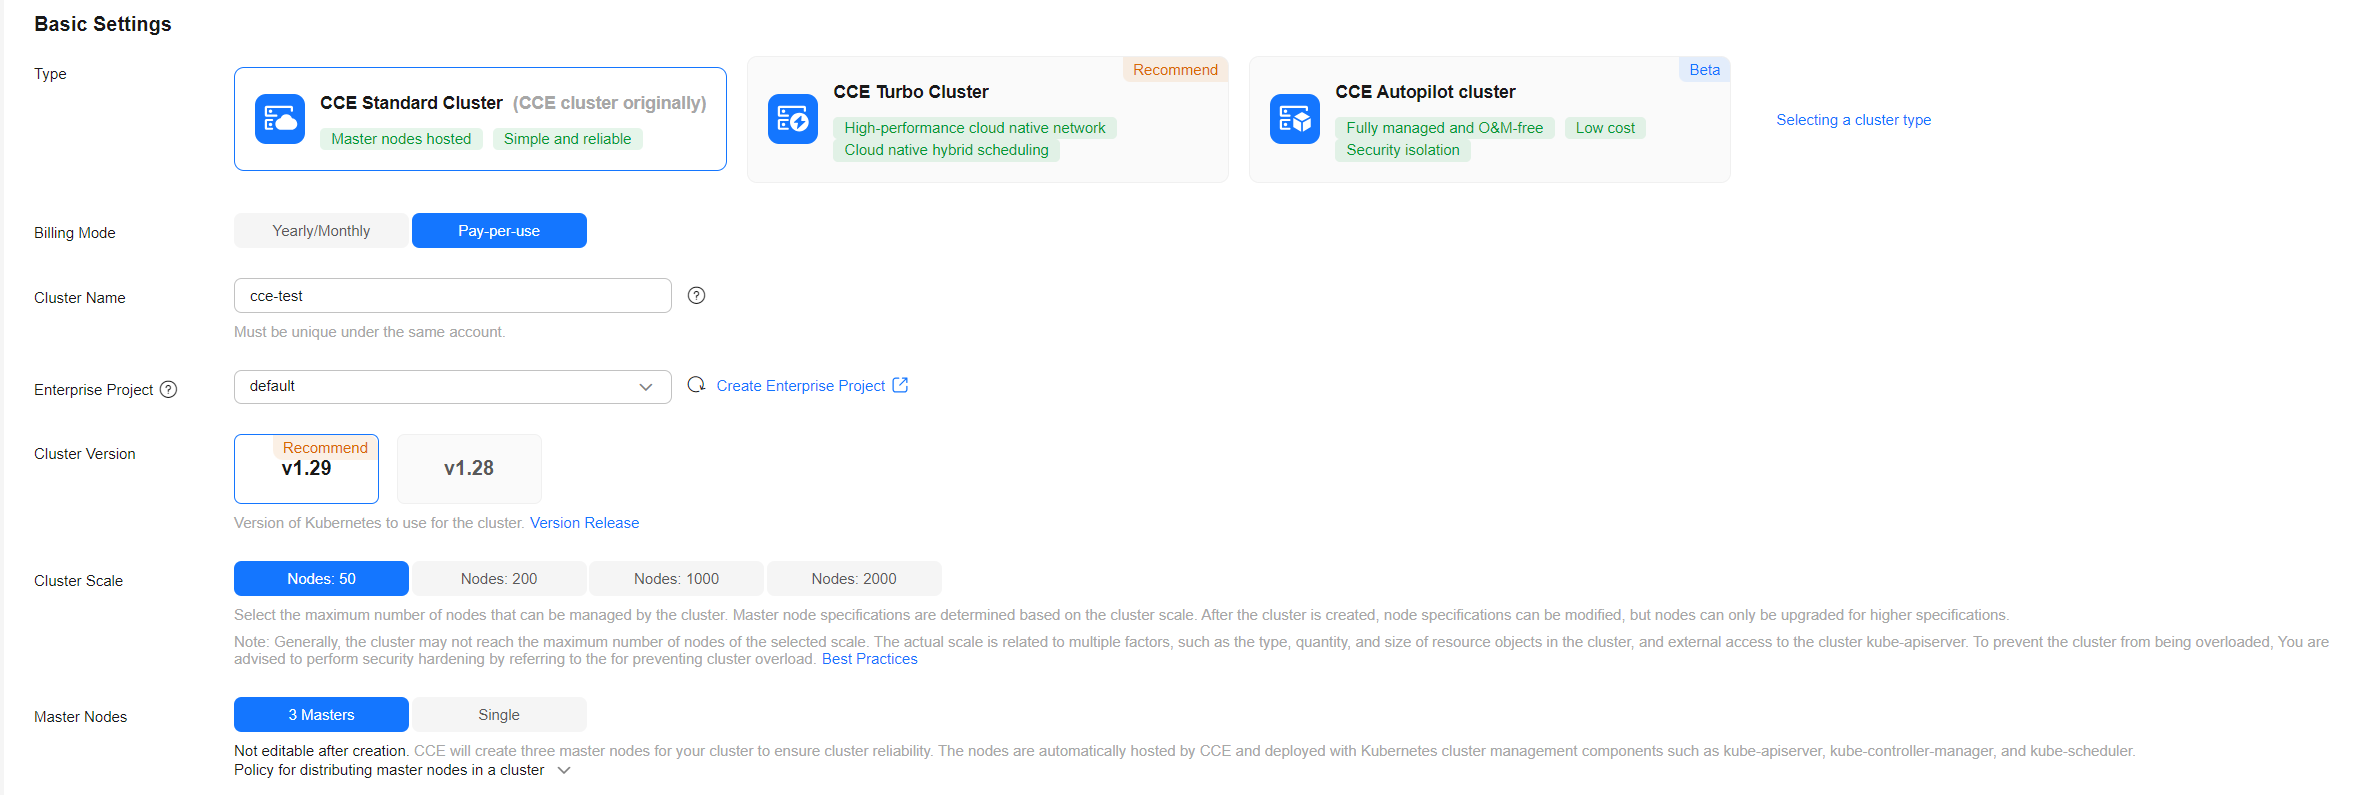
Parameter
Example
Description
Type
CCE Standard Cluster
CCE supports multiple cluster types to meet diverse needs, including highly reliable, highly secure, commercial containers.
You can select CCE Standard Cluster or CCE Turbo Cluster as required.
- CCE standard clusters provide highly reliable, highly secure, commercial containers.
- CCE Turbo clusters use high-performance cloud native networks and support cloud native hybrid scheduling. These clusters offer improved resource utilization and are suitable for a wider range of scenarios.
For more details, see Comparison Between Cluster Types.
Billing Mode
Pay-per-use
Select a billing mode for the cluster.
- Yearly/Monthly: a prepaid billing mode. Resources are billed based on how long you will need the resources for. This mode is more cost-effective when resource usage periods are predictable.
If you choose this option, select the desired duration and decide whether to enable automatic renewal (monthly or yearly). Monthly subscriptions renew automatically every month, and yearly subscriptions renew automatically every year.
- Pay-per-use: a postpaid billing mode. Resources are billed based on actual usage duration. This mode is suitable for flexible scenarios where you may need to provision or delete resources at any time.
For more details, see Billing Modes.
Cluster Name
cce-test
Enter a name for the cluster.
Enterprise Project
default
Enterprise projects facilitate project-level management and grouping of cloud resources and users.
This parameter is only displayed for enterprise users who have enabled enterprise projects.
Cluster Version
v1.29 (recommended)
Select the latest Kubernetes commercial release to benefit from new, reliable, and production-ready features. CCE offers multiple Kubernetes versions.
Cluster Scale
Nodes: 50
This parameter controls the maximum number of worker nodes the cluster can manage. Configure it as needed. After the cluster is created, it can be scaled out, but it cannot be scaled in.
Master Nodes
3 Masters
Select the number of master nodes, also known as control plane nodes. These nodes are hosted on CCE and run Kubernetes components like kube-apiserver, kube-controller-manager, and kube-scheduler.
- Multiple: Three master nodes will be created to ensure high availability.
- Single: Only one master node will be created in your cluster.
This setting cannot be changed after the cluster is created.
- Configure network parameters.
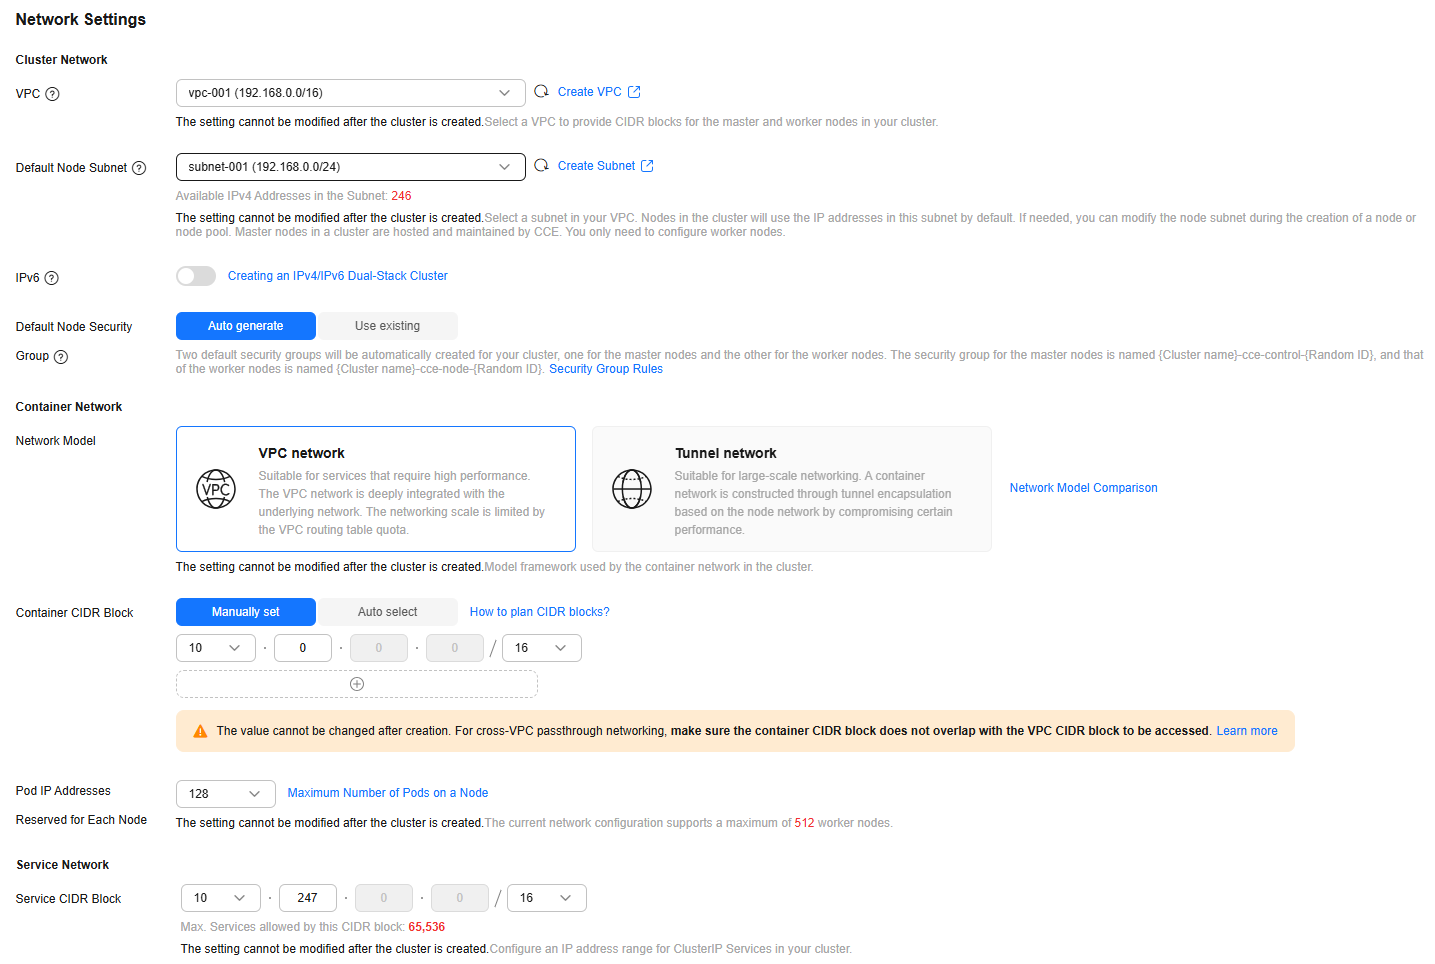
Parameter
Example
Description
VPC
vpc-001
Select a VPC for the cluster.
If no VPC is available, click Create VPC to create one. After creating the VPC, click the refresh icon. For details, see Creating a VPC and Subnet.
Default Node Subnet
subnet-001
Select a subnet. Nodes in the cluster will be assigned IP addresses from this subnet.
Network Model
VPC network
Select VPC network or Tunnel network. The default value is VPC network.
For details about the differences between container network models, see Container Networks.
Container CIDR Block
Manually set (10.0.0.0/16)
Specify the container CIDR block. The CIDR block determines how many containers you can deploy in the cluster. You can select Manually set or Auto select.
Pod IP Addresses Reserved for Each Node
128
Specify the number of allocatable container IP addresses (the alpha.cce/fixPoolMask parameter) on each node. This determines the maximum number of pods that can be created on each node.
Service CIDR Block
10.247.0.0/16
Configure the cluster-wide IP address range. This controls how many Services can be created. This setting cannot be changed later.
- Click Next: Select Add-on. On the page displayed, select the add-ons to be installed during cluster creation.
This example only includes mandatory add-ons, which are installed automatically.

- Click Next: Configure Add-on. No setup is needed for the default add-ons.
- Click Next: Confirm Settings, check the displayed cluster resource list, and click Submit.
Wait for the cluster to be created. It takes approximately 5 to 10 minutes.
The newly created cluster in the Running state with zero nodes will be displayed on the Clusters page.
Figure 1 Cluster created
Step 3: Create a Node Pool and Nodes
- Log in to the CCE console and click the cluster name to access the cluster console.
- In the navigation pane, choose Nodes. On the Node Pools tab, click Create Node Pool in the upper right corner.
- Configure the node pool parameters.
This example describes only mandatory parameters. You can keep default settings for most other parameters. For details, see Creating a Node Pool.
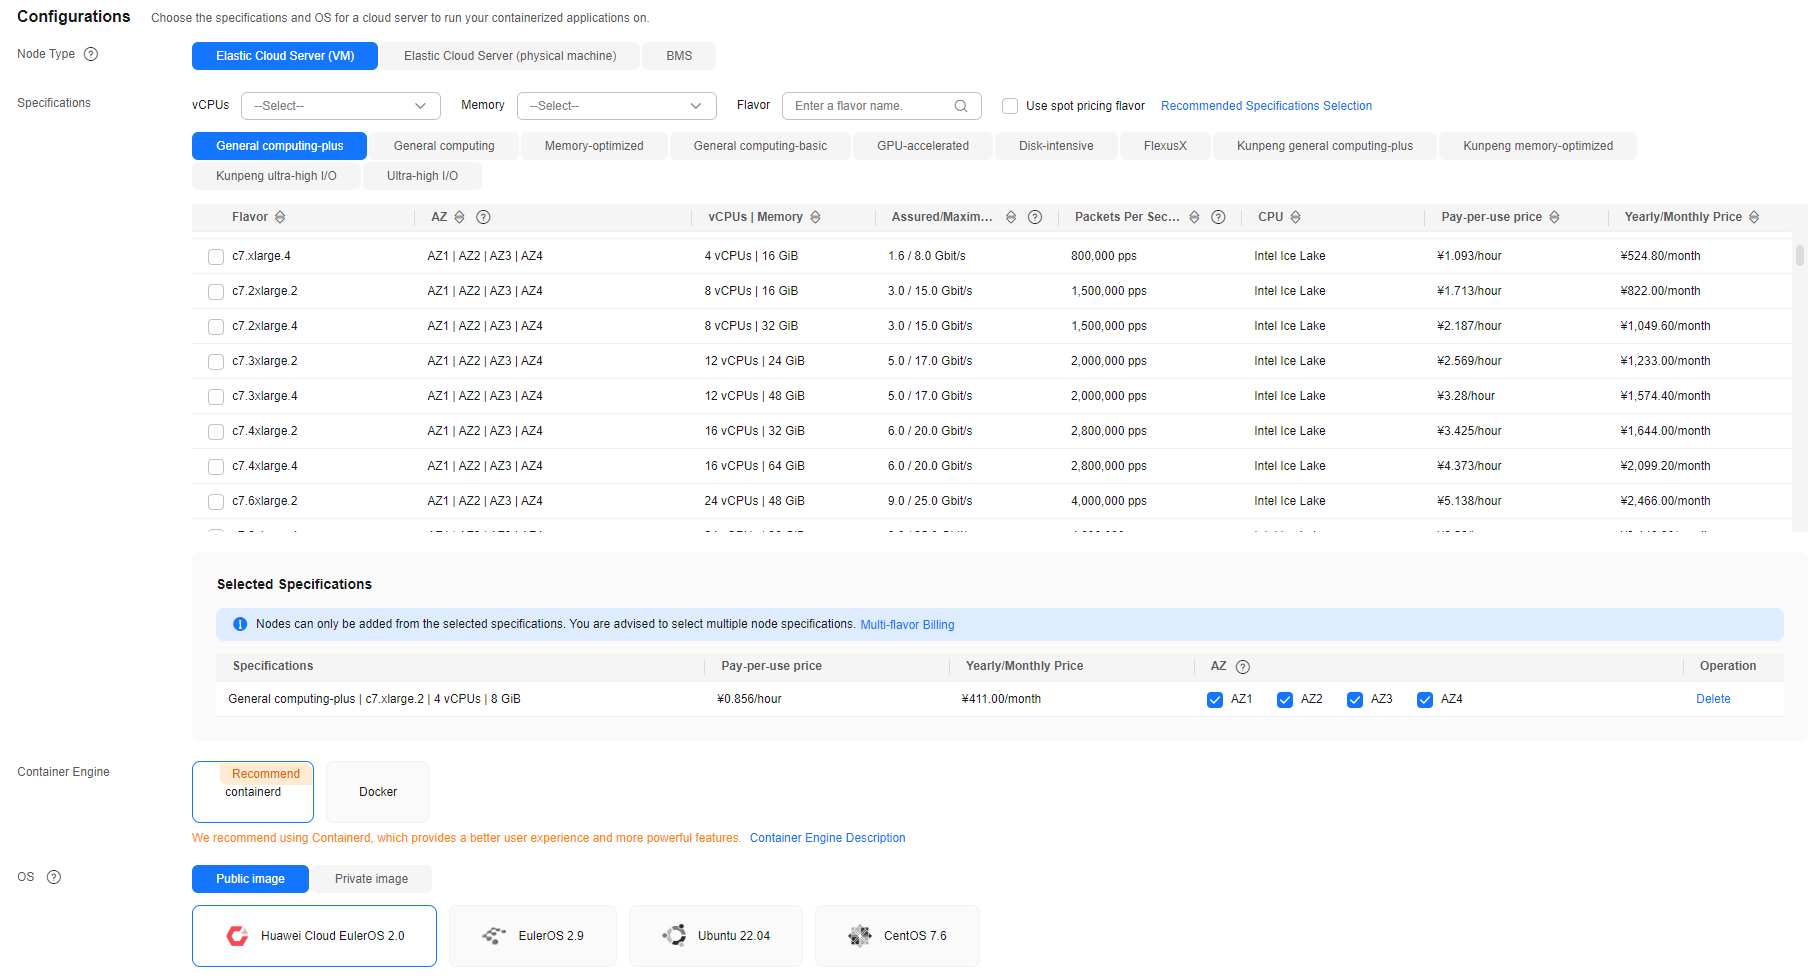
Parameter
Example
Description
Node Type
Elastic Cloud Server (VM)
Select a node type based on service requirements. The available node flavors will then be displayed in the Specifications area for you to choose from.
Specifications
General computing-plus
4 vCPUs | 8 GiB
Select a node flavor that best fits your service needs.
- In this example, there are no specific requirements for memory or GPU resources. General computing-plus or general computing nodes are recommended.
- General computing-plus nodes use dedicated vCPUs and next-generation network acceleration engines to provide strong compute and network performance.
- General computing nodes provide a balance of compute, memory, and network resources and a baseline level of vCPU performance with the ability to burst above the baseline.
- For optimal cluster component performance, choose a node with at least 4 vCPUs and 8 GiB of memory.
Container Engine
containerd
Select a container engine based on service requirements. For details about the differences between container engines, see Container Engines.
OS
Huawei Cloud EulerOS 2.0
Select an OS for the nodes.
Login Mode
A custom password
- Password: Set and confirm a password for node login. The default username is root.
Keep the password secure. It cannot be retrieved if forgotten.
- Key Pair: Select a key pair for node login and confirm that you have the key file. Without this file, you will not be able to log in.
Key pairs are used for identity authentication when you remotely access nodes. If you do not have a key pair, click Create Key Pair. For details, see Creating a Key Pair on the Management Console.
- In this example, there are no specific requirements for memory or GPU resources. General computing-plus or general computing nodes are recommended.
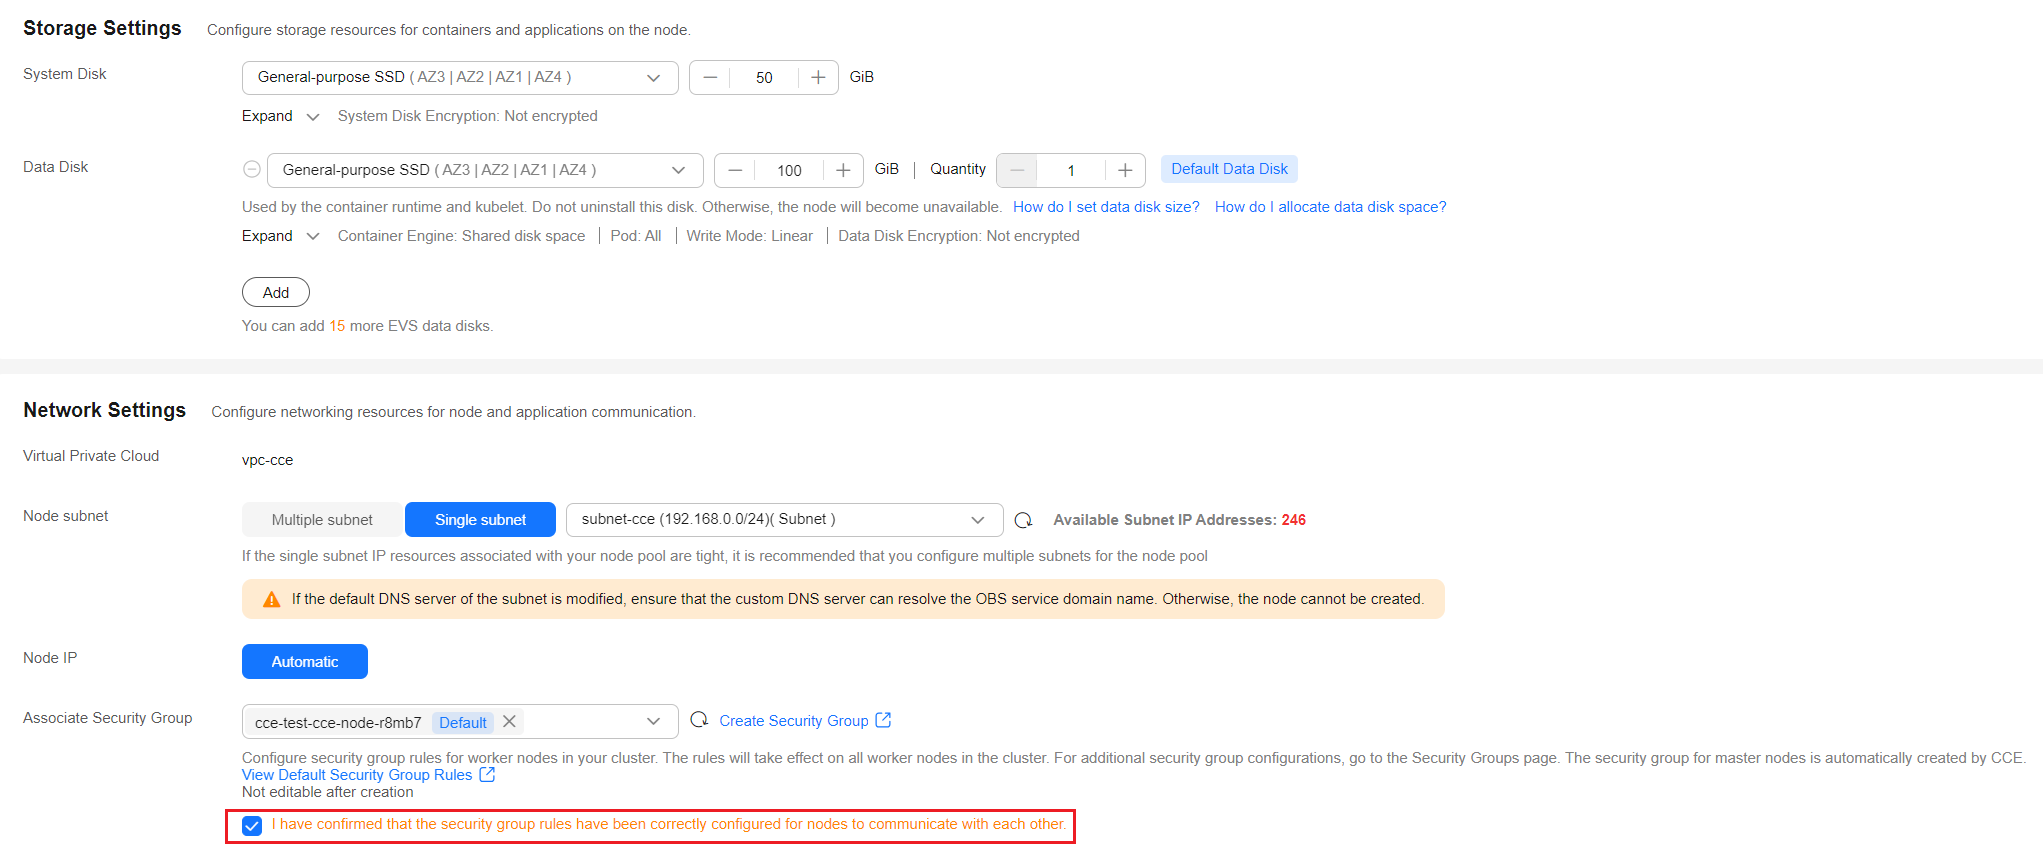
- Configure parameters in Storage Settings and Network Settings. In this example, keep the default settings. Select I have confirmed that the security group rules have been correctly configured for nodes to communicate with each other. and click Next: Confirm.
- Review the node specifications, read and confirm the instructions on the page, and click Submit.
- Locate the newly created node pool and click Scaling. The node pool initially contains zero nodes.

- Set the number of nodes to add to 2. This will create two more nodes in the node pool.
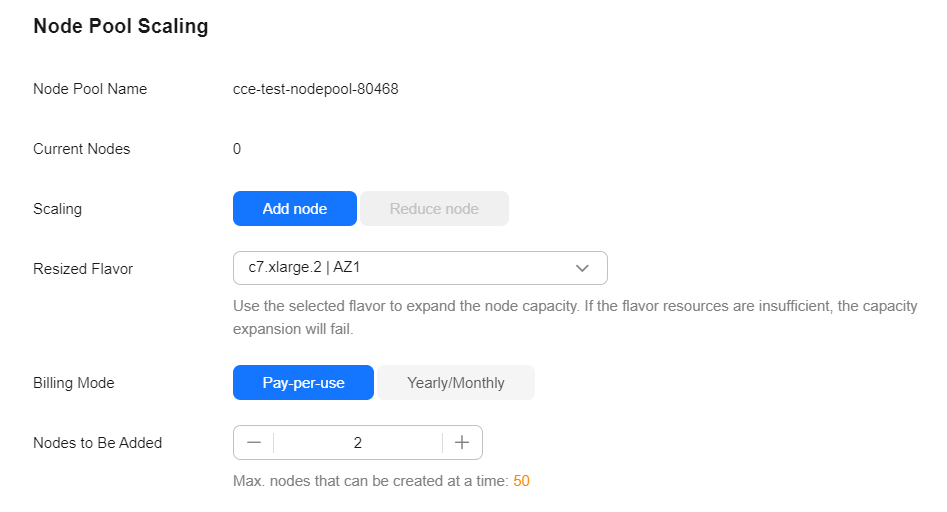
- Wait for the nodes to be created. It takes approximately 5 to 10 minutes.

Step 4: Access the Cluster Using kubectl

You need to create an ECS bound with an EIP in the same VPC as the cluster first.
- Install kubectl on the ECS.
You can check whether kubectl has been installed by running kubectl version. If kubectl has been installed, you can skip this step.
The Linux environment is used as an example to describe how to install and configure kubectl. For more installation methods, see kubectl.
- Download kubectl.
cd /home
curl -LO https://dl.k8s.io/release/{v1.29.0}/bin/linux/amd64/kubectl
{v1.29.0} specifies the version. You can replace it as required.
- Install kubectl.
chmod +x kubectl
mv -f kubectl /usr/local/bin
- Download kubectl.
- Configure a credential for kubectl to access the Kubernetes cluster.
- Log in to the CCE console and click the cluster name to access the cluster console. Choose Overview in the navigation pane.
- On the page displayed, locate the Connection Information area, click Configure next to kubectl, and view the kubectl connection information.
- In the window that slides out from the right, locate the Download the kubeconfig file area, select Intranet access for Current data, and download the corresponding configuration file.
- Log in to the VM where the kubectl client has been installed and copy and paste the configuration file (for example, kubeconfig.yaml) downloaded in the previous step to the /home directory.
- Save the kubectl authentication file to the configuration file in the $HOME/.kube directory.
cd /home mkdir -p $HOME/.kube mv -f kubeconfig.yaml $HOME/.kube/config - Run the kubectl command to see whether the cluster can be accessed.
For example, to view the cluster information, run the following command:
kubectl cluster-info
Information similar to the following is displayed:
Kubernetes master is running at https://*.*.*.*:5443
CoreDNS is running at https://*.*.*.*:5443/api/v1/namespaces/kube-system/services/coredns:dns/proxy
To further debug and diagnose cluster problems, use 'kubectl cluster-info dump'.
Step 5: Install Helm
This section uses Helm v3.7.0 as an example. If other versions are needed, see Helm.
- Download the Helm client to a VM in a cluster.
wget https://get.helm.sh/helm-v3.7.0-linux-amd64.tar.gz
- Decompress the Helm package.
tar -xzvf helm-v3.7.0-linux-amd64.tar.gz
- Copy and paste Helm to the system path, for example, /usr/local/bin/helm.
mv linux-amd64/helm /usr/local/bin/helm
- Check the Helm version.
helm version
version.BuildInfo{Version:"v3.7.0",GitCommit:"eeac83883cb4014fe60267ec6373570374ce770b",GitTreeState:"clean",GoVersion:"g01.16.8"}
Step 6: Deploy the Template
This section uses the WordPress template as an example.
- Add the official WordPress repository.
helm repo add bitnami https://charts.bitnami.com/bitnami
- Run the following commands to create a WordPress workload:
helm install myblog bitnami/wordpress \
    --set mariadb.primary.persistence.enabled=true \
    --set mariadb.primary.persistence.storageClass=csi-disk \
    --set mariadb.primary.persistence.size=10Gi \
    --set persistence.enabled=false
The custom instance name is specified by myblog. The remaining parameters serve the following functions:
- Persistent storage volumes are used by the MariaDB database that is connected to WordPress to store data. StorageClass is used to automatically create persistent storage. The EVS disk type (csi-disk) is used, with a size of 10 GiB.
- WordPress requires no data persistence, so you can set persistence.enabled to false for the PV.
The command output is as follows:
coalesce.go:223: warning: destination for mariadb.networkPolicy.egressRules.customRules is a table. Ignoring non-table value ([])
NAME: myblog
LAST DEPLOYED: Mon Mar 27 11:47:58 2023
NAMESPACE: default
STATUS: deployed
REVISION: 1
TEST SUITE: None
NOTES:
CHART NAME: wordpress
CHART VERSION: 15.2.57
APP VERSION: 6.1.1

** Be patient while the chart is being deployed.**

Your WordPress site can be accessed through the following DNS name from within your cluster:

    myblog-wordpress.default.svc.cluster.local (port 80)

To access your WordPress site from outside the cluster, follow the steps below:

1. Get the WordPress URL by running these commands:

  NOTE: It may take a few minutes for the LoadBalancer IP to be available.
        Watch the status with: 'kubectl get svc --namespace default -w myblog-wordpress'

   export SERVICE_IP=$(kubectl get svc --namespace default myblog-wordpress --template "{{ range (index .status.loadBalancer.ingress 0) }}{{ . }}{{ end }}")
   echo "WordPress URL: http://$SERVICE_IP/"
   echo "WordPress Admin URL: http://$SERVICE_IP/admin"

2. Open a browser and access WordPress using the obtained URL.

3. Log in with the following credentials to see your blog:

  echo Username: user
  echo Password: $(kubectl get secret --namespace default myblog-wordpress -o jsonpath="{.data.wordpress-password}" | base64 -d)
Step 7: Access WordPress
- Modify the WordPress Service configuration.
To use a LoadBalancer Service in CCE, you need to configure it with additional annotations. Unfortunately, bitnami/wordpress does not come with this configuration, so you will have to modify it manually.
kubectl edit svc myblog-wordpressAdd kubernetes.io/elb.autocreate and kubernetes.io/elb.class to metadata.annotations and save the changes. These two annotations are used to create a shared load balancer, which allows access to WordPress via the EIP of the load balancer.
apiVersion: v1 kind: Service metadata: name: myblog-wordpress namespace: default annotations: kubernetes.io/elb.autocreate: '{ "type": "public", "bandwidth_name": "myblog-wordpress", "bandwidth_chargemode": "bandwidth", "bandwidth_size": 5, "bandwidth_sharetype": "PER", "eip_type": "5_bgp" }' kubernetes.io/elb.class: union spec: ports: - name: http ... - Check the Service.
kubectl get svc
If information similar to the following is displayed, the workload's access mode has been configured. You can use the LoadBalancer Service to access the WordPress workload from the Internet. **.**.**.** specifies the EIP of the load balancer, and 80 indicates the access port.
NAME               TYPE           CLUSTER-IP       EXTERNAL-IP   PORT(S)          AGE
kubernetes         ClusterIP      10.247.0.1       <none>        443/TCP          3d
myblog-mariadb     ClusterIP      10.247.202.20    <none>        3306/TCP         8m
myblog-wordpress   LoadBalancer   10.247.130.196   **.**.**.**   80:31540/TCP   8m
- Access WordPress.
- To access the WordPress web page, enter <EIP of the load balancer>:80 in the address box of a browser.
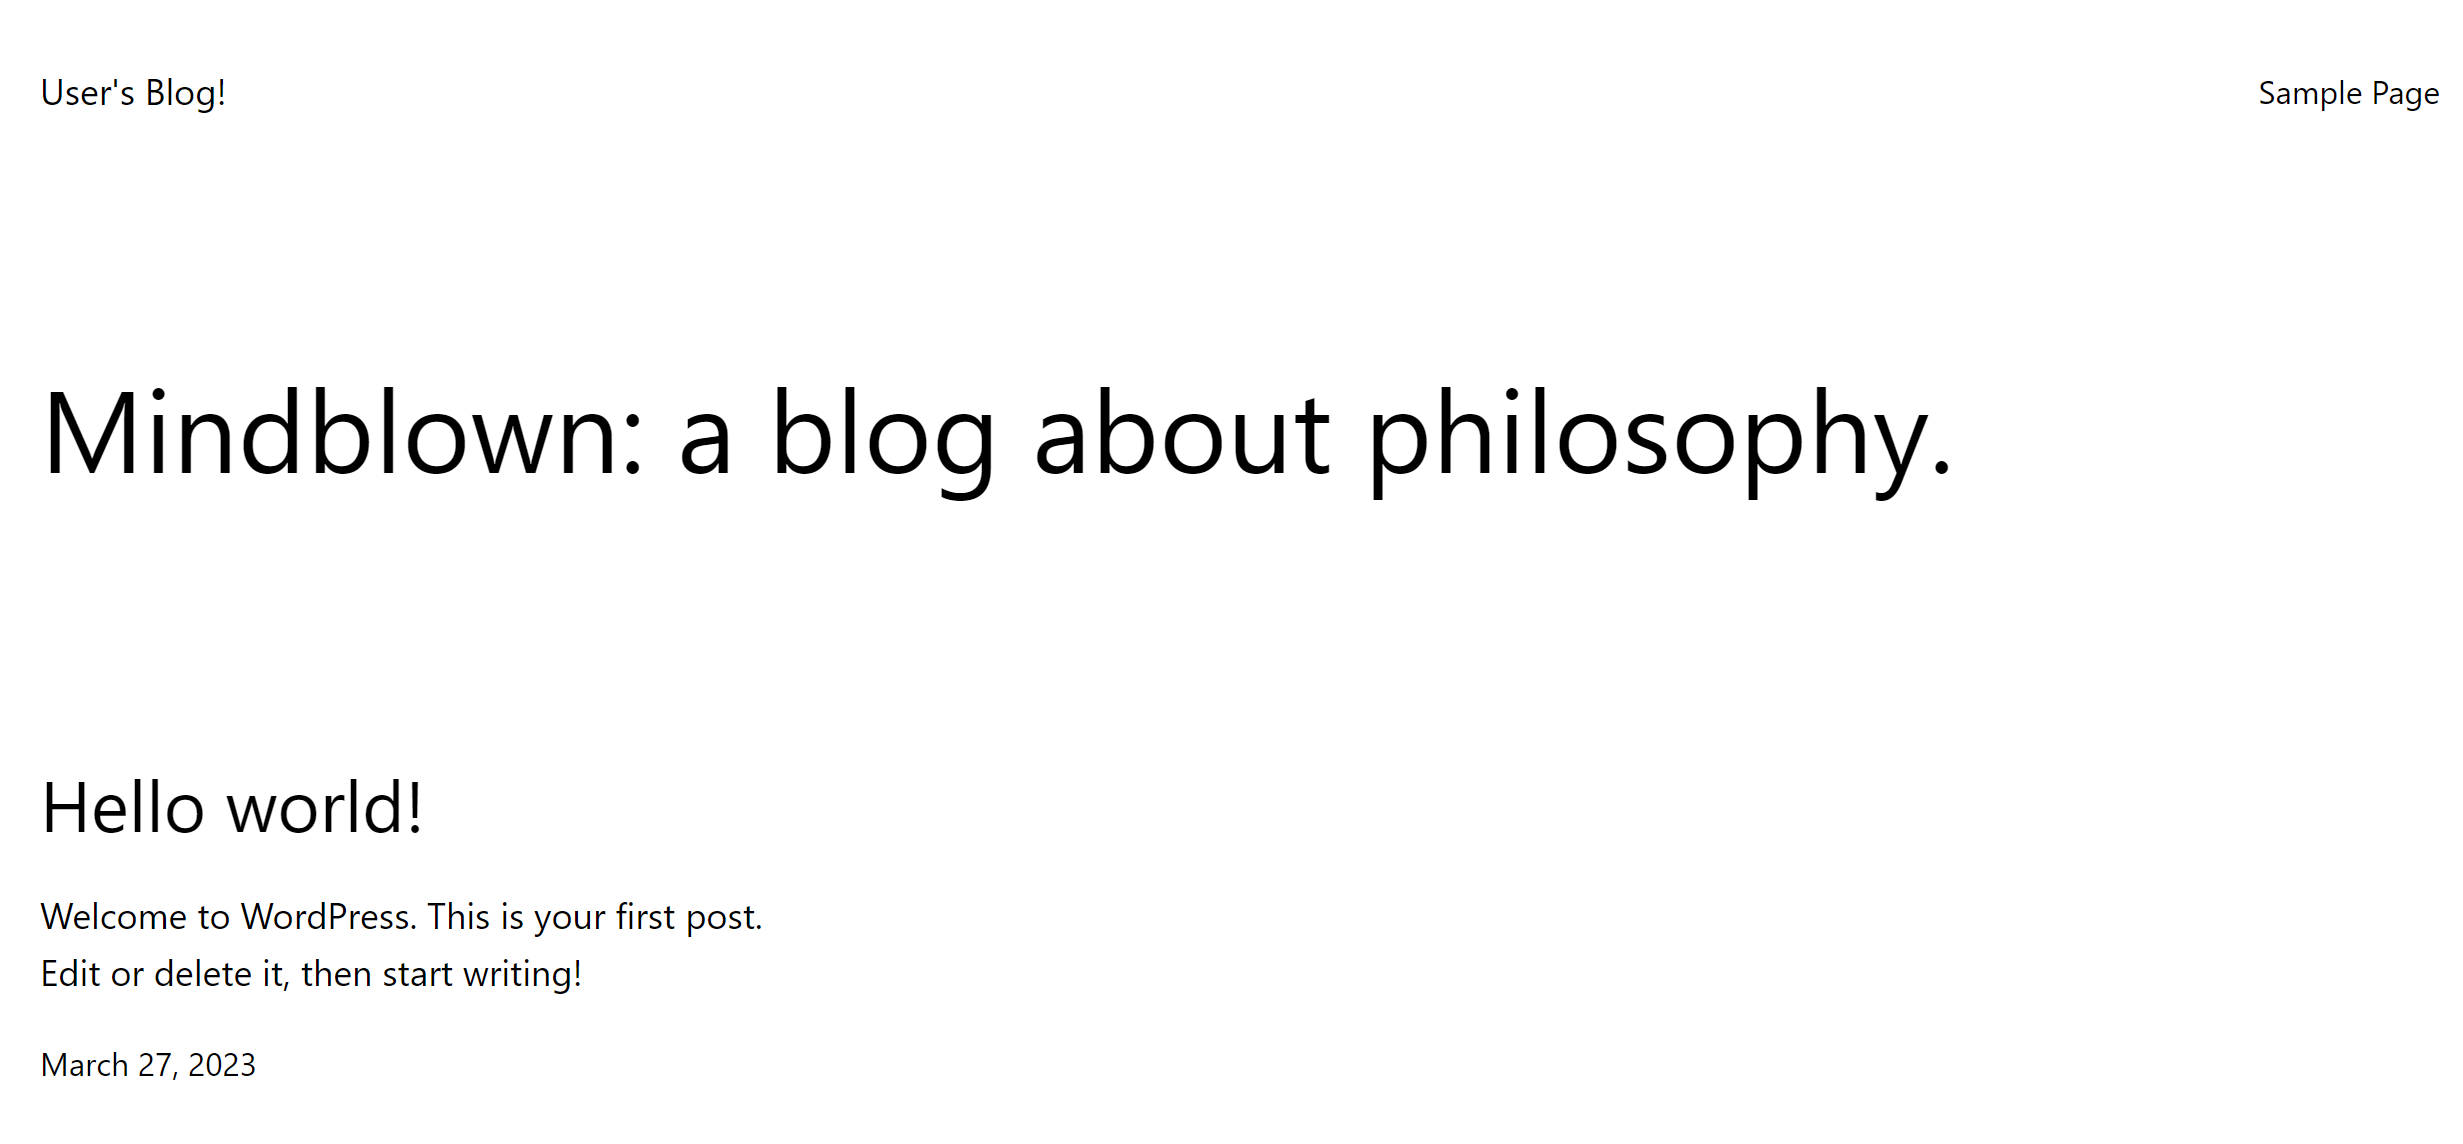
- To access the WordPress management console:
- Run the following command to obtain the password of user:
kubectl get secret --namespace default myblog-wordpress -o jsonpath="{.data.wordpress-password}" | base64 -d - In the address box of a browser, enter <EIP of the load balancer>:80/login to access the WordPress backend. The user name is user, and the password is the character string obtained in the previous step.
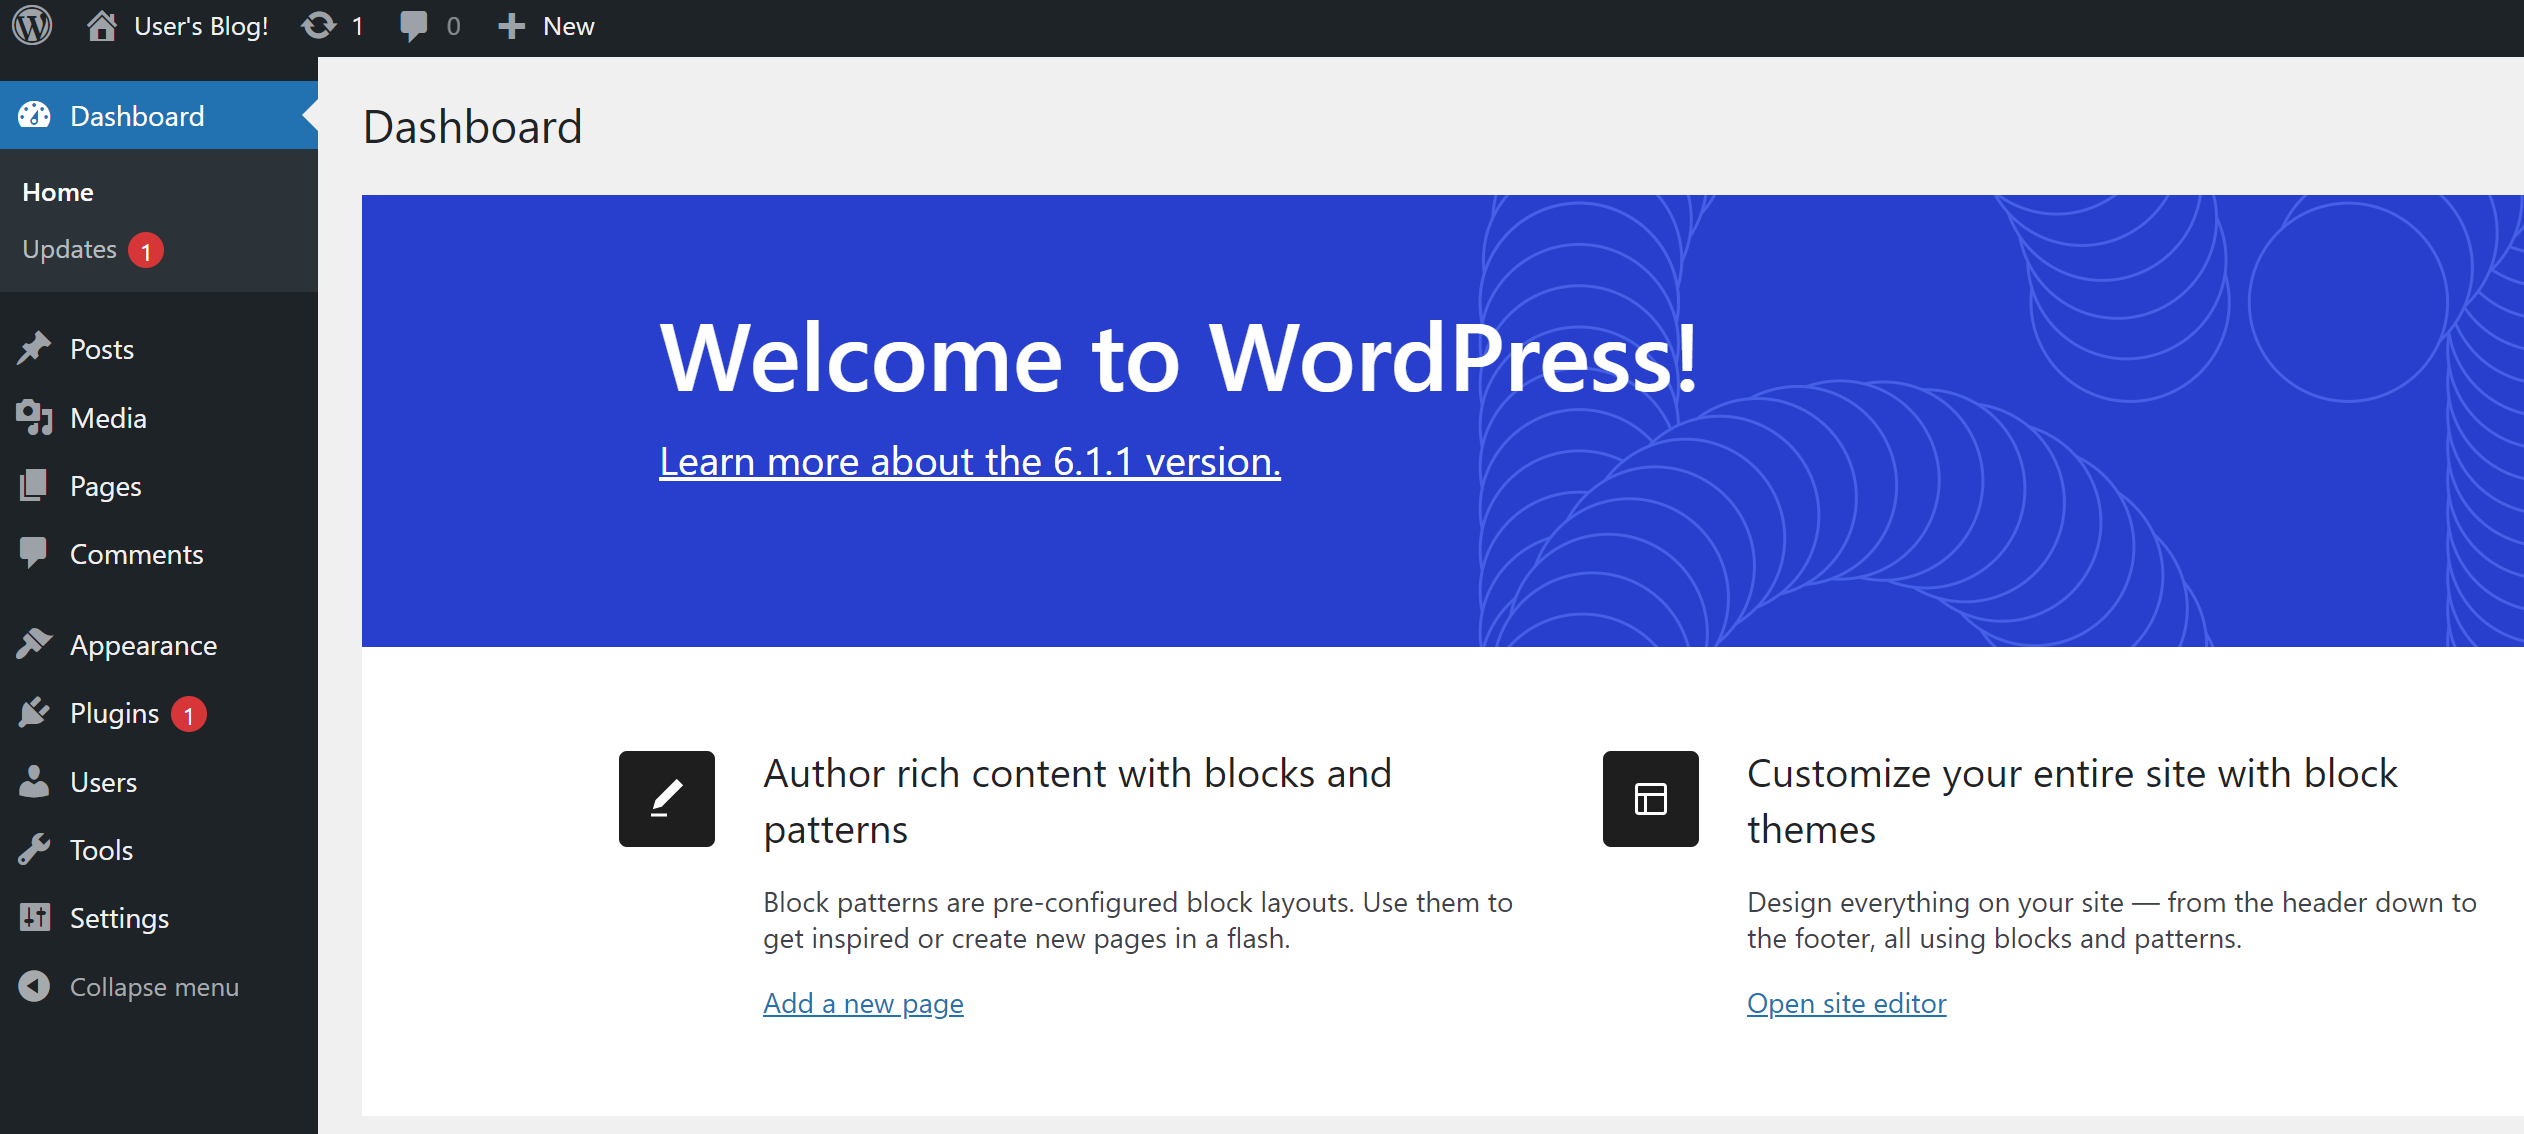
- Run the following command to obtain the password of user:
- To access the WordPress web page, enter <EIP of the load balancer>:80 in the address box of a browser.
Follow-up Operations: Release Resources
Release resources promptly if the cluster is no longer needed to avoid extra charges. For details, see Deleting a Cluster.
Feedback
Was this page helpful?
Provide feedbackThank you very much for your feedback. We will continue working to improve the documentation.


