Help Center/
GeminiDB/
GeminiDB Influx API/
Working with GeminiDB Influx API/
Instance Modifications/
Adding Instance Nodes
Updated on 2025-04-01 GMT+08:00
Adding Instance Nodes
Scenarios
This section describes how to add nodes to an instance to suit your service requirements.
Usage Notes
- Adding nodes may lead to the decrease of OPS. Perform this operation during off-peak hours.
- You can only add nodes when the instance status is Available or Checking restoration.
- An instance cannot be deleted when one or more nodes are being added.
- Currently, a maximum of 12 nodes are supported. To obtain more nodes, choose Service Tickets > Create Service Ticket in the upper right corner of the console and contact customer service.
Method 1
- In the service list, choose Databases > GeminiDB.
- On the Instances page, locate the instance that you want to add nodes to and click its name.
- In the Node Information area on the Basic Information page, click Add Node.
- Specify Add Nodes and click Next.
- On the displayed page, confirm the node configuration details.
- Yearly/Monthly
- If you need to modify your settings, click Previous.
- If you do not need to modify your settings, click Next and complete the payment.
- Pay-per-use
- If you need to modify your settings, click Previous.
- If you do not need to modify your settings, click Submit.
- Yearly/Monthly
- View the result of adding nodes.
- When new nodes are being added, the instance status is Adding node.
- After the nodes are added, the DB instance status becomes Available.
- Click the instance name. In the Node Information area on the Basic Information page, view the information about the new nodes.
Method 2
- Log in to the Huawei Cloud console.
- In the service list, choose Databases > GeminiDB.
- On the Instances page, locate the instance you want to add nodes for and choose in the Operation column.
Figure 1 Adding a node

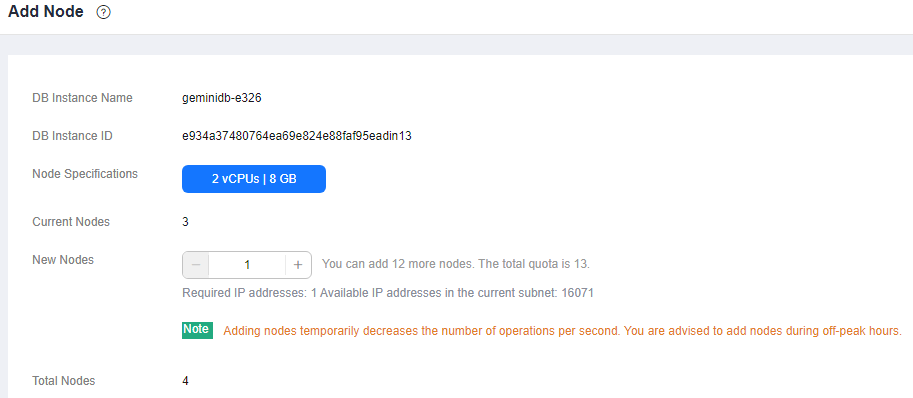
- Specify Add Nodes and click Next.
Figure 2 Adding a node

- View the result of adding nodes.
- When new nodes are being added, the instance status is Adding node.
- After the nodes are added, the DB instance status becomes Available.
- Click the instance name. In the Node Information area on the Basic Information page, view the information about the new nodes.
Parent topic: Instance Modifications
Feedback
Was this page helpful?
Provide feedbackThank you very much for your feedback. We will continue working to improve the documentation.
The system is busy. Please try again later.


