
Configuring Jobs
- Log in to the DataArts Studio console by following the instructions in Accessing the DataA.
- On the DataArts Studio console, locate a workspace and click DataArts Factory.
- In the left navigation pane of DataArts Factory, choose .
- Click
 in the job directory and select Show Check Box. Figure 1 Clicking Show Check Box
- Select jobs, click
 , and select Configure Job. Figure 2 Configure Job
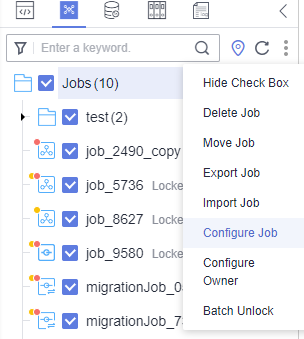
- Configure general parameters for the jobs. Figure 3 General Configuration

Table 1 General Configuration Parameter
Description
Node Status Polling Interval
How often the system checks whether all the nodes are executed. The value ranges from 1 to 60 seconds.
If you select Keep it unchanged, the poll interval remains unchanged for the nodes.
Max. Node Execution Duration
Maximum duration of executing the nodes of a job. When Retry upon Failure is set to Yes for a node, the node will be re-executed upon an execution failure.
If you select Keep it unchanged, the maximum execution duration remains unchanged for the nodes.
Job Agency
During execution of the jobs, the agency is used to communicate with other services.
If you select Keep it unchanged, the agency remains unchanged for the jobs.
Retry upon Failure
Whether to re-execute the nodes of the selected jobs if the nodes fail to be executed.
If you select Keep it unchanged, the retry policy remains unchanged for the nodes.
Retry upon Timeout
This parameter is displayed only when Retry upon Failure is set to Yes.
Whether to re-execute the nodes of the selected jobs if the nodes time out.
If you select Keep it unchanged, the retry policy remains unchanged for the nodes.
Maximum Retries
This parameter is displayed only when Retry upon Failure is set to Yes.
Maximum number of node retries
The value range is 1 to 100, and the default value is 1.
Retry Interval
This parameter is displayed only when Retry upon Failure is set to Yes.
Interval at which a retry is performed upon a failure
The value range is 5 to 600, and the default value is 120. The unit is second.
Policy for Handling Subsequent Nodes If the Current Node Fails
Operation to be performed if all nodes of the selected jobs fail to be executed.
If you select Keep it unchanged, the failure policy remains unchanged for the nodes.
Action After Dependency Job Failure
Action to be taken if the dependency jobs of the selected jobs fail. This parameter is invalid if no dependency jobs have been configured for the selected jobs.
If you select Keep it unchanged, the failure policy remains unchanged for the selected jobs.
Owner
Owner of the selected jobs, which can only be a member of the current workspace.
If you select Keep it unchanged, the own remains unchanged for the jobs.
Concurrent Periodic Job Instances
Number of jobs that can be handled concurrently
If you select Keep it unchanged, the number of concurrent periodic job instances remains unchanged.
Cancel Expired Job Instances
If you select Yes, you need to set Days Overdue. If the waiting time before a job instance starts running exceeds the configured Days Overdue, the job instance will be canceled and cleared.
If you select No, waiting job instances will not be cleared.
If you select Keep it unchanged, the original timeout duration rule for job instances is retained.
Days Overdue
This parameter is displayed only when Cancel Expired Job Instances is set to Yes.
The value range is 2 to 271, and the default value is 60. The unit is day.
The minimum value is 2, that is, a job instance can be canceled only after two days.
Remarks
Enter the remarks.
- Select CDM Cluster and configure the CDM cluster for the CDM Job node of the selected jobs.
Select the current CDM cluster from the drop-down list box on the left, and select the target CDM cluster from the drop-down list box on the right.

- Before migrating a CDM cluster, you must create a job with the same name in the new cluster.
- Configure two CDM clusters for a CDM job.
- If you select one of the source clusters, only the selected cluster will be migrated.
- If you select both source clusters, they will be both migrated to the destination cluster.
- Search: Enter a job name and click
 to filter out the jobs that contain the CDM Job node.
 - Refresh: Click
 to refresh the list of jobs that contain the CDM Job node.
 - Download: Click
 to download the selected jobs.
Figure 4 CDM Cluster
- Select DLI Queue and configure the DLI queue of the DLI SQL node of the selected jobs.
Select the current DLI queue from the drop-down list box on the left, and select the target DLI queue from the drop-down list box on the right.
- Search: Enter a job name and click
 to filter out the jobs that contain the DLI SQL node.
 - Refresh: Click
 to refresh the list of jobs that contain the DLI SQL node.
 - Download: Click
 to download the selected jobs.
Figure 5 DLI Queue
- Search: Enter a job name and click
- Click OK.
Feedback
Was this page helpful?
Provide feedbackThank you very much for your feedback. We will continue working to improve the documentation.


