Exporting and Importing Jobs
- Exporting jobs is to export the latest saved content in the development state.
- After a job is imported, the content in the development state is overwritten and a new version is automatically submitted.

When exporting or importing jobs across time zones in DataArts Factory, you need to change the value of expressionTimeZone to the target time zone.
Exporting Jobs
- Log in to the DataArts Studio console by following the instructions in Accessing the DataArts Studio Instance Console.
- On the DataArts Studio console, locate a workspace and click DataArts Factory.
- In the left navigation pane of DataArts Factory, choose .
- Click
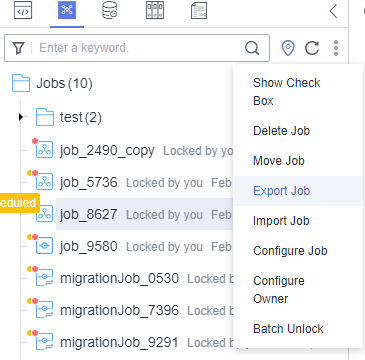
 in the job directory and select Show Check Box.
 - Select jobs, click
 , and select Export Job. In the displayed dialog box, select Export jobs only or Export jobs and their dependency scripts and resource definitions. After the export is successful, you can obtain the exported .zip file.
Figure 1 Selecting and exporting jobs
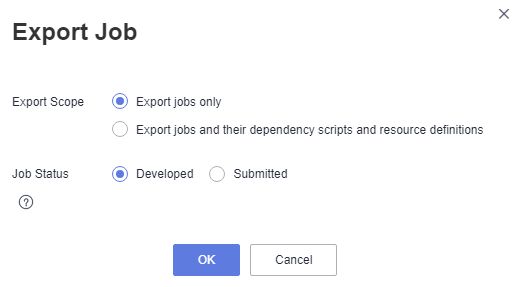
- In the displayed Export Job dialog box, set Export Scope and Job Status and click OK. You can view the result in the download center.
Figure 2 Exporting jobs

Importing Jobs
This function is available only if the OBS service is available. If OBS is unavailable, jobs can be imported from the local PC.

- The maximum size of a job file imported from OBS is 10 MB. The maximum size of a job file imported from a local PC is 10 MB. The maximum size of a job file imported from a local PC cannot be larger than 10 MB after decompression.
- If the name of a job to be imported already exists in the system, ensure that the job is in the stopped state. Otherwise, the import fails.
Import one or more jobs from the job directory.
- In the left navigation pane of DataArts Factory, choose .
- Click
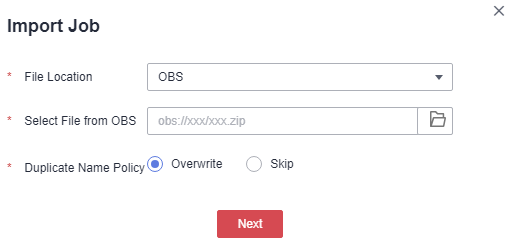
 > Import Job in the job directory, select the job file that has been uploaded to OBS or local directory, and rename the policy.

If you select Overwrite for Duplicate Name Policy but the hard lock policy is used and the script is locked by another user, the overwriting will fail. For details about soft and hard lock policies, see Configuring the Hard and Soft Lock Policy.
Figure 3 Importing jobs and their dependencies
- Click Next to import the job as instructed.

- If a job contains a tag in the locked state, the job fails to be imported.
- When a job fails to be imported and a tag needs to be automatically generated, if the tag already exists and is locked, it will not be added to the job.
- During the import, if the data connection, DLI queue, or GES graph associated with the job does not exist in DataArts Factory, the system prompts you to select one again.
Feedback
Was this page helpful?
Provide feedbackThank you very much for your feedback. We will continue working to improve the documentation.


