
Buying a DB Instance and Connecting to It Using MySQL-Front
After buying a DB instance, you can log in to a Windows ECS, install MySQL-Front on the ECS, and use a private IP address to connect to the DB instance through MySQL-Front.
MySQL-Front is a Windows front end for MySQL databases. It allows you to interact with MySQL databases through a GUI, including connecting to a database, running SQL commands, and managing tables and records.
Operation Process
| Process | Description |
|---|---|
| Select required basic settings and additional options and buy a TaurusDB instance. | |
| Purchase a Windows ECS that is in the same region and VPC as your DB instance. | |
| Test the network connectivity between the ECS and the private IP address and port of the DB instance, and install MySQL-Front on the ECS. | |
| Use MySQL-Front to connect to the DB instance through the private IP address and port. |
Step 1: Buy a TaurusDB Instance
- Go to the Buy DB Instance page.
- On the displayed page, configure required information and click Next.
Table 1 Basic information Parameter
Description
Billing Mode
Select Pay-per-use.
Region
Region where an instance is deployed.
DB Instance Name
The name must start with a letter and consist of 4 to 64 characters. Only letters (case-sensitive), digits, hyphens (-), and underscores (_) are allowed.
- If you create multiple instances at a time, a hyphen (-) followed by a number with four digits will be appended to the instance name, starting with -0001. For example, if you enter instance, the first instance will be named instance-0001, the second instance-0002, and so on.
- Each name of the instances created in batches can contain 4 to 59 characters. Only letters, digits, hyphens (-), and underscores (_) are allowed.
DB Engine Version
Select TaurusDB V2.0.
DB Instance Type
Select Cluster or Single.
- Cluster: A cluster instance can contain one primary node and 1 to 15 read replicas. The primary node processes read and write requests, and the read replicas process only read requests. If the primary node becomes unavailable, TaurusDB automatically fails over to a read replica. Cluster instances apply to medium- and large-sized enterprises in the Internet, taxation, banking, and insurance sectors.
- Single: A single-node instance contains only one primary node and there are no read replicas. Single-node instances do not involve data synchronization between nodes and can easily ensure atomicity, consistency, isolation, and durability of transactions. They are only recommended for development and testing of microsites, and small and medium enterprises, or for learning about TaurusDB.
AZ Type
An AZ is a physical region where resources have their own independent power supply and networks. AZs are physically isolated but interconnected through an internal network.
- Single-AZ: The primary node and read replicas are deployed in the same AZ.
- Multi-AZ: The primary node and read replicas are deployed in different AZs to ensure high reliability.
Time Zone
You need to select a time zone for your instance based on the region hosting your instance. The time zone is selected during instance creation and cannot be changed after the instance is created.
Table 2 Instance specifications Parameter
Description
Instance Specifications
Different instance specifications support different numbers of database connections and maximum IOPS.
CPU Architecture
Select x86 or Kunpeng.
Nodes
Total number of one primary node and read replicas you created for the instance. You can create up to 9 read replicas at a time.
Storage
It contains the system overhead required for inodes, reserved blocks, and database operations.
Storage will be scaled up dynamically based on the amount of data that needs to be stored, and is billed hourly on a pay-per-use basis.
TDE
Transparent Data Encryption (TDE) encrypts data files and backup files using certificates to implement real-time I/O encryption and decryption. This function effectively protects your databases and data files.
After TDE is enabled, you need to select a cryptographic algorithm AES256 or SM4 as needed.
Table 3 Network Parameter
Description
VPC
A dedicated virtual network where your instance is located. It isolates networks for different workloads to enhance security.
You need to select a VPC and subnet. If no VPC is available, TaurusDB will allocate a default VPC (default_vpc) for your instance. You can also use an existing or new VPC and subnet.
NOTICE:After a TaurusDB instance is created, the VPC cannot be changed.
Security Group
A security group enhances security by controlling access to TaurusDB from other services. When you select a security group, you must ensure that it allows the client to access instances.
If no security group is available or has been created, TaurusDB allocates a security group to your instance by default.
IPv6
Before enabling IPv6, ensure that IPv6 has been enabled for the VPC and subnet where the DB instance is located. For details about how to configure IPv6 for the VPC and subnet, see "IPv4/IPv6 Dual-Stack Management" in Virtual Private Cloud Operation Guide.
After IPv6 is enabled, the DB instance can run in dual-stack mode. It means that the DB instance can use both IPv4 and IPv6 addresses. The DB instance can be accessed through either an IPv4 or IPv6 address, and the communications are independent of each other.
Table 4 Database configuration Parameter
Description
Administrator
The default login name for the database is root.
Administrator Password
The password must consist of 8 to 32 characters and contain at least three of the following: uppercase letters, lowercase letters, digits, and special characters (~!@#%^*-_=+?,()&$|.). Enter a strong password and periodically change it to improve security and defend against threats such as brute force cracking attempts.
Keep this password secure. If lost, the system cannot retrieve it.
Confirm Password
Enter the administrator password again.
Table 5 Parameter Template Parameter
Description
Parameter Template
Contains engine configuration values that can be applied to one or more instances. You can modify the instance parameters as required after the instance is created.
NOTICE:- If you use a custom parameter template when creating a DB instance, the following specification-related parameters in the custom template are not applied. Instead, the default values are used.
innodb_log_buffer_size
max_connections
innodb_buffer_pool_instances
innodb_page_cleaners
innodb_parallel_read_threads
innodb_read_io_threads
innodb_write_io_threads
threadpool_size
- The value of innodb_parallel_select_count is determined by your instance specifications, instead of the parameter value you configured in the parameter template. The default value is OFF for instance with 16 vCPUs or less and ON for instances with more than 16 vCPUs.
Table Name
Specifies whether table names are case sensitive. This option cannot be changed later.
- Case sensitive: Table names are case sensitive.
- Case insensitive: Table names are case insensitive and are stored in lowercase letters by default.
Enterprise Project
Only available for enterprise users. If you want to use this function, contact customer service.
An enterprise project provides a way to manage cloud resources and enterprise members on a project-by-project basis.
Select an enterprise project from the drop-down list. The default project is default.
Table 6 Tag Parameter
Description
Tag
Tags a DB instance. This configuration is optional. Adding tags helps you better identify and manage your DB instances. Each DB instance can have up to 20 tags.
Table 7 Batch creation Parameter
Description
Quantity
You can create instances in batches. The default value is 1. The value ranges from 1 to 10.
- Confirm the settings for the pay-per-use DB instance.
- If you need to modify your settings, click Previous.
- If you do not need to modify your settings, click Submit.
- To view and manage DB instances, go to the Instances page.
- During the creation process, the instance status is Creating. After the status of the instance is Available, you can use the instance.
- Automated backup is enabled by default during instance creation. After your instance is created, the backup policy cannot be disabled and a full backup will be automatically created.
- After the instance is created, you can confirm the DB instance type on the Instances page.
- After the instance is created, you can add a description.
- After the instance is created, you can click the instance name to go to the Basic Information page. In the Network Information area, obtain the private IP address and database port.
- The default database port is 3306, but you can change it after instance creation is complete.

To ensure data and instance security, change the database port immediately after the instance is created.
Step 2: Buy an ECS
- Log in to the management console and check whether there is an ECS available.
- If there is a Linux ECS, see Buying a DB Instance and Connecting to It Using the mysql Client.
- If there is a Windows ECS, go to 3.
- If no ECS is available, go to 2.
- Buy an ECS and select Windows as its OS.
To download a MySQL client to the ECS, bind an EIP to the ECS. The ECS must be in the same region, VPC, and security group as the DB instance for mutual communications.
For details about how to create a Windows ECS, see section "Creating an ECS" in Elastic Cloud Server User Guide.
- On the ECS Information page, view the region and VPC of the ECS.
- On the Basic Information page of the DB instance, view the region and VPC of the DB instance.
- Check whether the ECS and DB instance are in the same region and VPC.
- If they are in the same region and VPC, go to Step 3: Test Connectivity and Install MySQL-Front.
- If they are in different regions, create another ECS or DB instance. The ECS and DB instance in different regions cannot communicate with each other. To reduce network latency, deploy your DB instance in the region nearest to your workloads.
- If they are in different VPCs, change the VPC of the ECS to that of the DB instance. For details, see section "Changing a VPC" in Elastic Cloud Server User Guide.
Step 3: Test Connectivity and Install MySQL-Front
- Log in to the ECS. For details, see section "Logging In to a Windows ECS Using VNC" in Elastic Cloud Server User Guide.
- On the ECS, check whether it can connect to the DB instance using the private IP address and port obtained in 4.
telnet private_IP_address port
If the message "command not found" is displayed, install the Telnet tool based on the OS used by the ECS.
- If yes, network connectivity is normal.
- If no, check the security group rules.
- If in the security group of the ECS, there is no outbound rule with Destination set to 0.0.0.0/0 and Protocol & Port set to All, add an outbound rule for the private IP address and port of the DB instance.
- If in the security group of the DB instance, there is no inbound rule allowing the access from the private IP address and port of the ECS, add an inbound rule for the private IP address and port of the ECS.
- Open a browser, and download and install the MySQL-Front tool on the ECS.
Step 4: Use MySQL-Front to Connect to the DB Instance
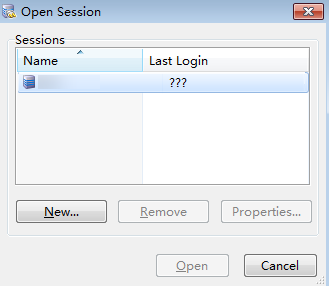
- Start MySQL-Front.
- In the displayed dialog box, click New. Figure 1 Connection management
- Enter the information of the DB instance to be connected and click Ok. Figure 2 Adding an account
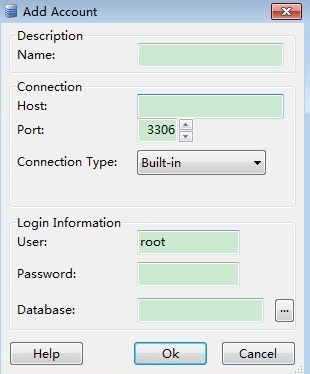
Table 8 Parameter description Parameter
Description
Name
Database connection task name. If you do not specify this parameter, it will be the same as that configured for Host by default.
Host
Private IP address.
Port
Database port. The default value is 3306.
User
Account name of the DB instance. The default value is root.
Password
Password of the account for accessing the DB instance.
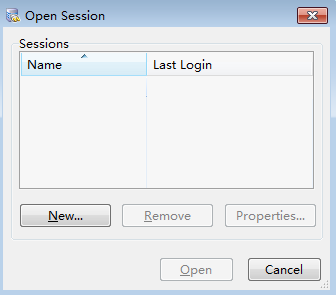
- In the displayed window, select the connection that you have created in 3 and click Open. If the connection information is correct, the DB instance is successfully connected. Figure 3 Opening a session
Feedback
Was this page helpful?
Provide feedbackThank you very much for your feedback. We will continue working to improve the documentation.


