
Example Typical Scenario: Configure Network Connectivity Between DLI and Data Sources on a Private Network
Scenario
When DLI accesses data sources on a private network (such as MRS, RDS, CSS, Kafka, and DWS), it needs to establish a VPC peering connection with the target service's VPC through an enhanced datasource connection for network connectivity.
This section describes how to configure the network connectivity between DLI and data sources on a private network using an enhanced datasource connection.
Procedure
- Obtain data source information: Record the private IP address and port number of the data source to prepare for subsequent connectivity configurations.
- Acquire the CIDR block of the elastic resource pool: Note down the CIDR block of the DLI elastic resource pool for future connectivity setups.
- Allow access from the DLI CIDR block: Add ingress rules to the data source's security group to allow access from the DLI CIDR block.
- Create an enhanced datasource connection: Use the enhanced datasource connection feature available on the DLI console to set up a peering connection between DLI and the data source, enabling mutual network communication.
- Test network connectivity: Test the network connectivity between DLI and the data source on the DLI queue.

Preparations
- An elastic resource pool has been created and a DLI queue has been added. For details, see Creating an Elastic Resource Pool and Creating Queues Within It.
- The CIDR block of DLI compute resources cannot overlap with the subnet segments of other data sources.
- Datasource connections cannot be bound with the default queue.
- A cluster of the external data source has been created. You can select a data source as needed. For details, see Table 1.
Table 1 Reference for creating clusters of other data sources Service Name
Reference Documents
RDS
DWS
DMS for Kafka
CSS
MRS
Step 1: Obtain the Private IP Address, Port Number, and Security Group of an External Data Source
Record the private IP address and port number of the data source to prepare for subsequent connectivity configurations.
Typically, the following information needs to be recorded:
- VPC and subnet: used to configure enhanced datasource connections.
- Private IP address: used to test the network connectivity between DLI and the data source.
For details about how to obtain the network information of common data sources, see Table 2.
| Data Source | Method of Obtaining Network Information |
|---|---|
| DMS for Kafka |
|
| RDS | |
| CSS |
|
| DWS |
|
| MRS HBase | An MRS 3.x cluster is used as an example.
|

Step 2: Obtain the CIDR Block of the DLI Elastic Resource Pool
- Log in to the DLI management console.
- In the navigation pane on the left, choose Resources > Resource Pool.
- On the displayed page, select the elastic resource pool you want to check.
- Click
 to expand the basic information card of the elastic resource pool and view the pool's VPC CIDR block.
Step 3: Add a Rule to the Security Group of the External Data Source to Allow Access from the DLI Queue
- Log in to the VPC console.
- In the navigation pane on the left, choose Access Control > Security Groups.
- Click the name of the security group to which the external data source belongs.
Obtain the security group name of the data source on the management console of the data source by referring to Step 1: Obtain the Private IP Address, Port Number, and Security Group of an External Data Source.
- On the Inbound Rules tab, add a rule to allow access from the queue network segment.
Set the inbound rule parameters based on Table 3.
Figure 2 Adding an inbound rule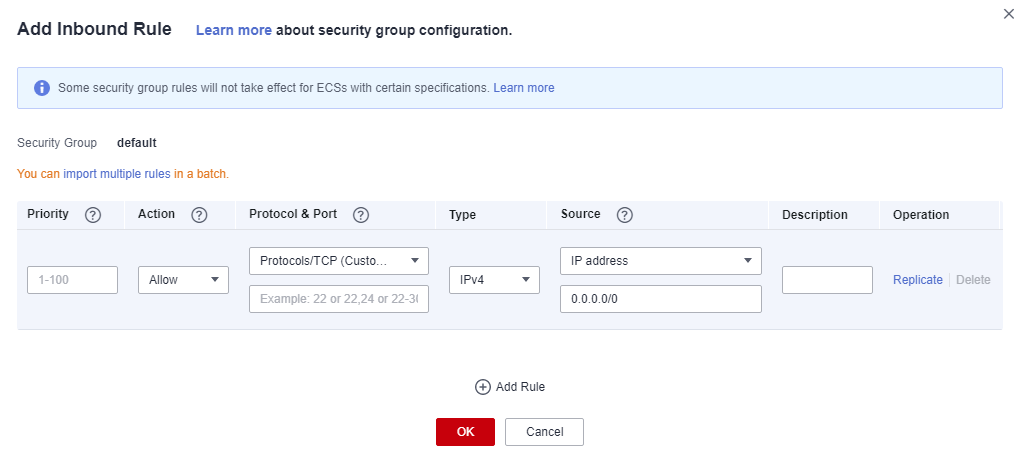
Table 3 Inbound rule parameters Parameter
Description
Example Value
Priority
The security group rule priority.
The priority value ranges from 1 to 100. The default value is 1, indicating the highest priority. A smaller value indicates a higher priority of a security group rule.
1
Action
Action of the security group rule.
Select Allow.
Protocol &Port
- Network protocol: The value can be All, TCP, UDP, ICMP, or GRE.
- Port: Port or port range over which the traffic can reach your instance. The port ranges from 1 to 65535.
In this example, select TCP. Leave the port blank or set it to the data source port obtained in Step 1: Obtain the Private IP Address, Port Number, and Security Group of an External Data Source.
Type
Type of IP addresses.
IPv4
Source
Allows access from IP addresses or instances in another security group.
In this example, enter the queue CIDR block obtained in Step 2: Obtain the CIDR Block of the DLI Elastic Resource Pool.
Description
Supplementary information about the security group rule. This parameter is optional.
_
Step 4: Create an Enhanced Datasource Connection
- Log in to the DLI management console. In the navigation pane on the left, choose Datasource Connections. On the displayed page, click Create in the Enhanced tab.
- In the displayed dialog box, set the following parameters:
- Connection Name: Name of the enhanced datasource connection
- Elastic Resource Pool: Select the elastic resource pool for which you want to establish a network connection.
- VPC: Select the VPC of the external data source obtained in Step 1: Obtain the Private IP Address, Port Number, and Security Group of an External Data Source.
- Subnet: Subnet of the data source obtained in Step 1: Obtain the Private IP Address, Port Number, and Security Group of an External Data Source
Set other parameters as you need.
- Click OK. Click the name of the created datasource connection to view its status. You can perform subsequent steps only after the connection status changes to Active.
- To connect to MRS HBase, you need to add MRS host information. The procedure is as follows:
- On the Datasource Connections page, click the Enhanced tab and locate the row that contains the created enhanced datasource connection. Click More > Modify Host in the Operation column.
- In the dialog box that appears, enter the MRS HBase host information obtained in Step 1: Obtain the Private IP Address, Port Number, and Security Group of an External Data Source to the Host Information box. Figure 3 Modifying host information

- Click OK.
Step 5: Test Network Connectivity
- In the navigation pane on the left, choose Resources > Queue Management. On the displayed page, locate the desired queue, click More in the Operation column, and select Test Address Connectivity.
- In the displayed dialog box, enter the IP address and port number of the data source obtained in Step 1: Obtain the Private IP Address, Port Number, and Security Group of an External Data Source in the address box and click Test. If the queue passes the test, it can access the data source.

For MRS HBase, use ZooKeeper IP address:ZooKeeper port or ZooKeeper host information:ZooKeeper port for the test.
Feedback
Was this page helpful?
Provide feedbackThank you very much for your feedback. We will continue working to improve the documentation.


