Managing Dimension Tables
A dimension table corresponds to a dimension and consists of a wide range of dimension fields. Creating, publishing, editing, and suspending a dimension table highly relate to the corresponding dimension. After a dimension is published, the system automatically creates and publishes the corresponding dimension table.
Viewing the Publish History of a Dimension Table
- On the DataArts Architecture page, choose in the left navigation pane.
- Click the Dimension Tables tab.
- Select a dimension table in the list and click View History in the Operation column.
- On the page displayed, you can view the publish history, version comparison information, and publish log of the dimension table.
If the publish log includes error logs, the publishing has failed. You can click Resynchronize to synchronize the table to other DataArts Studio modules.
Previewing SQL
- On the DataArts Architecture page, choose in the left navigation pane.
- Click the Dimension Tables tab.
- Select a dimension table in the list and click Preview SQL in the Operation column.
- On the page displayed, you can view or copy the SQL statement.
Synchronizing a Dimension Table
After you create or edit a dimension, you can manually synchronize the dimension table if the synchronization fails.

- The system performs the synchronization based on the data table update mode on the Function Settings tab page of Configuration Center. For details, see Functions.
- After a dimension table is associated with a quality rule and published, you can click Synchronize Subjects from DataArts Architecture as Directories on the Quality Jobs page on the DataArts Quality console. The quality jobs automatically generated in DataArts Architecture will be synchronized to the corresponding directories in DataArts Quality based on the subject structure.
- On the DataArts Architecture page, choose in the left navigation pane.
- Click the Dimension Tables tab.
- In the dimension table list, select the target dimension table and click Synchronize above the list. The dialog box for synchronizing the dimension table is displayed.

In enterprise mode, you can choose to synchronize the table to the production or development environment. By default, they are synchronized to the production environment. If you do not choose an environment, the tables cannot be synchronized.
Figure 1 Synchronizing dimension tables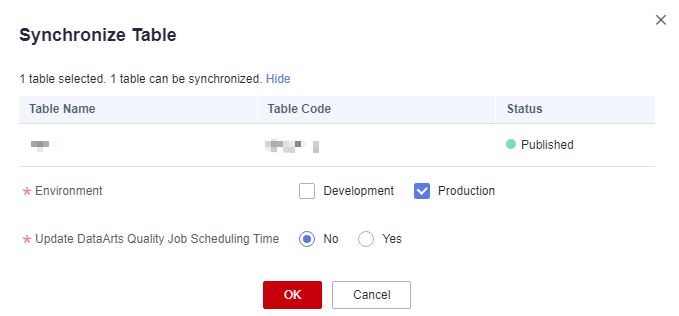
- After confirming that the information is correct, click OK. The synchronization result is displayed.
After the synchronization, you can view the synchronization status of the dimension table in the dimension table list. You can also click
 above the list to refresh the status. You can switch between the production environment and development environment to view the synchronization result.
Associating a Dimension Table with a Quality Rule
- On the DataArts Architecture page, choose in the left navigation pane.
- Click the Dimension Tables tab.
- In the dimension table list, select the target dimension table, and click Associate Rule.
Figure 2 Associating a dimension table with a quality rule

- On the page displayed, set the parameters. After the configuration is complete, click OK.
- Update Existing Rule: If this option is selected, the newly added rule will overwrite the old rule.
- Table Field: This parameter applies to all fields by default. You can enter a regular expression to filter fields as required.
- WHERE Clause: This parameter can be used to filter fields.
- Generate Anomaly Data: If this option is enabled, anomaly data is stored in the specified database based on the configured parameters.
- Database/Schema: database or schema that stores anomaly data. This parameter is displayed when Generate Anomaly Data is enabled.
- Table Prefix: prefix of the table that stores anomaly data. This parameter is displayed when Generate Anomaly Data is enabled.
- Table Suffix: suffix of the table that stores anomaly data. This parameter is displayed when Generate Anomaly Data is enabled.
- Add Rule: You can click Add Rule to add a rule. For example, add a rule named Unique value, select the rule, click OK, enter an alarm condition expression in the Alarm Condition text box, add other rules in the same way, and click OK.
- An alarm condition expression consists of alarm parameters and logical operators. When a quality job is running, the system calculates the result of the alarm condition expression and determines whether to trigger the alarm based on the result of the expression. If the expression result is true, the alarm will be triggered. Otherwise, no quality alarm will be triggered. In the Associate Quality Rule dialog box, the alarm parameters of each quality rule are displayed as buttons.
Associating a Single Field with a Quality Rule
- On the DataArts Architecture page, choose in the left navigation pane.
- Click the Dimension Tables tab.
- In the dimension table list, click the name of the target dimension table.
- In the field list on the dimension table details page, click
 in the row of the target field to associate the field with a quality rule.
Figure 3 Associating a single field with a quality rule
- After the configuration is complete, click OK.
- Update Existing Rule: If this option is selected, the newly added rule will overwrite the old rule.
- Add Rule: You can click Add Rule to add a rule. For example, add a rule named Unique value, select the rule, click OK, enter an alarm condition expression in the Alarm Condition text box, add other rules in the same way, and click OK.
- An alarm condition expression consists of alarm parameters and logical operators. When a quality job is running, the system calculates the result of the alarm condition expression and determines whether to trigger the alarm based on the result of the expression. If the expression result is true, the alarm will be triggered. Otherwise, no quality alarm will be triggered. In the Associate Quality Rule dialog box, the alarm parameters of each quality rule are displayed as buttons.
Figure 4 Adding a rule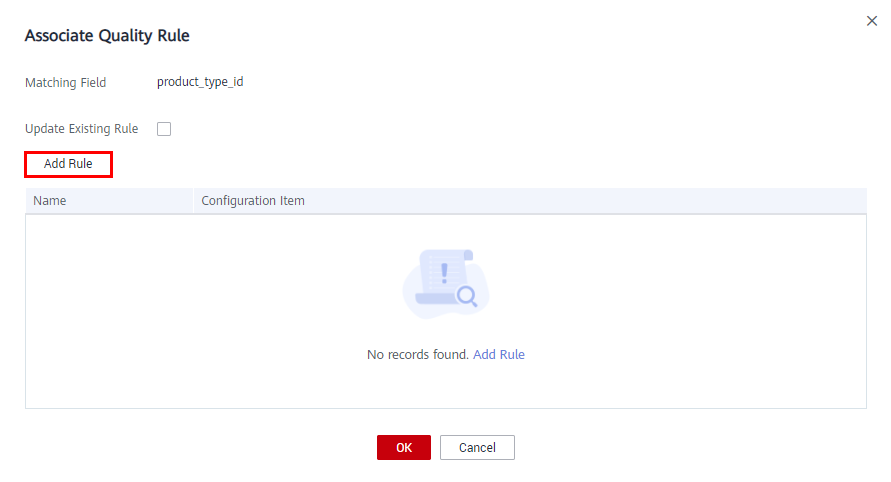
Associating Table Fields with a Quality Rule in Batches
- On the DataArts Architecture page, choose in the left navigation pane.
- Click the Dimension Tables tab.
- In the dimension table list, click the name of the target dimension table.
- In the table field list on the dimension table details page, select the target table fields and click Associate Rule.
Figure 5 Associating table fields with a quality rule
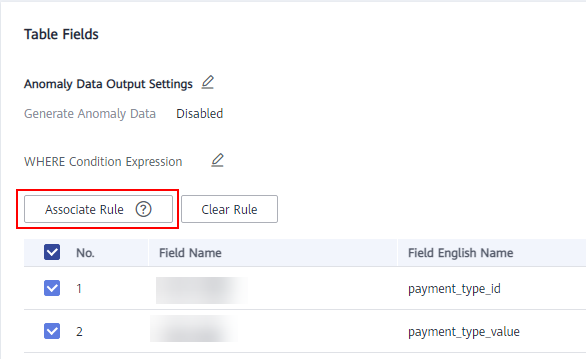
- On the page displayed, add a rule and set the rule parameters.
- Update Existing Rule: If this option is selected, the newly added rule will overwrite the old rule.
- Add Rule: You can click Add Rule to add a rule. For example, add a rule named Unique value, select the rule, click OK, enter an alarm condition expression in the Alarm Condition text box, add other rules in the same way, and click OK.
- An alarm condition expression consists of alarm parameters and logical operators. When a quality job is running, the system calculates the result of the alarm condition expression and determines whether to trigger the alarm based on the result of the expression. If the expression result is true, the alarm will be triggered. Otherwise, no quality alarm will be triggered. In the Associate Quality Rule dialog box, the alarm parameters of each quality rule are displayed as buttons.
Figure 6 Associating table fields with a quality rule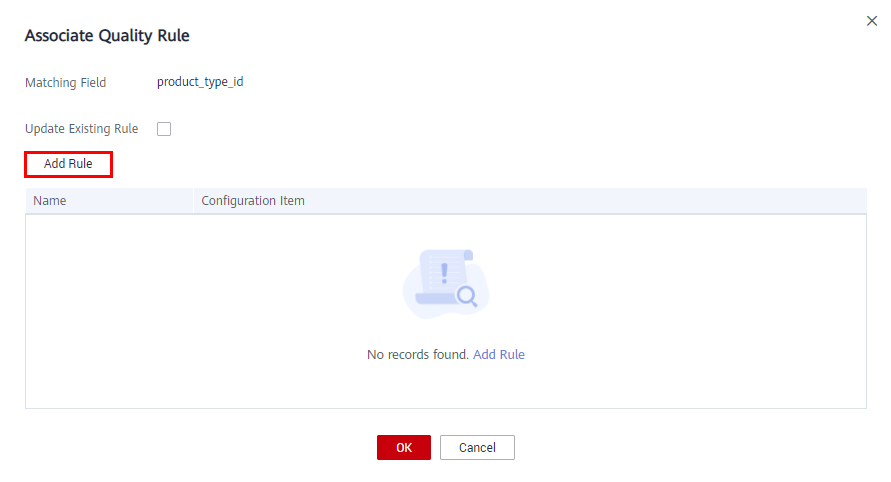
- (Optional) If you want to store anomaly data that does not comply with the preset rules in the exception table, enable Anomaly Data Output Settings.
Figure 7 Enabling Anomaly Data Output Settings

Click the pen icon next to Anomaly Data Output Settings and enable Generate Anomaly Data. The anomaly data will be stored in the specified database based on the settings.
Figure 8 Anomaly Data Output Settings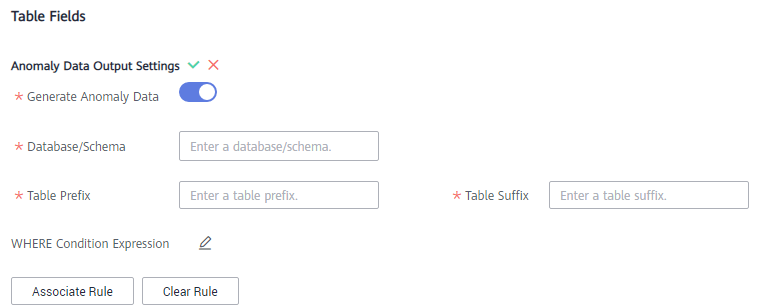 The parameters are as follows:
- Database/Schema: database or schema that stores anomaly data
- Table Prefix: prefix of the table that stores anomaly data
- Table Suffix: suffix of the table that stores anomaly data
Click
 to save the settings.
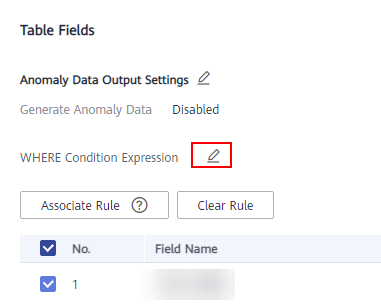
 - (Optional) By default, the quality rule applies to the entire table. If you want to query data in specified partitions, set the where condition.
Figure 9 Where condition
- After the configuration is complete, click OK.
Deleting a Dimension Table
Dimensions in publishing review, published, or suspension review state cannot be deleted. You can delete a dimension table on the Dimensions page.
- On the DataArts Architecture page, choose in the left navigation pane.
- Click the Dimension Tables tab.
- In the dimension table list, select the target dimension table and click Delete above the list.
Figure 10 Deleting a dimension table

- Confirm the dimension table to delete, and click Yes.
Viewing Dimension Table Details
- On the DataArts Architecture page, choose in the left navigation pane.
- Click the Dimension Tables tab.
- Click the name of a dimension table to go to its details page.
- View the basic information and fields of the dimension table. You can also configure anomaly data output settings.
- Click Modify and enable Generate Anomaly Data. Anomaly data will be stored in the specified database based on the configured parameters.
- Database/Schema: Enter the database or schema to which anomaly data will be stored.
- Set Table Prefix and Table Suffix, which indicate the prefix and suffix of the table to which anomaly data will be stored.

The prefix and suffix of the table can contain only letters, digits, and underscores (_).
- Click
 to save the settings.
- You can configure a where condition expression to filter fields.
Feedback
Was this page helpful?
Provide feedbackThank you very much for your feedback. We will continue working to improve the documentation.


