
Adding a Disk to a ClickHouse Node
Scenario
With the service volume increase, the data disk capacity of the ClickHouse node cannot meet service requirements. Therefore, you need to increase the number of data disks.
Prerequisites
The ClickHouse cluster and instances are normal.
Procedure
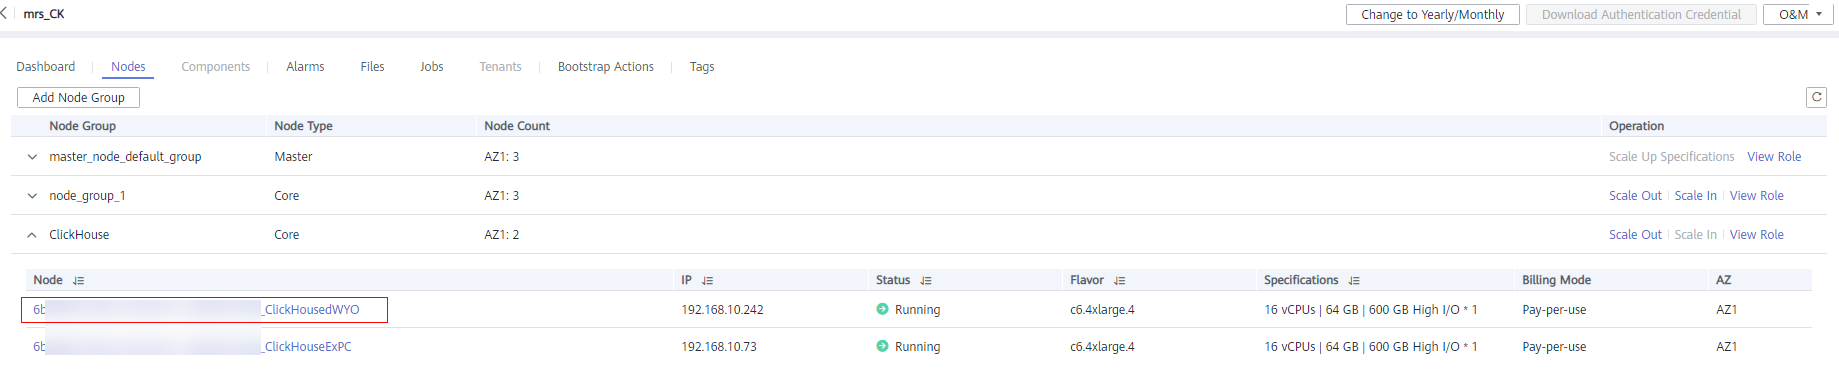
- Log in to the MRS console. In the left navigation pane, choose Clusters > Active Clusters and click a cluster name.
- Click Nodes. In the corresponding ClickHouse node group, click the name of the node to which a data disk is to be added.
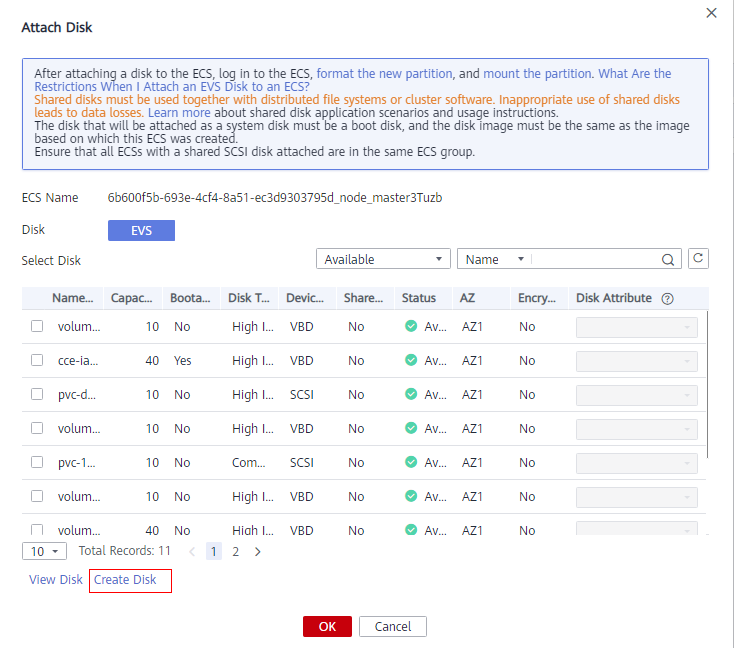
- On the Disks tab page, click Attach Disk.

- On the Attach Disk page, select Create Disk.
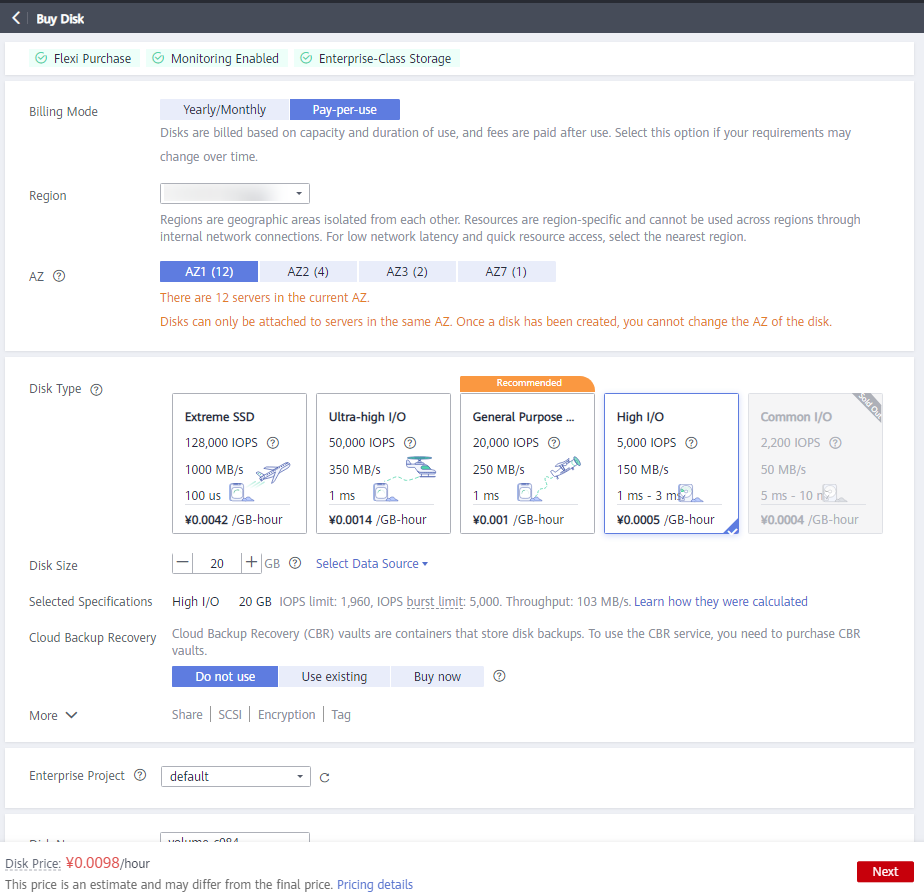
- Purchase an EVS disk. For details, see Purchasing an EVS Disk.
- Attach an EVS disk to a node.
- On the Elastic Volume Service page, locate the target EVS disk and click Attach in the Operation column.
- On the displayed Attach Disk page, select the target ECS.
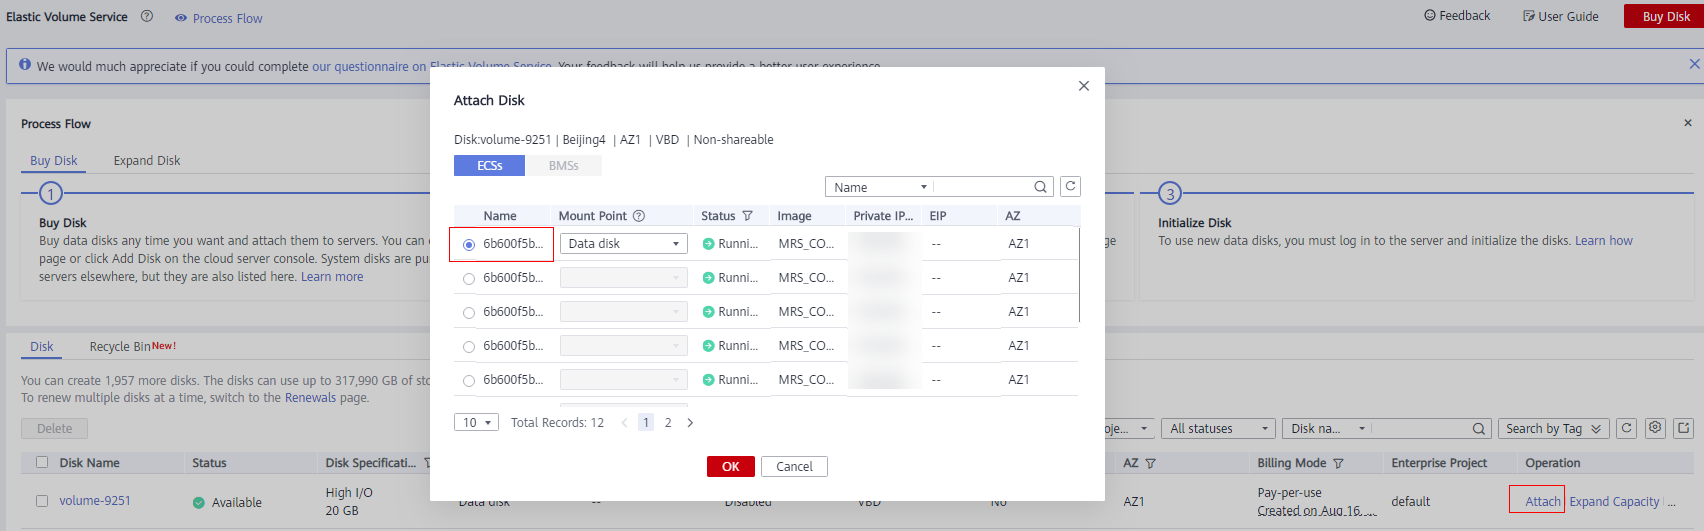
- Click OK. A dialog box is displayed, showing The attaching process is NOT completed yet. You must initialize the disk before using it.
- Click OK to return to the EVS disk list page. When the disk status changes to In-use, the disk is successfully attached.
- Log in to the node to which the disk is attached as user root and initialize the Linux data disk. For details, see Initializing a Linux Data Disk (fdisk) or Initializing a Linux Data Disk (parted).
In the following operations, the /srv/BigData/data2 directory is used as an example.
- Connect to the ClickHouse server. For details, see Using ClickHouse from Scratch.
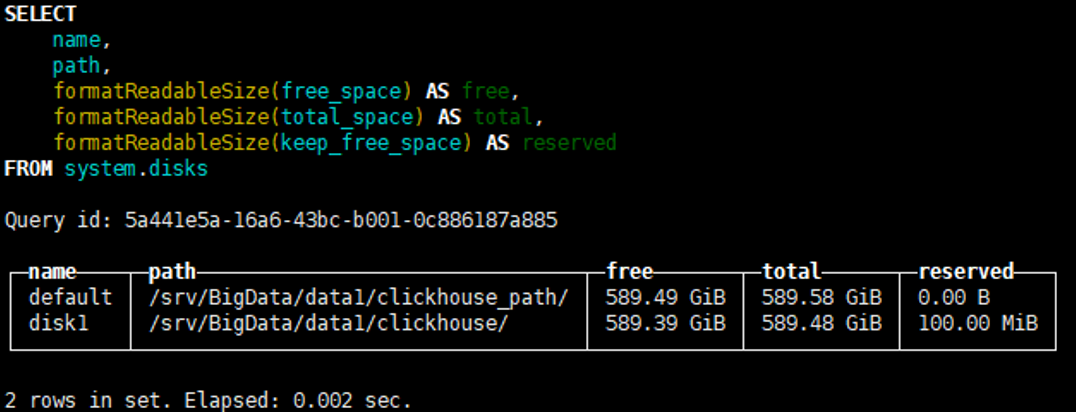
- Run the following SQL statement to check the disk directories detected by ClickHouse:
SELECT
name,
path,
formatReadableSize(free_space) AS free,
formatReadableSize(total_space) AS total,
formatReadableSize(keep_free_space) AS reserved
FROM system.disks;
Run the exit; command to exit the ClickHouse server.
- Create the /srv/BigData/data2/clickhouse folder and change the owner of the directory to which the disk is mounted.
mkdir /srv/BigData/data2/clickhouse
chown -R omm:wheel /srv/BigData/data2/
- Log in to FusionInsight Manager. For details, see Accessing FusionInsight Manager (MRS 3.x or Later). Choose Cluster > ClickHouse > Configurations > All Configurations.
- Search for _clickhouse.storage_configuration.disks and add the new ClickHouse data directory to the configuration item.

- Before you add a new ClickHouse data directory for the first time, delete the existing default variable ${CH_DATA_PATH}.
- Use commas (,) to separate multiple directories. The added directories end with a slash (/). The format is /srv/BigData/data1/clickhouse/,...,/srv/BigData/dataN/clickhouse/.
For example, add /srv/BigData/data2/clickhouse/ to /srv/BigData/data1/clickhouse/, and the new directory is /srv/BigData/data1/clickhouse/,/srv/BigData/data2/clickhouse/.
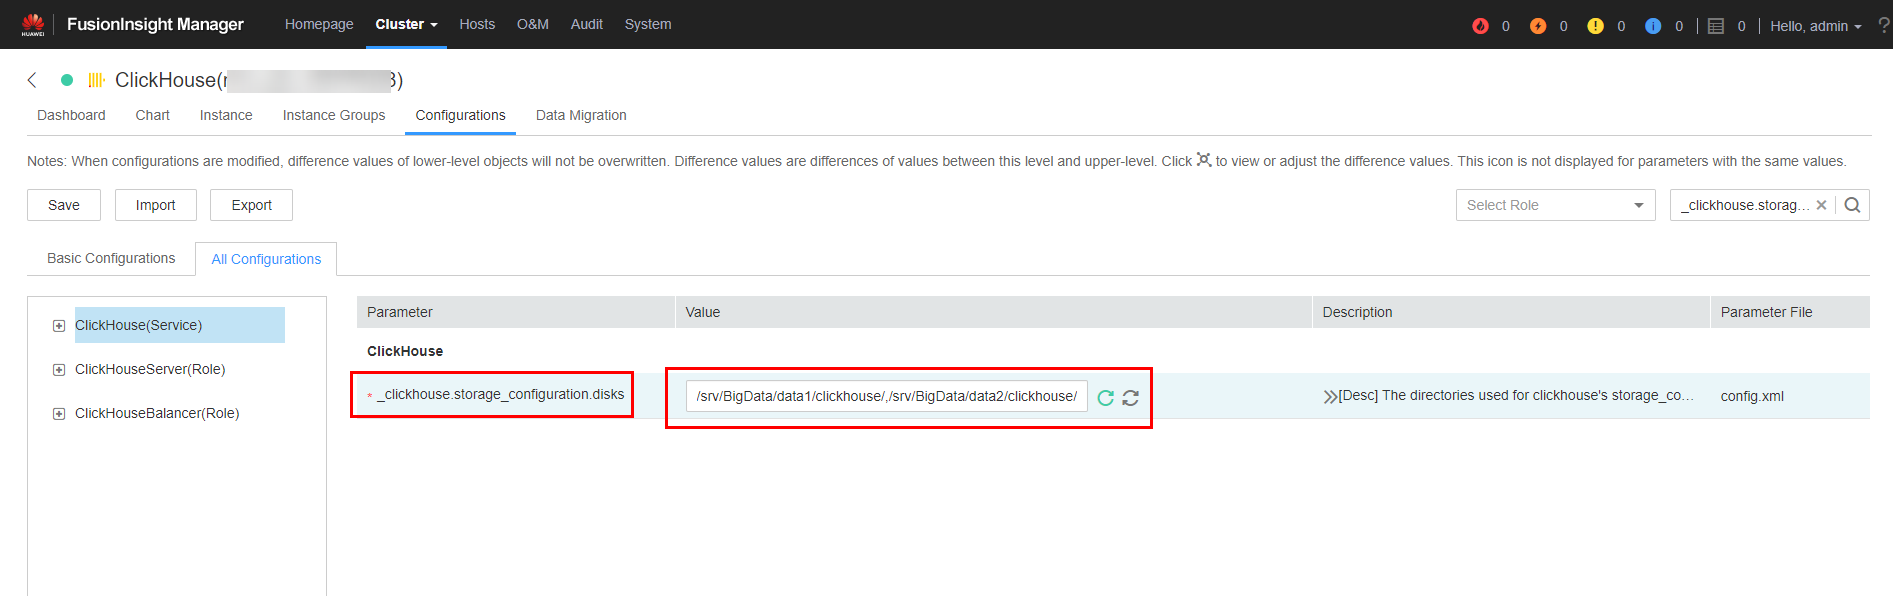
- After the new directory is added, click Save to save the configuration. Click Dashboard and choose More > Synchronize Configuration.
You do not need to restart the ClickHouse service after adding a disk, but you need to do so after deleting a disk.
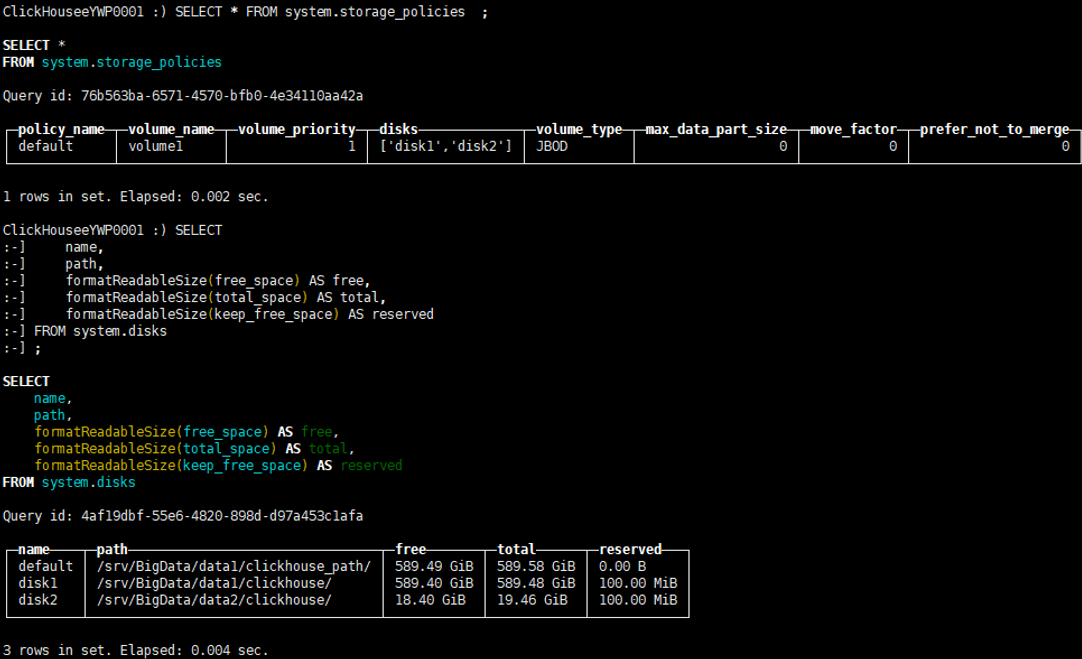
- Connect to the ClickHouse server by referring to Using ClickHouse from Scratch and run the following command to check whether the new disk and storage policy take effect:
SELECT * FROM system.storage_policies;
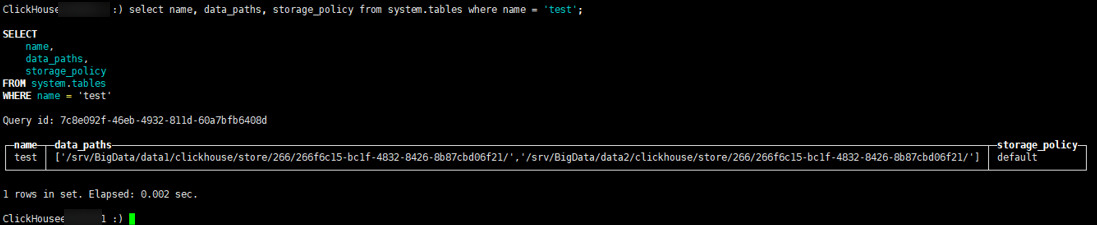
- Check whether the disk is successfully created.
Run the following commands to create a table on the ClickHouse server, insert data into the table, and check whether the data is correctly written to the disk:
create table test(`id` Int32,`name` String) engine=MergeTree() order by id;
insert into test values(1,'aa'),(2,'bb'),(3,'cc');

select name, data_paths, storage_policy from system.tables where name = 'test';
Feedback
Was this page helpful?
Provide feedbackThank you very much for your feedback. We will continue working to improve the documentation.


