
What Do I Do If a Linux Image File Is Not Pre-Configured When I Use It to Register a Private Image?
If an image file is not configured as instructed in Table 1 before it is exported from the original platform, you can use it to create an ECS, configure the ECS, and use the ECS to create a private image. Figure 1 shows the process.

An ECS can run properly only after Xen and KVM drivers are installed on it. If no such drivers are installed, the performance of the ECS will be affected and some functions will be unavailable. Ensure that KVM drivers have been installed for the image file before it is exported from the original platform. Otherwise, the ECSs created from the image will fail to start.
- For Xen, install native Xen and KVM drivers. For details, see How Do I Install Native Xen and KVM Drivers?
- For KVM, install native KVM drivers. For details, see Installing Native KVM Drivers.
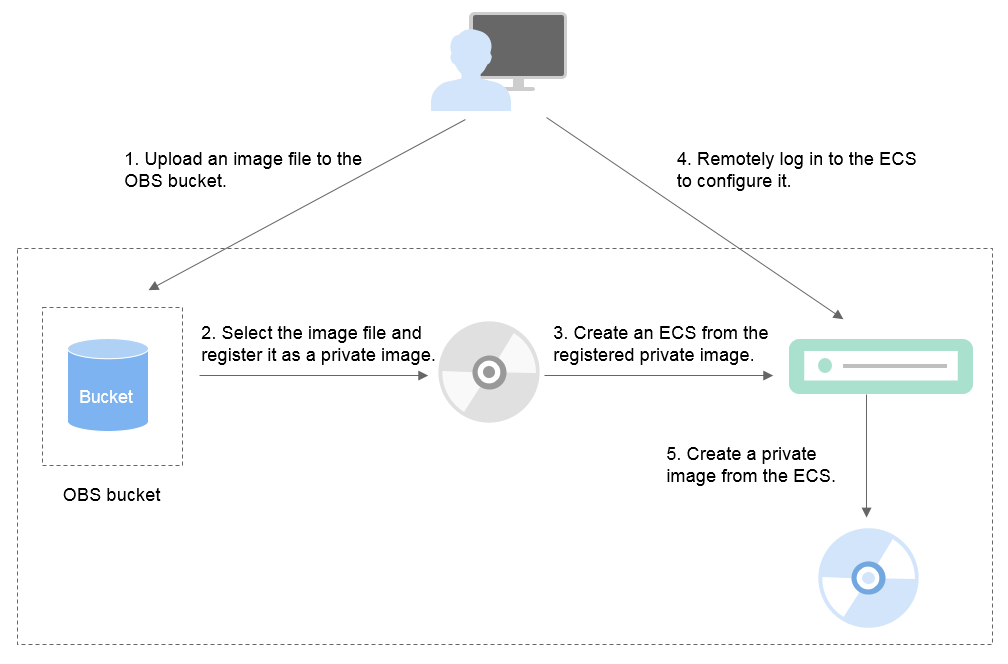
Step 1: Upload the Image File
Upload the external image file to an OBS bucket. For details, see Uploading an External Image File.
Step 2 Register the Image File as a Private Image
On the management console, select the uploaded image file and register it as a private image. For details, see Registering an External Image File as a Private Image.
Step 3: Create an ECS
Create an ECS from the private image.
- Access the IMS console.
- Log in to the management console.
- Under Computing, click Image Management Service.
The IMS console is displayed.
- Click the Private Images tab.
- Locate the row that contains the private image and click Apply for ECS in the Operation column.
- Set parameters as promoted to create an ECS. Pay attention to the following:
- You must add inbound rules for security groups of the ECS to ensure that the ECS can be accessed.
- If Cloud-Init has been installed in the image file, set a login password as prompted. If Cloud-Init is not installed, use the password or certificate contained in the image file to log in.
For details, see Elastic Cloud Server User Guide.
- Check the ECS to see if the private image used to create the ECS has been pre-configured.
- Check whether the ECS can be successfully started. If the start succeeds, Xen and KVM drivers have been installed for the external image file on the original platform or the drivers have been automatically installed for the private image on the cloud platform. If the start failed, install Xen and KVM drivers for the image file and start from Step 1: Upload the Image File again.
- Check whether you can log in to the ECS using your configured password or key. If you can, Cloud-Init has been installed. If you cannot, use the password or key contained in the image file to log in to the ECS and install Cloud-Init as instructed in Installing Cloud-Init.
- Check the network configuration by referring to Step 4: Configure the ECS.
If the ECS meets the preceding requirements, the private image has been pre-configured. Skip Step 4: Configure the ECS and Step 5: Create a Private Image from the ECS.
Step 4: Configure the ECS
Remotely log in to the ECS created in Step 3: Create an ECS to configure it.
- Log in to the ECS.
- Configure the network.
- Run the ifconfig command to check whether the private IP address of the ECS is the same as that displayed on the console. If they are inconsistent, delete files from the network rule directory as instructed in Deleting Files from the Network Rule Directory.
- Check whether DHCP is configured. If the ECS is configured with a static IP address, change its IP address assignment mode to DHCP as instructed in Configuring DHCP.
- Run the service sshd status command to check whether SSH is enabled. If it is disabled, run the service sshd start command to enable it. Ensure that your firewall (for example, Linux iptables) allows SSH access.
- Configure a file system.
- Change disk identifiers in the GRUB file to UUID. For details, see Changing Disk Identifiers in the GRUB File to UUID.
- Change disk identifiers in the fstab file to UUID. For details, see Changing Disk Identifiers in the fstab File to UUID.
- Clear the automatic mount configuration of non-system disks in the /etc/fstab file. For details, see Detaching Data Disks from an ECS.
- (Optional) Configure value-added functions.
- Install and configure Cloud-Init. For details, see Installing Cloud-Init and Configuring Cloud-Init.
- Enable NIC multi-queue. For details, see How Do I Enable NIC Multi-Queue for an Image?
- Configure an IPv6 address. For details, see How Do I Configure an ECS to Use DHCPv6?
Step 5: Create a Private Image from the ECS
Create a private image from the ECS. For details, see Creating a System Disk Image from a Linux ECS.
(Optional) Clear the Environment
After the image registration is complete, delete the image file as well as the intermediate private image and ECS to prevent them from occupying storage and compute resources.
- Delete the image registered in Step 2 Register the Image File as a Private Image.
- Delete the ECS created in Step 3: Create an ECS.
- Delete the image file from the OBS bucket.
Feedback
Was this page helpful?
Provide feedbackThank you very much for your feedback. We will continue working to improve the documentation.See the reply and handling status in My Cloud VOC.
For any further questions, feel free to contact us through the chatbot.
Chatbot


