Storing Hive Metadata to RDS
This topic describes how to switch the Hive metadata of the existing cluster to the metadata stored in the RDS database. This operation enables MRS clusters to share the same metadata, retains the metadata when the cluster is deleted, and avoids Hive metadata migration during cluster migration.
Creating and Configuring an RDS DB Instance
- Log in to the RDS console and buy an RDS DB instance. For details, see Buying a DB Instance.
- To ensure network communications between the cluster and the MySQL or PostgreSQL database, create the instance in the same VPC and subnet as the cluster.
- Security group rules of the RDS DB instance must allow inbound access from MySQL (default port 3306) and PostgreSQL (default port 5432) database ports.
For example, click the instance name on the RDS console to go to the instance management page. In the Connection Information area, click the name next to Security Group. On the page that is displayed, click the Inbound Rules tab, and click Add Rule. In the displayed Add Inbound Rule dialog box, in the Protocol & Port area, set the protocol to TCP and port to 3306. In the Source area, select IP address and enter the IP addresses of all nodes where the MetaStore instances of Hive are located.
- Hive can interconnect with RDS for MySQL and PostgreSQL databases. The supported versions are MySQL 5.7.x and 8.0 and PostgreSQL 14.
- In the navigation pane of the RDS console, choose Instances. Locate the row containing the RDS DB instance used by an MRS data connection, click Log In in the Operation column to log in to the DB instance as user root.
Figure 1 Logging in to an RDS DB instance

- On the home page of the instance, click Create Database to create a database.

If no new database is created, the MRS data connections will fail to configure.
Figure 2 Creating a database
- On the top of the page, choose Account Management > User Management.
- For clusters earlier than MRS 3.x, if the selected data connection type is RDS MySQL database, ensure that the database user is root. If the user is not root, create a user and grant permissions to the user by referring to Step 5 to Step 6.
- For MRS 3.x or later clusters, if the selected data connection type is RDS MySQL database, the database user must not be root. In this case, create a user and grant permissions to the user by referring to Step 5 to Step 6.
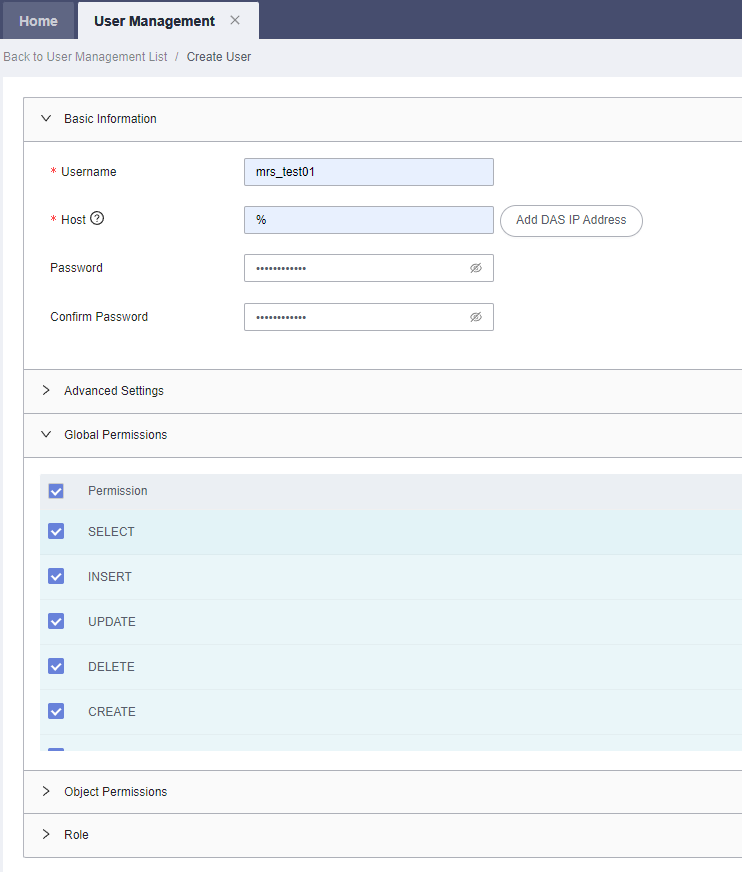
- Click Create User to create a non-root user, select all permissions in the Global Permissions area, and set other parameters as required.
Figure 3 Creating a user

- On the top of the page, choose SQL Operations > SQL Query, switch to the target database by database name, and run the following SQL statements to grant permissions to the database user. In the following statements, ${db_name} and ${db_user} indicate the name of the database to be connected to MRS and the name of the new user, respectively.
grant all privileges on ${db_name}.* to '${db_user}'@'%' with grant option;
grant reload on *.* to '${db_user}'@'%' with grant option;
flush privileges;
Figure 4 Assigning permissions to a database user
Creating an RDS Data Connection for an Existing MRS Cluster
Perform the following steps to create an RDS data connection for an existing MRS cluster.
- Log in to the MRS console.
- In the navigation pane, choose Data Connections.
- Click Create Data Connection.
- Set parameters by referring to Table 1.
Table 1 Parameters for creating a data connection Parameter
Example Value
Description
Type
-
The type of an external source connection. Value options are as follows:
- RDS PostgreSQL database. Clusters with Hive installed can connect to this type of database.
- RDS MySQL database. Clusters with Hive or Ranger installed can connect to this type of database.
Name
newtest
The name of a data connection.
Database Instance
-
The RDS database instance. This instance must be created in RDS before being used here, and the database must have been created. For details, see Creating and Configuring an RDS DB Instance. Click View DB Instance to view the created DB instances.
Database
dataname
The name of the database to be connected.
Username
datauser
The username for logging in to the database to be connected.
Password
-
The password for logging in to the database to be connected.
If the selected data connection type is RDS MySQL database, ensure that the database user is user root. If the user is not root, perform operations by referring to Creating and Configuring an RDS DB Instance.
- Click OK.
Configuring a Hive Data Connection
This function is not supported in MRS 3.0.5.
- Log in to the MRS console.
- In the navigation pane, choose Active Clusters.
- Click the name of a cluster to go to the cluster details page.
- On the Dashboard tab page, click Manage next to Data Connection.
- On the Data Connections page, the data connections of the cluster are displayed. You can click Disassociate to delete a data connection.
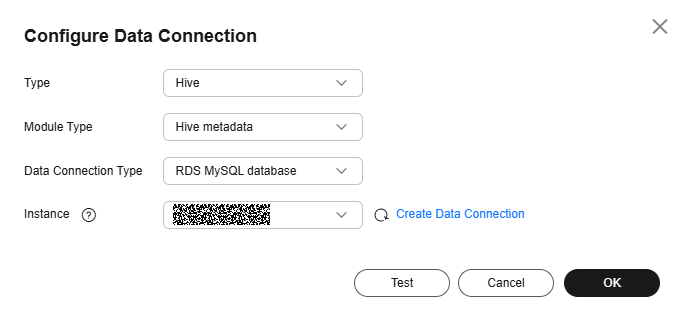
- If there is no associated data connection on the Data Connection dialog box, click Configure Data Connection to add a connection.
Only one data connection can be configured for a module type. For example, after a data connection is configured for Hive metadata, no other data connection can be configured for it. If no module type is available, the Configure Data Connection button is unavailable.
Table 2 Configuring a Hive data connection Parameter
Description
Type
Hive
Module Type
Hive metadata
Data Connection Type
- RDS PostgreSQL database (supported for clusters of MRS 1.9.x)
- RDS MySQL database
- Local database
Instance
This parameter is valid only when Data Connection Type is set to RDS PostgreSQL database or RDS MySQL database. Select the name of the connection between the MRS cluster and the RDS database. This instance must be created before being referenced here. You can click Create Data Connection to create a data connection. For details, see Creating an RDS Data Connection for an Existing MRS Cluster.
Figure 5 Configuring a data connection
- Click Test to test connectivity of the data connection.
- After the data connection is successful, click OK.
- Upload the open-source driver package of PostgreSQL to all nodes where MetaStore instances are deployed to replace the existing driver package in the cluster.
Upload the driver package postgresql-42.2.5.jar to the ${BIGDATA_HOME}/third_lib/Hive directory on all MetaStore instance nodes. Download the open-source driver package from https://repo1.maven.org/maven2/org/postgresql/postgresql/42.2.5/.
- For MRS 3.3.0 and later versions, to store Hive metadata into the RDS PostgreSQL database, log in to all MetaStore instance nodes and run the following command to replace the SQL file content:
sed -i 's#PRIMARY KEY ("MAPPING_ID"),#PRIMARY KEY (MAPPING_ID),#g' $BIGDATA_HOME/FusionInsight_Current/*_MetaStore/install/hive-3.1.0/scripts/metastore/upgrade/postgres/hive-schema-3.1.0.postgres.sql
sed -i 's#UNIQUE ("CAT_NAME", "DB_NAME", "TBL_NAME")#UNIQUE (CAT_NAME, DB_NAME, TBL_NAME)#g' $BIGDATA_HOME/FusionInsight_Current/*_MetaStore/install/hive-3.1.0/scripts/metastore/upgrade/postgres/hive-schema-3.1.0.postgres.sql
- On the cluster details page, click the Components tab and then Hive.
For MRS 3.2.0-LTS or later, if multiple MRS clusters are interconnected with the same RDS database, choose Service Configuration, change Basic to All in the search area, choose MetaStore > Customization in the navigation pane, add metastore.whether.query.all.tokens to the hive.metastore.customized.configs parameter, set the value to false, and click Save Configuration.
- On the Service Status tab page, choose More > Restart Service and click OK to restart the Hive service.
- If IAM users are not synchronized, click the Dashboard tab on the cluster details page, click Synchronize on the right of IAM User Sync, and then restart the Hive service.
- Hive will create necessary database tables in the specified database after restart. (If tables already exist, they will not be created again.)
Verifying Hive Metadata Storage in an External Database
- Log in to the node where the Hive client is installed and run the following commands. The authenticated user must have the permission to create Hive tables.
Switch to the client installation directory.
cd Client installation directoryLoad the environment variables.
source bigdata_env
Authenticate the user. Skip this step for clusters with Kerberos authentication disabled.
kinit Service user - Run the following command to log in to the Hive client:
beeline
- Run the following commands to create a Hive table and insert data to the table:
Create a table:
create table user_info(id string,name string,gender string,age int,addr string);Insert data:
insert into table user_info(id,name,gender,age,addr) values("12005000201","A","man",19,"city"); - On the SQL query page of the database of the interconnected RDS for MySQL instance, run the following command:
select * from tbls;
If the query result contains information about the Hive table created in Step 3, the Hive metadata is successfully stored to the external RDS MySQL database.
Figure 6 Table information queried
Feedback
Was this page helpful?
Provide feedbackThank you very much for your feedback. We will continue working to improve the documentation.See the reply and handling status in My Cloud VOC.
For any further questions, feel free to contact us through the chatbot.
Chatbot


