Connecting to a Third-party Image Repository
HSS can connect to third-party image repositories and provides security detection and management capabilities for vulnerabilities, baselines, and malicious files, helping you detect security risks in images in a timely manner. This section describes how to connect a third-party image repository to HSS.
Prerequisite
The repository cluster (cluster where the repository is deployed) has been connected to HSS and is in the Running state. For details, see Installing the Container Security Agent.
Constraints
- Third-party cloud container clusters: Alibaba Cloud, Tencent Cloud, AWS, and Azure.
- Third-party image repositories: Harbor and JFrog.
Connecting to a Third-party Image Repository
- Log in to the HSS console.
- Click
 in the upper left corner and select a region or project.
 - In the navigation pane, choose .
- Click the Third-Party Image Repository tab.
- Click Connect to Third-Party Image Repository.
- Enter the required information as prompted. For details about the parameters, see Table 1.
Figure 1 Connecting to a Third-party image repository

Table 1 Parameters for accessing an image repository Parameter
Description
Example Value
Jump Cluster
Select the cluster that carries the image repository.
cluster01
Scan Component Source
The image scan component is used to pull images, scan and analyze required metadata, and transmit the metadata to the server. The server performs security detection on the metadata, such as vulnerabilities, baselines, malicious files, and sensitive information.
The image scan component needs to be uploaded to the image repository. You can obtain the image scan component in either of the following ways:
- SWR: The cluster can communicate with SWR and obtain image scan components from SWR.
- Manually uploaded: If the network between the cluster and SWR is disconnected, you need to manually upload the image scan component to the image repository.
SWR
Image Repository Name
Enter the full name of an image repository.
test
Image Repository Type
Click
 and select the type of the image repository.
Harbor
Image Repository API Version
Click
 and select the interface version of the image repository.
V1
Image Repository Project
If you select Manually uploaded and the image repository type is Harbor, you need to enter image repository project information.
-
Image Repository Path
If you select Manually uploaded and set the image repository type to Jfrog, you need to enter the image repository path.
-
Communication Type
Select the communication protocol type of the image repository.
- HTTP
- HTTPS
HTTPS
Image Repository Address
Enter the image repository address.
You can enter the website address or IP address:port number of the image repository.
Example: myharbor.com
myharbor.com
Username
Enter the login username.
-
Password
Enter the password of the login user.
-
- (Optional) If you select Manually uploaded for the scan component, perform the following operations to configure the scan components after entering the access information:
- For the CN North-Beijing1, CN North-Beijing4, CN East-Shanghai1, CN East-Shanghai2, CN South-Guangzhou, CN-Hong Kong, AP-Singapore, CN Southwest-Guiyang1, and AP-Jakarta regions, perform the following operations:
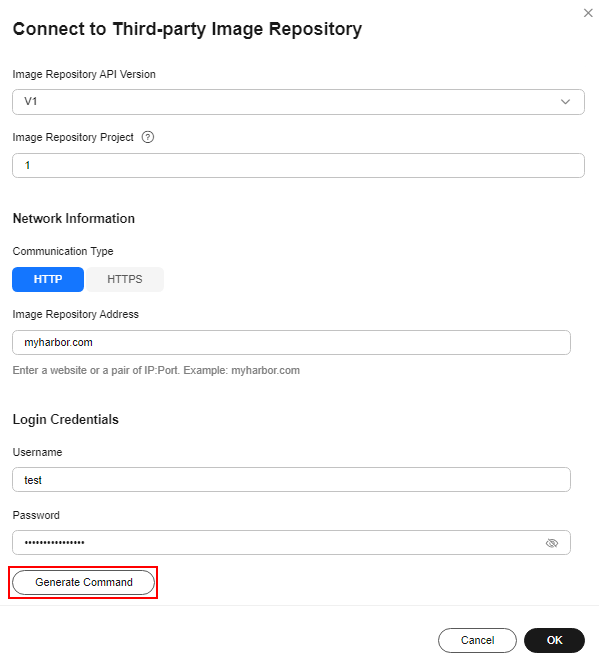
- In the Connect to Third-Party Image Repository dialog box, click Generate Command.
Figure 2 Generating a command

- In the Connect to Third-party Image Repository dialog box, click ImageScanComponent.rar to download the scan component package.
Figure 3 Downloading a scan component

- Copy the ImageScanComponent.rar to any cluster node.
- In the Connect to Third-party Image Repository dialog box, click Copy the following command. Run the copied command on the cluster node where ImageScanComponent.rar is located. The scan component will be uploaded to the image repository.
Figure 4 Copying a command

- If the information shown in Figure 5 is displayed, the scan component is uploaded successfully.
- In the Connect to Third-Party Image Repository dialog box, click Generate Command.
- For other regions, perform the following operations:
- In the Connect to Third-Party Image Repository dialog box, click Generate Command.
Figure 6 Generating commands

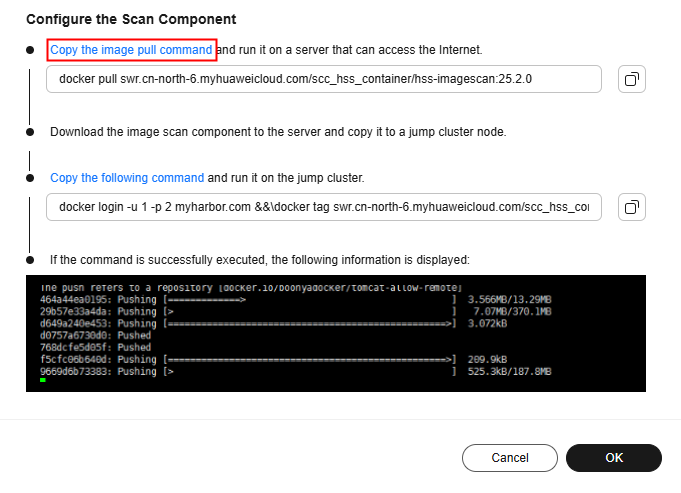
- In the Connect to Third-party Image Repository dialog box, click Copy the image pull command.
Figure 7 Downloading a scan component

- Log in to any Linux server that can access the Internet, paste and run the command copied in 7.b to download the scan component image.
- Copy the downloaded scan component image to any node in the repository cluster.
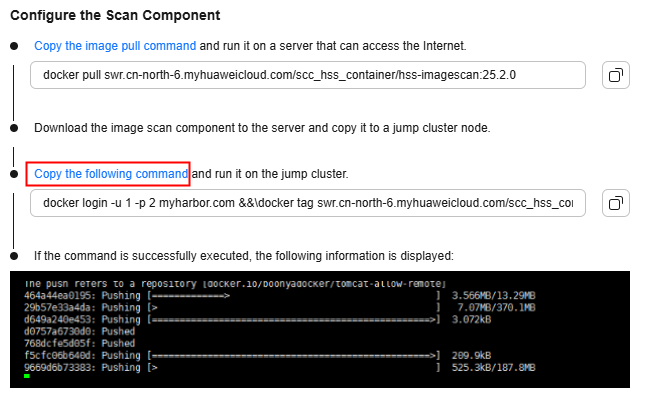
- In the Connect to Third-party Image Repository dialog box, click Copy the following command. Run the copied command on the cluster node where the scan component is located. The scan component will be uploaded to the image repository.
Figure 8 Copying commands

- If the information shown in Figure 9 is displayed, the scan component is uploaded successfully.
- In the Connect to Third-Party Image Repository dialog box, click Generate Command.
- For the CN North-Beijing1, CN North-Beijing4, CN East-Shanghai1, CN East-Shanghai2, CN South-Guangzhou, CN-Hong Kong, AP-Singapore, CN Southwest-Guiyang1, and AP-Jakarta regions, perform the following operations:
- Click OK to connect to the image repository.
- On the Third-party Image Repositories tab page, view the access result in the Image Repository Status column of the target image repository.
Feedback
Was this page helpful?
Provide feedbackThank you very much for your feedback. We will continue working to improve the documentation.See the reply and handling status in My Cloud VOC.
For any further questions, feel free to contact us through the chatbot.
Chatbot


