
Application Services
Adding an application service is the first step for API data security protection. After an application is added and the proxy is used to access the application, the system automatically sorts out the APIs, accounts, and sensitive data in the application, and protects and audits the assets.
So, you need to manually add the application assets to be audited and protected to the Services page so that the application assets can be accessed through a proxy.
For example, assume that you need to add application demo. The domain name of the application asset is example.com, the original address of the application is 172.xx.xx.53:8182, the application protocol is HTTPS, and the address of the API data security protection server is 172.xx.xx.44:8441.
The following describes how to add an application asset and enable proxy access.
Adding a Proxy Application
- Log in to the web console of the API data security protection system as user sysadmin.
- In the navigation pane on the left, choose Assets > Services.
- Click Add.
- In the Add Service dialog box, set asset information.
Figure 1 Adding an application asset
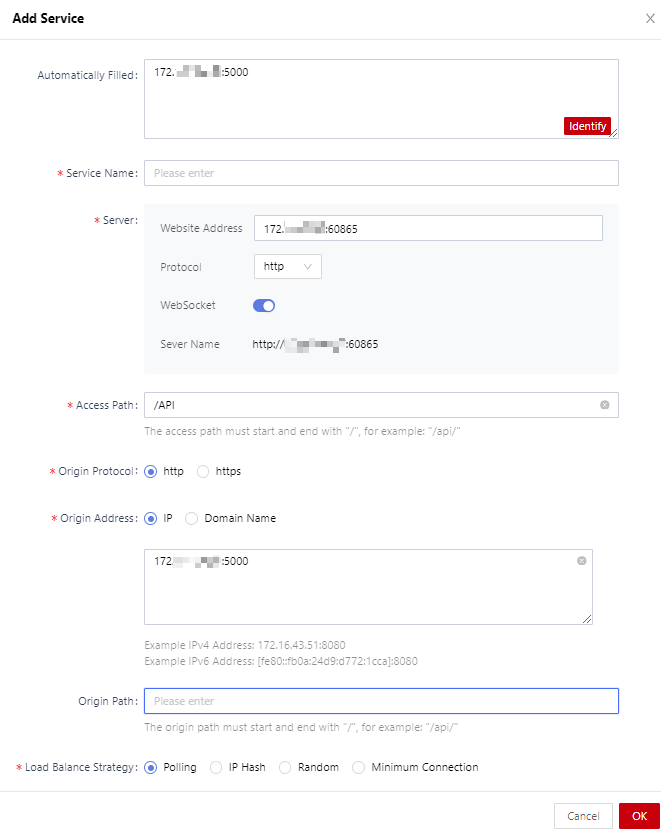
Table 1 Adding an application asset Parameter
Description
Automatically Filled
Copy the original URL of the application server to this text box and click Identify to let the system intelligently identify and set parameters.
Service Name
The name of an application service.
Server-Website Address
Enter the address that the client user accesses and bind it to the application protocol.
- If you enter a domain name (for example, example.com), you do not need to enter a port number. After the configuration, guests access application assets through the domain name proxy.
- If you enter a domain name, you need to modify the mapping between the domain name and IP address so that the domain name can be resolved to the IP address for API data security protection. Generally, you can modify the mapping between the domain name and IP address in the DNS service. If no DNS is available or during the test, you can modify the hosts file on the client to resolve the domain name to the IP address for API data security protection.
- If you enter an IP address, enter the IP address and proxy port for API data security protection. You can enter any idle port ranging from 1 to 65535. After the configuration, guests can use the combination of IP address plus port to access application assets.
Server-Protocol
- Select the proxy protocol of the API data security protection server.
- If you select https, you need to select a certificate from the certificate drop-down list.
Select Certificate
If the application protocol is set to https, select a certificate from the certificate drop-down list. You need to upload the certificate or make a certificate on the certificate management page in advance. For details, see Managing Certificates.
Access Path
Proxy path, which is the prefix of the URL for the client access.
Origin Protocol
Select the origin server protocol, that is, the protocol used by the original address of the application.
Origin Address
Type of the origin server address. It can be an IP address or domain name.
- If you select IP, enter the original IP address of the application server, for example, 172.16.35.53 and port shown in the figure.
- If you select Domain Name, enter the origin domain name of the application server.
DNS Server
If you select a domain name as the origin server address, enter the DNS address of the proxy server.
Server IP
If the origin server address is a domain name, you can enter the server IP address without entering the DNS address.
Origin Path
Prefix of the origin server URL.
Load Balance Strategy
Select the load balancing policy for proxy access. If there are multiple origin server addresses, the proxy access will be distributed across the servers based on the configured load balancing policy.
Authorization Status
Whether to enable the application proxy service.
- Click OK.
- After the application domain name or IP address (for example, example.com) is added, guests can access the application through the proxy.
Figure 2 Application asset list

Related Operations
- To edit an application asset, click Edit on the right of the target application and modify its configuration.
- To delete an application asset that you no longer need, click Delete on the right of the target application to delete it.
- To batch delete application assets, select them all and click Delete in the upper right corner.
- Click
 next to the target application and select endpoint configuration from the drop-down list to view its endpoint details.
Feedback
Was this page helpful?
Provide feedbackThank you very much for your feedback. We will continue working to improve the documentation.See the reply and handling status in My Cloud VOC.
For any further questions, feel free to contact us through the chatbot.
Chatbot


