

Managing DCS Instance Shards and Replicas
This section describes how to query the shards and replicas of a master/standby, Cluster, or read/write splitting DCS Redis instance, and how to manually promote a replica to master.
- By default, a master/standby or read/write splitting instance has only one shard with one master and one replica. You can view the sharding information on the Node Management page. To manually switch the master and replica roles, see Performing a Master/Standby Switchover for a DCS Instance.
- For a master/standby instance with multiple replicas, you can set the failover priority on the Node Management page or remove a replica's IP address from the domain name. (This operation is supported only when there are multiple replicas. After the IP address is removed, it will be excluded from the information returned when you access the instance using the read-only domain name.)
- A Proxy Cluster or Redis Cluster instance consists of multiple shards. Each shard has one master and one replica by default. You can view the sharding information on the Node Management page and manually switch the master and replica roles based on service requirements.
- You can view the number of shards of a Cluster instance in the Cache Size area on the Instance Details card. For details, see Viewing and Modifying Basic Information About a DCS Instance.
- After a Cluster instance is created, you can change its number of shards by referring to Changing DCS Instance Specifications.
Notes and Constraints
- This feature is supported only by instances of DCS Redis 4.0 or later.
- For single-node instances, this feature is supported only in regions with Node Management available.
Procedure
- Log in to the DCS console.
- Click
 in the upper left corner of the management console and select the region where your instance is located.
 - In the navigation pane, choose Cache Manager.
- Click the name of an instance to go to its details page.
- Choose Node Management.
All shards of the instance are displayed, including Shard Name, Shard ID, and Replicas.
- Click
 next to a shard name to expand all replicas of the shard, including Replica IP Address, Node ID, Replica ID, Status, Role, and AZ. Figure 1 Node management (Cluster instance)
 Figure 2 Node management (master/standby instance)
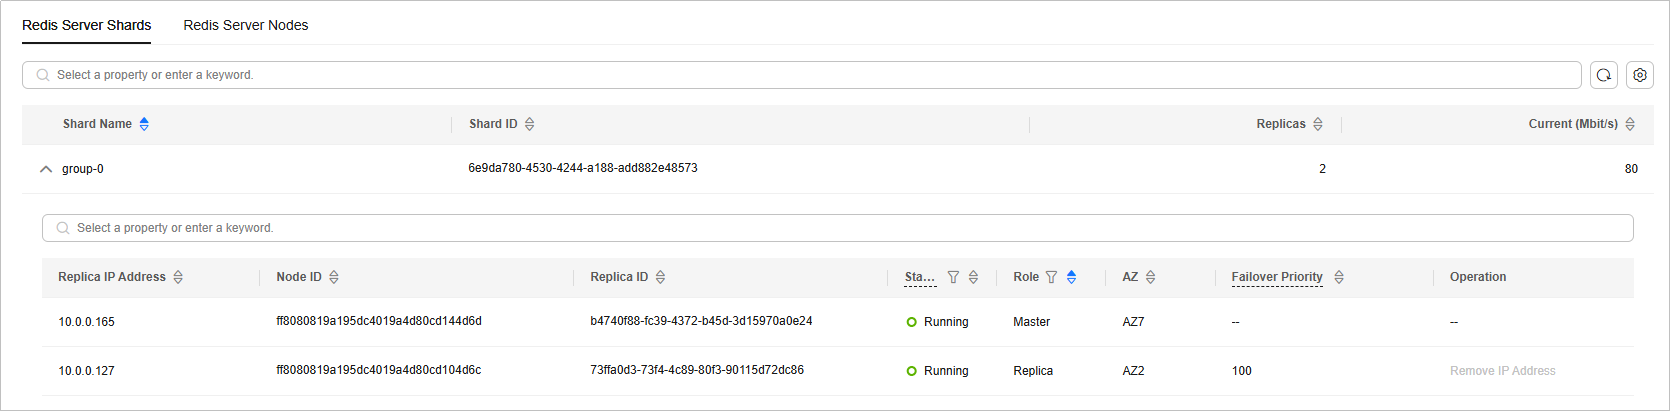 Figure 3 Node management (single-node instance)

You can also perform the following operations on replicas:
- Cluster instance
On the Redis Server Shards tab, expand the information about a single shard of the Cluster instance and click Promote to Master in the Operation column of a replica to promote the replica to the master. For a Proxy Cluster instance, you can also view the proxy node information (IP Address, Node ID, and Name) on the Proxies tab.
- Master/Standby or read/write splitting instance
- If a master/standby instance has more than one replica, you can remove the IP address of a read-only replica by clicking Remove IP Address in the Operation column of the replica. After the IP address is removed, the read-only domain name will no longer resolve to that IP address.
If a master/standby instance has only one replica, its IP address cannot be removed.
- If a master/standby or read/write splitting instance has multiple replicas, click
 in the Failover Priority column to change the priority of the replica to be promoted to master.
 If the master fails, the replica with the smallest priority number is automatically promoted to master. For multiple replicas that have the same priority, an internal selection and failover will be performed inside the system. The priority ranges from 0 to 100. 0 indicates that the replica will never be automatically promoted, 1 indicates the highest priority, and 100 indicates the lowest priority.
- For a read/write splitting instance, you can also view the proxy node information (IP Address, Node ID, and Name) on the Proxies tab.
- If a master/standby instance has more than one replica, you can remove the IP address of a read-only replica by clicking Remove IP Address in the Operation column of the replica. After the IP address is removed, the read-only domain name will no longer resolve to that IP address.
- Single-node instance
A single-node instance has only one replica. You can view the node information of the instance on the Node Management page. Other operations are not supported.
- Cluster instance
Helpful Links
- For details about shards and replicas of a DCS Redis instance, see What Are Shard and Replica Quantities?.
- You can call APIs to query shards and replicas, set priorities for the master and replicas, and remove replicas' IP addresses. For details, see Shards and Replicas.
What is your overall rating for this page?
Thank you very much for your feedback. We will continue working to improve the documentation.See the reply and handling status in My Cloud VOC.
For any further questions, feel free to contact us through the chatbot.
Chatbot


