Configuring a Scheduling Calendar
- You can configure a scheduling calendar and specify the working days for scheduling a job.
- After creating a scheduling calendar, you can go to the DataArts Factory console, open a job, click Scheduling Setup, select Run periodically for Scheduling Type, and select the calendar you have created for Scheduling Calendar. A dry run is performed beyond the calendar, and the job is executed normally within the calendar range.

If the scheduling calendar function is used, the system checks whether the planned execution time of a job instance is a working day during data job scheduling or patching.
- If the planned execution time of the instance is a working day in the calendar, the instance is executed normally.
- If the planned execution time of the instance is not a working day in the calendar, a dry run is performed.
- A dry run of a scheduling calendar is counted in the quota for the number of job node scheduling times per day.
Constraints
This function is available for batch processing jobs but not for real-time processing jobs.
Procedure
- Log in to the DataArts Studio console by following the instructions in Accessing the DataArts Studio Instance Console.
- On the DataArts Studio console, locate a workspace and click DataArts Factory.
- In the left navigation pane, choose Configuration > Configure.
- Choose Scheduling Calendars.
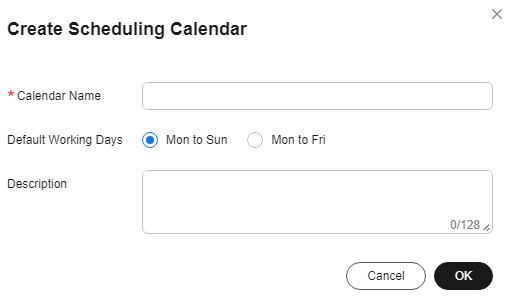
- Click Add. The Create Scheduling Calendar dialog box is displayed.
Figure 1 Create Scheduling Calendar dialog box

- Set parameters for the scheduling calendar.
Set Calendar Name, Default Working Days, and Description.
You can select Mon to Fri or Mon to Sun for Default Working Days. By default, Mon to Fri is selected.
- Click OK.
After creating the calendar, you can use it for jobs. Go to the DataArts Factory console, open a job, click Scheduling Setup, select Run periodically for Scheduling Type, and select the calendar you have created for Scheduling Calendar. A dry run is performed beyond the calendar, and the job is executed normally within the calendar range.
More Operations
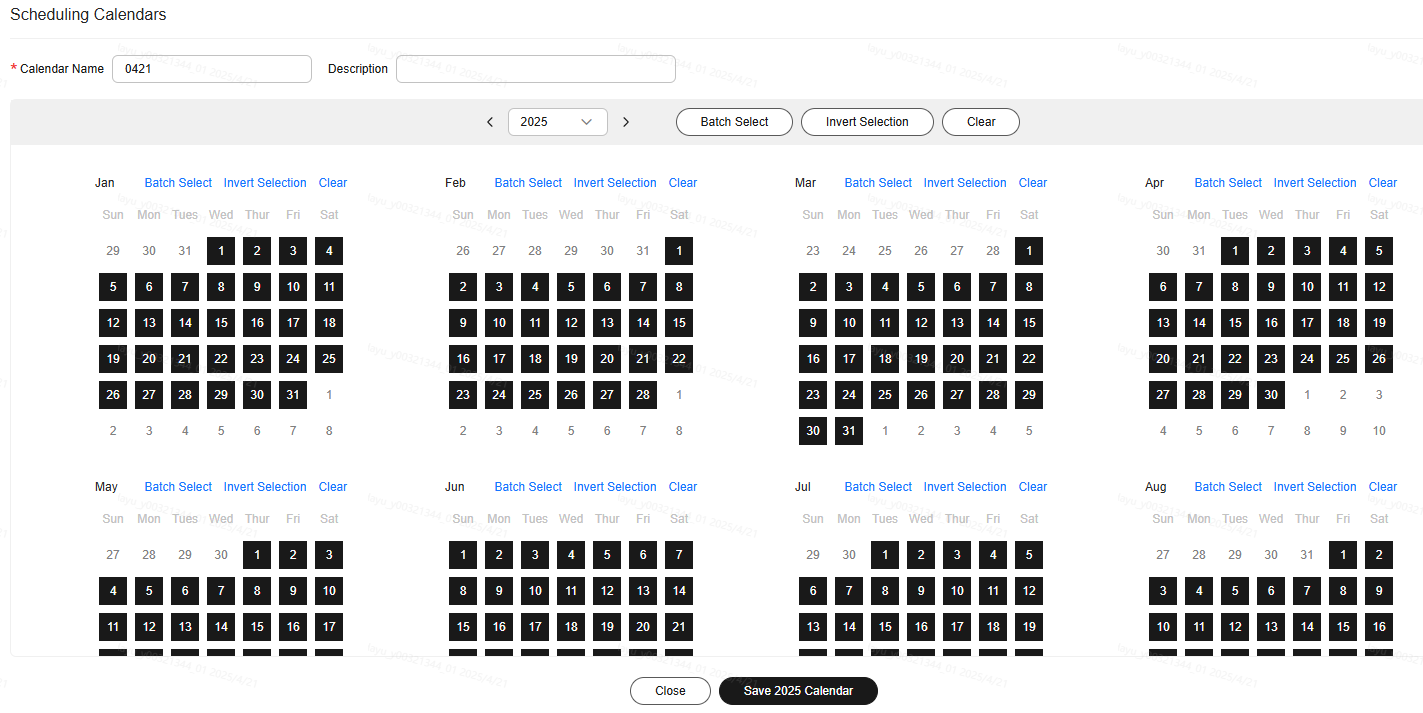
- Modify: Click Modify in the Operation column.
- Batch Select: Select Monday to Friday throughout the current month.
- Invert Selection: Select all non-working days.
- Clear: Clear selected working days.
Figure 2 Modifying a scheduling calendar

- Delete: Locate a calendar and click Delete in the Operation column. In the displayed dialog box, click OK.
If a calendar is used by a job, the calendar cannot be deleted. If you delete such a calendar, job scheduling may be affected.
- View Jobs: Locate a calendar and click View Jobs in the Operation column to view the jobs that use the calendar. You can download the list of the jobs.
Feedback
Was this page helpful?
Provide feedbackThank you very much for your feedback. We will continue working to improve the documentation.See the reply and handling status in My Cloud VOC.
For any further questions, feel free to contact us through the chatbot.
Chatbot


