

Help Center/ ModelArts/ Troubleshooting/ DevEnviron/ Custom Image Faults/ Unable to Access a Notebook Instance Created Using an Old Image
Updated on 2026-07-10 GMT+08:00
Unable to Access a Notebook Instance Created Using an Old Image
Symptom
If you created a notebook instance using an image registered before June 2023, the instance may run correctly and allow SSH connections, but its webpage might fail to load. You will see this error message:
Access to your notebook is denied due to lost token or incorrect token. Please log in again. Click here to return to the login page.
Figure 1 Error message example

Possible Causes
Notebook 1.0 was released before June 2023 and has been discontinued. You need to use the new version of notebook.
Solution
- Check whether the notebook instance is started using Notebook 1.0.
- Enable SSH remote development when creating a notebook instance. For details, see Creating a Notebook Instance.
- After connecting to the notebook instance using SSH, check whether the notebook instance is started using Notebook 1.0.
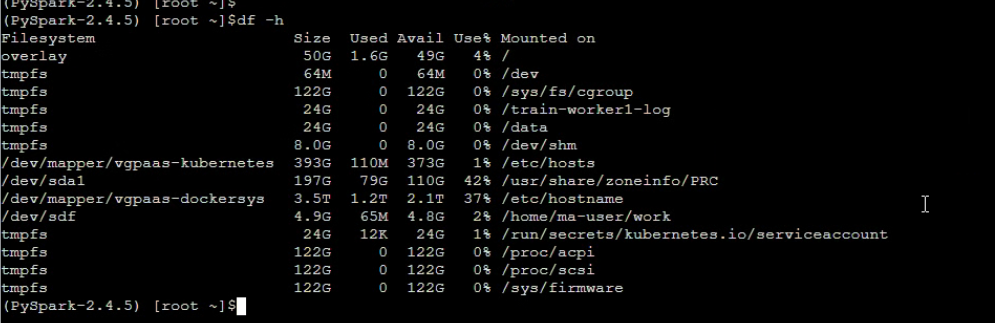
- Method 1: Run the df -h command.
If the /modelarts directory is not found, the notebook instance is started using Notebook 1.0.
Figure 2 /modelarts directory not found
- Method 2: Run the ps -ef command to check processes.
If the processes shown in the following figure are found, the notebook instance is started using Notebook 1.0.
Figure 3 Checking processes

- Method 1: Run the df -h command.
- Stop the notebook instance.
- Log in to the ModelArts console. In the navigation pane on the left, perform the following operations:
- New version: Choose Model Build > Notebook.
- Old version: Choose Development Space > Notebook.
- On the Notebook page, click Stop in the Operation column. In the displayed dialog box, click OK. For details, see Starting, Stopping, or Deleting a Notebook Instance.
- Log in to the ModelArts console. In the navigation pane on the left, perform the following operations:
- Delete historical images.
- Log in to the ModelArts console. In the navigation pane on the left, perform the following operations:
- New version: Choose Asset Management > Images.
- Old version: Choose Asset Management > Image Management.
- In the Registered Images tab, click the target image name. In the Operation column, click Delete.
- In the displayed dialog box, select the associated SWR image you want to delete, enter DELETE, and click OK.
- Log in to the ModelArts console. In the navigation pane on the left, perform the following operations:
- Register the image again.
- Log in to the ModelArts console. In the navigation pane on the left, perform the following operations:
- New version: Choose Asset Management > Images.
- Old version: Choose Asset Management > Image Management.
- In the Register Image tab, click Register.
- On the displayed page, set the parameters and click Register. For details, see Creating a Custom Image for a Notebook Instance.
- Log in to the ModelArts console. In the navigation pane on the left, perform the following operations:
- Create a notebook instance using the newly registered image. For details, see Creating a Notebook Instance.
Parent topic: Custom Image Faults
What is your overall rating for this page?
0
1
2
3
4
5
6
7
8
9
10
Very dissatisfiedVery satisfied
Thank you very much for your feedback. We will continue working to improve the documentation.See the reply and handling status in My Cloud VOC.
The system is busy. Please try again later.
For any further questions, feel free to contact us through the chatbot.
Chatbot


