
Help Center/
Huawei Qiankun CloudService/
Security Cloud Services/
Qiankun Shield and Firewall Onboarding/
Onboarding USG6000E Series Firewalls/
Logging in to the Web UI
Updated on 2024-01-24 GMT+08:00
Logging in to the Web UI
Procedure
- Configure an IP address for the network interface on the management PC so that the PC can communicate with the management interface (default IP address: 192.168.0.1/24) on the device. The following steps assume that the PC is running Windows 10.
- Click Start and then Control Panel.
- Choose Network and Internet > Network and Sharing Center. In the navigation pane on the left, click Change adapter settings.
- Right-click the network adapter to be configured and choose Properties from the shortcut menu. Double-click Internet Protocol Version 4 (TCP/IPv4) and configure the IP address shown in Figure 1.

If the PC has multiple network adapters and you cannot determine which network adapter is used, you are advised to remove and install the network cable and observe the status of each network adapter to determine the network adapter to be configured.
- Disable the network connection proxy.
If the network connection proxy is set, you may fail to log in to the web UI of the device. Therefore, you are advised to cancel the setting.
- Go back to Control Panel and click Internet Options.
- On the Connections tab page, click LAN settings in the Local Area Network (LAN) settings area.
Check whether a proxy server is set. If so, deselect the proxy server.
Figure 2 Setting a proxy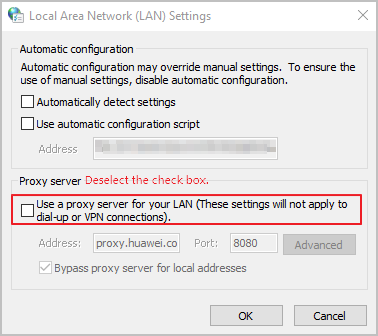
- Open a browser (Google Chrome is recommended) and access the standard configuration page at https://192.168.0.1:8443.
- Before you log in for the first time, you need to register an administrator account. Complete the registration as prompted.
- After the registration is complete, the login page is displayed. Use the registered administrator account to log in.

Parent topic: Onboarding USG6000E Series Firewalls
Feedback
Was this page helpful?
Provide feedbackThank you very much for your feedback. We will continue working to improve the documentation.See the reply and handling status in My Cloud VOC.
The system is busy. Please try again later.
For any further questions, feel free to contact us through the chatbot.
Chatbot


