Bu sayfa henüz yerel dilinizde mevcut değildir. Daha fazla dil seçeneği eklemek için yoğun bir şekilde çalışıyoruz. Desteğiniz için teşekkür ederiz.
- What's New
- Service Overview
- Getting Started
- User Guide
- User Guide (Staking Nodes)
-
Developer Guide
-
Ethereum Node Engine
- Introduction
- JSON-RPC API Request Examples
- Application Development
- Smart Contract Development
-
Ethereum APIs
- Dedicated Edition
-
Shared Edition
- eth_blocknumber
- eth_getBlockByNumber
- eth_getUncleByBlockNumberAndIndex
- eth_getUncleByBlockHashAndIndex
- eth_getUncleCountByBlockNumber
- eth_getUncleCountByBlockHash
- eth_getBlockByHash
- eth_getTransactionByHash
- eth_getTransactionCount
- eth_getTransactionByBlockHashAndIndex
- eth_getTransactionByBlockNumberAndIndex
- eth_getBlockTransactionCountByHash
- eth_getBlockTransactionCountByNumber
- eth_getTransactionReceipt
- eth_sendRawTransaction
- eth_call
- eth_createAccessList
- eth_estimateGas
- eth_feeHistory
- eth_maxPriorityFeePerGas
- eth_gasPrice
- eth_getBalance
- eth_subscribe
- eth_unsubscribe
- eth_getStorageAt
- eth_getCode
- eth_getProof
- eth_getLogs
- eth_getFilterChanges
- eth_getFilterLogs
- eth_newBlockFilter
- eth_newFilter
- eth_newPendingTransactionFilter
- eth_uninstallFilter
- eth_chainId
- web3_sha3
- web3_clientVersion
- net_version
- net_listening
- TRON Node Engine
-
Polygon PoS
- Polygon PoS Introduction
- HTTP Request Examples
- WebSocket Request Examples
-
Polygon PoS APIs
- Dedicated Edition
-
Shared Edition
-
Ethereum JSON-RPC APIs
- eth_blocknumber
- eth_getBlockByNumber
- eth_getUncleByBlockNumberAndIndex
- eth_getUncleByBlockHashAndIndex
- eth_getUncleCountByBlockNumber
- eth_getUncleCountByBlockHash
- eth_getBlockByHash
- eth_getTransactionByHash
- eth_getTransactionCount
- eth_getTransactionByBlockHashAndIndex
- eth_getTransactionByBlockNumberAndIndex
- eth_getBlockTransactionCountByHash
- eth_getBlockTransactionCountByNumber
- eth_getTransactionReceiptsByBlock
- eth_getTransactionReceipt
- eth_sendRawTransaction
- eth_call
- eth_createAccessList
- eth_estimateGas
- eth_feeHistory
- eth_maxPriorityFeePerGas
- eth_gasPrice
- eth_getBalance
- eth_getRootHash
- eth_subscribe
- eth_unsubscribe
- eth_getStorageAt
- eth_accounts
- eth_getCode
- eth_getProof
- eth_getLogs
- eth_getFilterChanges
- eth_getFilterLogs
- eth_newBlockFilter
- eth_newFilter
- eth_newPendingTransactionFilter
- eth_uninstallFilter
- eth_chainId
- web3_sha3
- web3_clientVersion
- Polygon JSON-RPC APIs
-
Ethereum JSON-RPC APIs
-
Arbitrum
- Arbitrum Introduction
- HTTP Request Examples
- WebSocket Request Examples
-
Arbitrum APIs
-
Shared Edition
-
Ethereum JSON-RPC APIs
- eth_blocknumber
- eth_getBlockByNumber
- eth_getUncleByBlockNumberAndIndex
- eth_getUncleByBlockHashAndIndex
- eth_getUncleCountByBlockNumber
- eth_getUncleCountByBlockHash
- eth_getBlockByHash
- eth_getTransactionByHash
- eth_getTransactionCount
- eth_getTransactionByBlockHashAndIndex
- eth_getTransactionByBlockNumberAndIndex
- eth_getBlockTransactionCountByHash
- eth_getBlockTransactionCountByNumber
- eth_syncing
- eth_getTransactionReceipt
- eth_sendRawTransaction
- eth_call
- eth_createAccessList
- eth_estimateGas
- eth_feeHistory
- eth_maxPriorityFeePerGas
- eth_gasPrice
- eth_getBalance
- eth_subscribe
- eth_unsubscribe
- eth_getStorageAt
- eth_accounts
- eth_getCode
- eth_getProof
- eth_getLogs
- eth_getFilterChanges
- eth_getFilterLogs
- eth_newBlockFilter
- eth_newFilter
- eth_newPendingTransactionFilter
- eth_uninstallFilter
- eth_chainId
- web3_sha3
- web3_clientVersion
-
Ethereum JSON-RPC APIs
-
Shared Edition
-
BNB Smart Chain
- BNB Smart Chain Introduction
- HTTP Request Examples
- WebSocket Request Examples
-
BNB Smart Chain APIs
- Dedicated Edition
-
Shared Edition
- eth_blocknumber
- eth_getBlockByNumber
- eth_hashrate
- eth_getUncleCountByBlockNumber
- eth_getUncleCountByBlockHash
- eth_getBlockByHash
- eth_getTransactionByHash
- eth_getTransactionCount
- eth_getTransactionByBlockHashAndIndex
- eth_getTransactionByBlockNumberAndIndex
- eth_getBlockTransactionCountByHash
- eth_getBlockTransactionCountByNumber
- eth_syncing
- eth_getTransactionReceipt
- eth_sendRawTransaction
- eth_call
- eth_mining
- eth_estimateGas
- eth_feeHistory
- eth_maxPriorityFeePerGas
- eth_gasPrice
- eth_getBalance
- eth_subscribe
- eth_unsubscribe
- eth_getStorageAt
- eth_accounts
- eth_getCode
- eth_getProof
- eth_getLogs
- eth_getFilterChanges
- eth_getFilterLogs
- eth_newBlockFilter
- eth_newFilter
- eth_newPendingTransactionFilter
- eth_uninstallFilter
- eth_chainId
- web3_sha3
- web3_clientVersion
- txpool_status
- net_listening
- net_version
- Batch Requests
-
Ethereum Node Engine
- API Reference
-
FAQs
-
APIs
- How Do I Determine Whether Flow Control Is Triggered for an API?
- What Are the Flow Control Policies for Full Nodes?
- How Many Methods Can Be Included in a JSON-RPC Batch Request for the Dedicated Version?
- How Many WebSocket Connections Can Be Made Each Time?
- How Do I Use HTTP Endpoints and Authentication Credentials to Access Nodes?
- Staking Nodes
-
APIs
- General Reference
Show all
Copied.
How Do I Use a Certificate and an Authentication Credential to Access a Node?
You can perform the following operations to use a certificate and an authentication credential to access a node.
Prerequisites
- You have created a full node.
- You have obtained a key on Staking Launchpad. For details, see NES User Guide (Staking Nodes).
- You have downloaded a validator client. Check the Prysm Documentation or Lighthouse Documentation to download a client as required.
Procedure
- Create and obtain an authentication credential.
- On the NES console, choose Dedicated > Authentication Credential and click Create Credential.
- Describe the credential and set the access policy.
Figure 1 Creating a credential
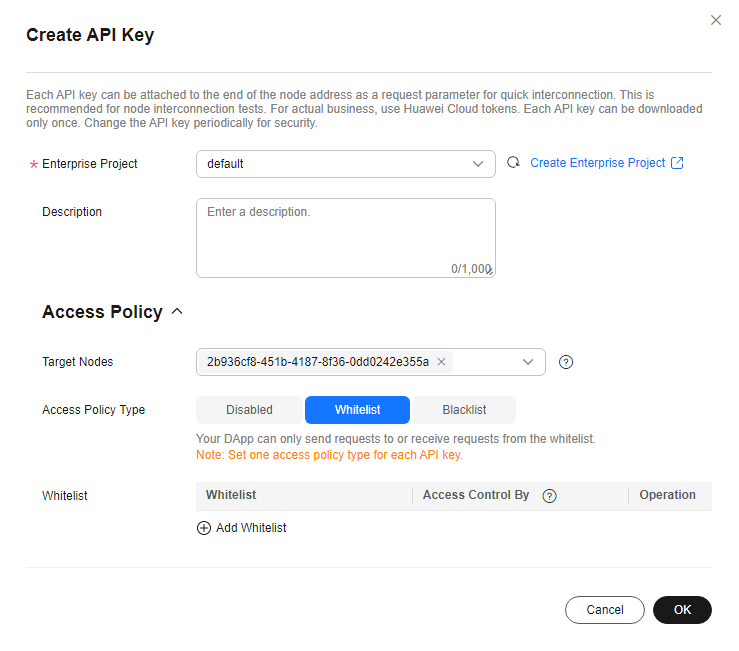
- Click OK. The credential is created and then automatically downloaded as a ZIP package.
NOTE:
Each credential can be downloaded only once. Change the credential periodically for security.
- Decompress the package and open the credential.csv file to obtain the credential.
- Start a staking node.
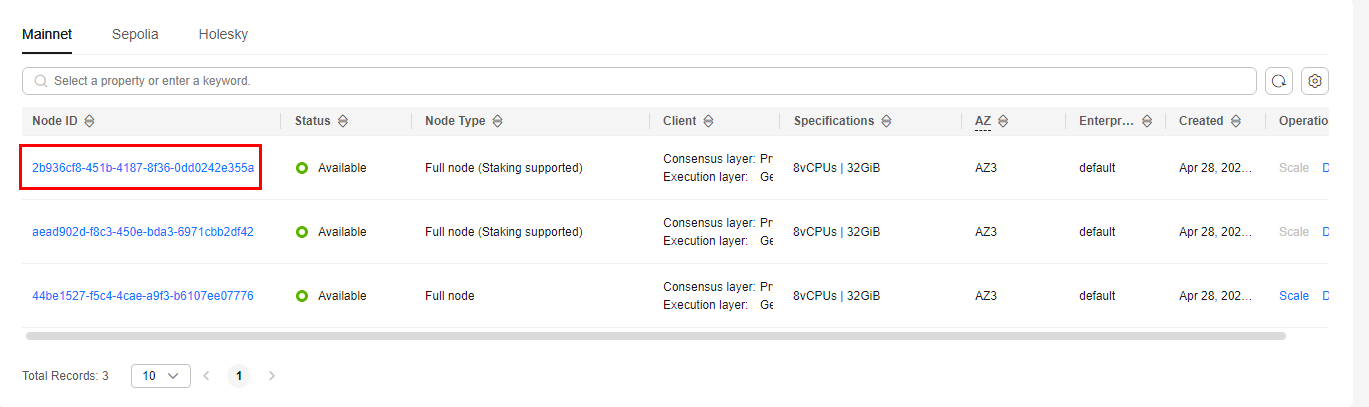
- Click a node ID.
Figure 2 Node ID
- Obtain the node information.
For a Prysm client, you can obtain its gRPC Endpoint and Node TLS Certificate.
For a Lighthouse client, you can obtain its HTTP Endpoint and Node TLS Certificate.Figure 3 Node details of a Prysm client - 
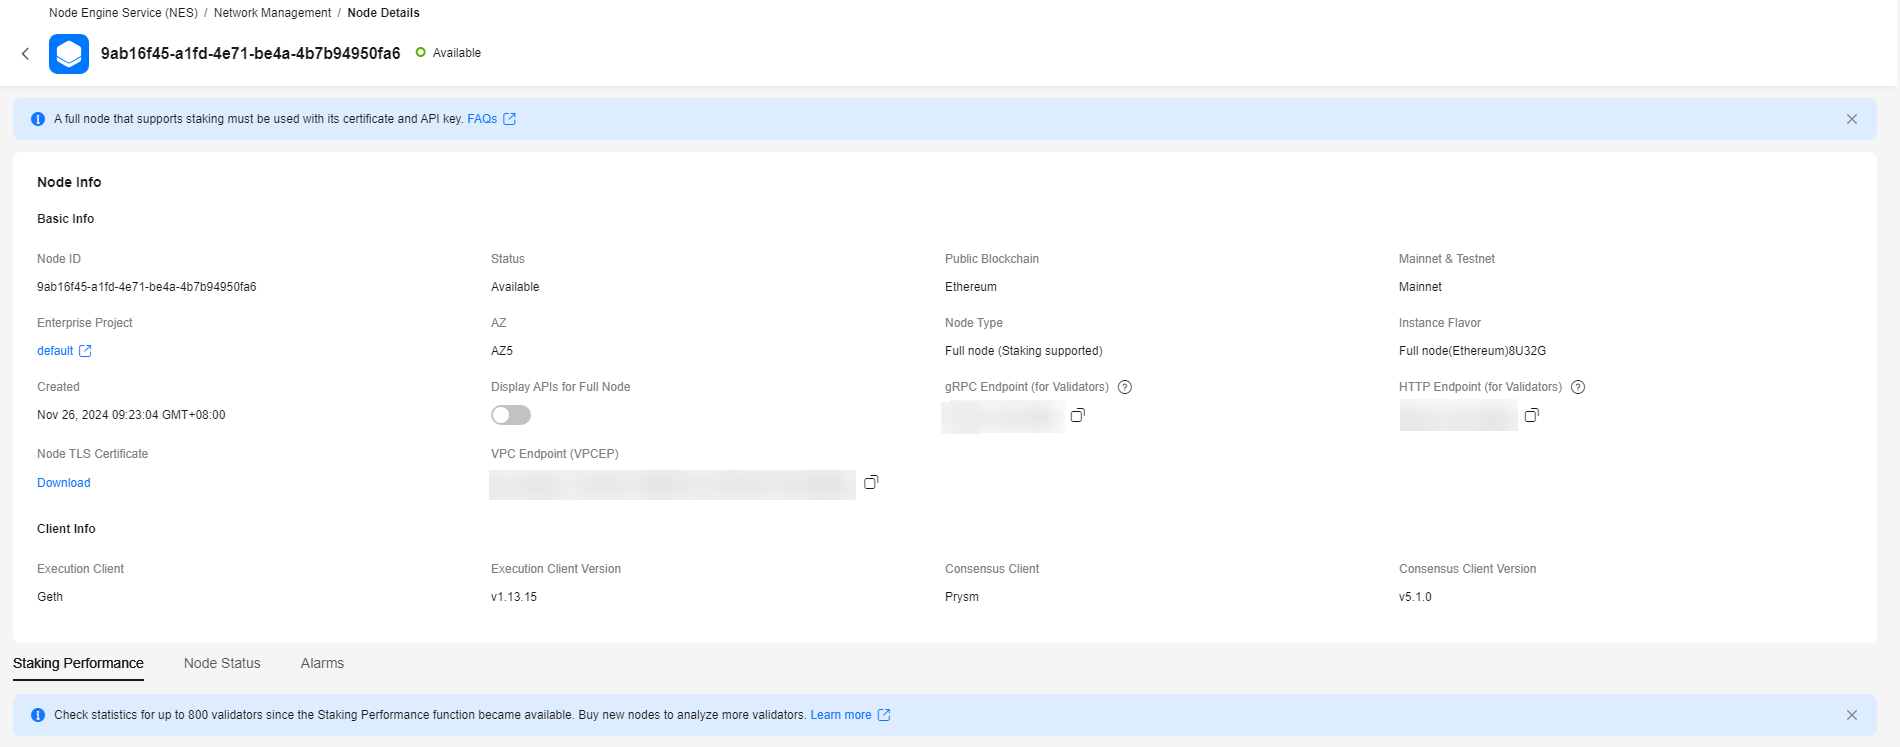
Paste the key and TLS certificate to the hardware machine installed with the script.
For a Prysm client, run the following command to import the key to the keystore:
./prysm.sh validator accounts import --keys-dir=<YOUR_FOLDER_PATH> --< NETWORK >
NETWORK is the staking network and YOUR_FOLDER_PATH is the actual key file path.
For a Lighthouse client, run the following command to import the key to the keystore:
lighthouse --network < NETWORK > account validator import --directory < YOUR_FOLDER_PATH >
NETWORK is the staking network and YOUR_FOLDER_PATH is the actual key file path.
- After the key is imported, perform the following operations for a Prysm client and Lighthouse client, respectively.
For a Prysm client, run the prysm.sh file, configure the following parameters, and start the staking node.
- beacon-rpc-provider: the value of gRPC Endpoint
- grpc-headers: the authentication credential
- tls-cert: the relative path of Node TLS Certificate
Example:
./prysm.sh validator --beacon-rpc-provider=xx.xx.xx.xx:30002 --grpc-headers=credential=xxxxxxxxxxxxxxxxxxxxxx --tls-cert=ca.crt
For a Lighthouse client, run the lighthouse vc command, configure the following parameters, and start the staking node.
- network: the staking network
- suggested-fee-recipient: the suggested fee recipient
- beacon-nodes-tls-certs: the relative path of Node TLS Certificate
- beacon-nodes: the HTTP endpoint or credential information
lighthouse vc --network < **NETWORK** > --suggested-fee-recipient <**YourFeeRecipientAddress** > --beacon-nodes-tls-certs ca.pem --beacon-nodes https://xx.xx.xx.xx:30000/xxxxxxxxxxxxxxxxxxxxxxxxxxxxxxx
NOTE:
These parameters are mandatory for interconnecting Huawei Cloud nodes. Check the Prysm Documentation and Lighthouse Documentation to learn other parameters.
- Click a node ID.
- Monitor a staking node.
Click a node ID and click the Node Status tab page.Figure 4 Node status
NOTE:
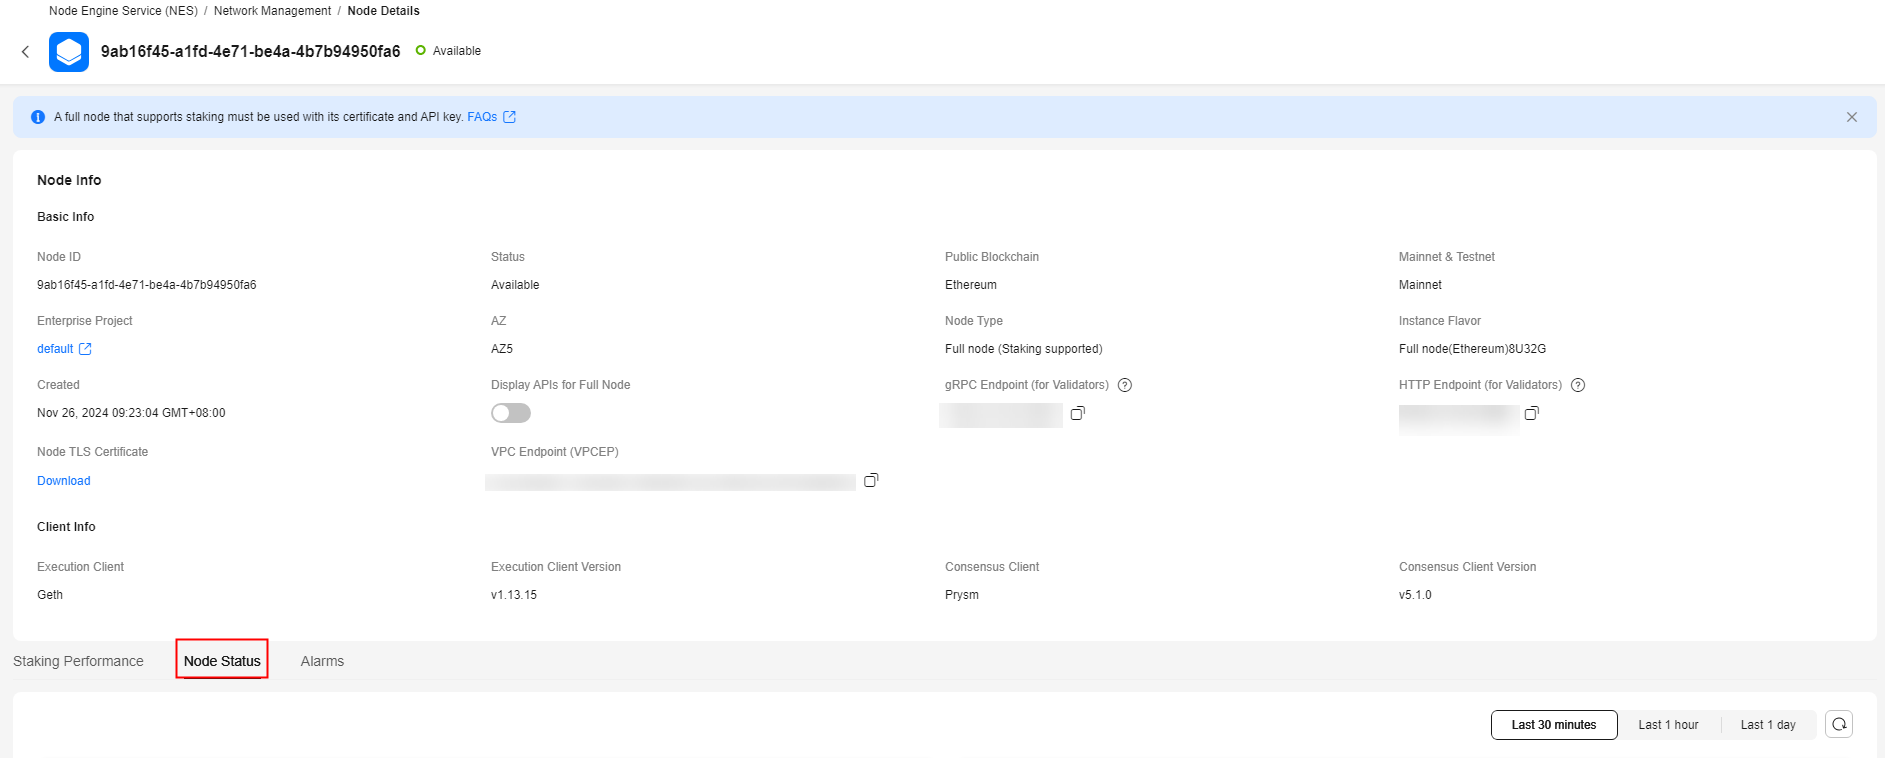
You need to monitor and perform O&M on the validator client where a staking node has been started. You can also enter the key on a page similar to the following to check the client execution.
Feedback
Was this page helpful?
Provide feedbackThank you very much for your feedback. We will continue working to improve the documentation.See the reply and handling status in My Cloud VOC.
For any further questions, feel free to contact us through the chatbot.
Chatbot