Configuring Logging
After logging is enabled for a bucket, OBS automatically converts bucket logs into objects following the naming rules and writes the objects into a target bucket.
Prerequisites
The log delivery user group has been assigned the Write and ACL View permissions for the target bucket. For details, see Configuring a Bucket ACL.
Procedure
- Log in to OBS Browser.
- Click the blank area in the row of the bucket for which you want to configure logging and choose More > Configure Logging.
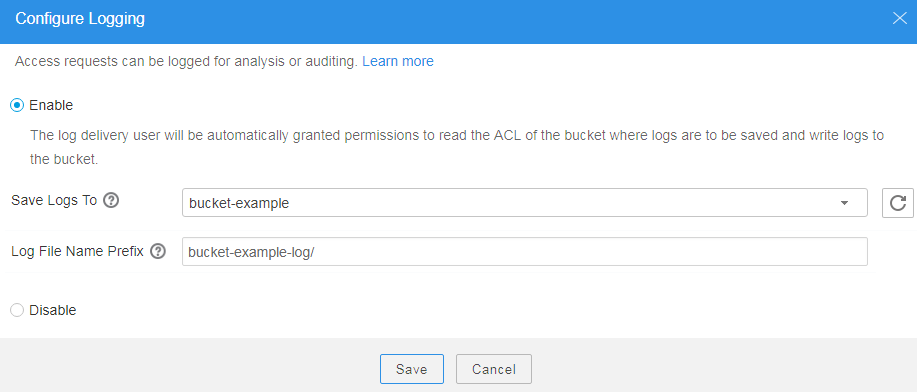
- Select Enable. See Figure 1.
- Select an existing bucket where you want to store log files.
- Enter a prefix for the Log File Name Prefix.
After logging is enabled, generated logs are named in the following format:
<Log File Name Prefix>YYYY-mm-DD-HH-MM-SS-<UniqueString>
- <Log File Name Prefix> is the shared prefix of log file names.
- YYYY-mm-DD-HH-MM-SS indicates when the log is generated.
- <UniqueString> indicates a character string generated by OBS.
On OBS Console, if the configured <Log File Name Prefix> ends with a slash (/), logs generated in the bucket are stored in the <Log File Name Prefix> folder in the bucket, facilitating the management of log files.
Example:
- If the bucket named bucket is used to save log files, and the log file name prefix is set to bucket-log/, all log files delivered to this bucket are saved in the bucket-log folder. A log file is named as follows: 2015-06-29-12-22-07-N7MXLAF1BDG7MPDV.
- If the bucket named bucket is used to save log files, and the log file name prefix is set to bucket-log, all log files are saved in the root directory of the bucket. A log file is named as follows: bucket-log2015-06-29-12-22-07-N7MXLAF1BDG7MPDV.
- Click Save.
- In the displayed dialog box, click OK to close the dialog box.
Feedback
Was this page helpful?
Provide feedbackThank you very much for your feedback. We will continue working to improve the documentation.See the reply and handling status in My Cloud VOC.
For any further questions, feel free to contact us through the chatbot.
Chatbot


