Migrating Doris Data to MRS with CCR
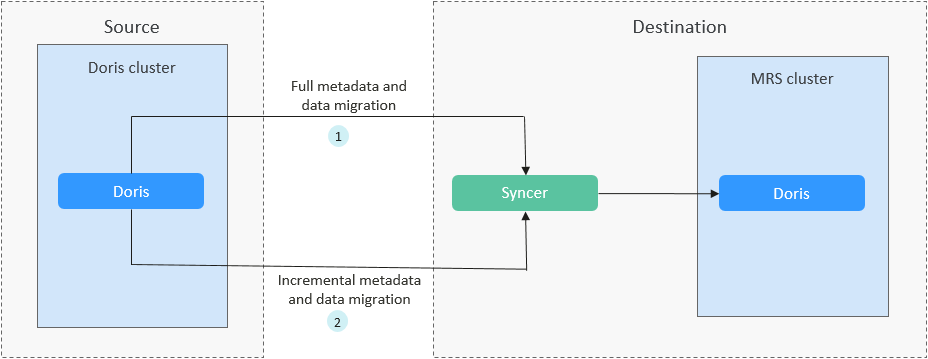
The Syncer service captures binlogs from the source cluster and synchronizes them to the destination cluster in real time. This enables the seamless migration of Doris historical metadata, incremental metadata, historical data, and incremental data. By leveraging real-time binlog synchronization, Syncer ensures both full and incremental migration of Doris.
Notes and Constraints
- Doris version constraints for migration based on Cross Cluster Replication (CCR)
The minimum supported versions are 2.0.15 for Doris 2.0 and 2.1.6 for Doris 2.1.
- Metadata and data migrations consumes resources in the source cluster. Therefore, migrate the data during off-peak hours.
- Component version constraints
Syncer version ≥ Destination Doris version ≥ Source Doris version
- Starting from Syncer version 2.1.8 and 3.0.4, Syncer no longer supports Doris 2.0.
- Data migration is supported only from earlier Doris versions to later ones.
- Metadata is automatically generated by CCR, so pre-creating it is not supported and may lead to migration failures.
- For details about parameter configurations, see Configuration Instructions on the Apache Doris official website.
Solution Architecture

- Full metadata and data migration: The CCR task performs full data synchronization, copying all source data to the destination in a single operation.
- Incremental metadata and data migration: After completing full synchronization, the CCR task continues with incremental synchronization to maintain data consistency between the source and destination.
The migration solution supports various networking types, such as the public network, VPN, and Direct Connect. Select a networking type based on the site requirements. The migration can be performed only when the source and destination networks can communicate with each other.
|
Migration Network Type |
Advantage |
Disadvantage |
|---|---|---|
|
Direct Connect |
|
|
|
VPN |
|
|
|
Public IP address |
|
|
Full and incremental metadata and data migration
- Enable binlog configuration on both the source Doris cluster and the destination cluster.
- Add the following content to the fe.conf and be.conf files in the source Doris cluster and save the files:
enable_feature_binlog=true
- Log in to MRS Manager of the destination cluster, choose Cluster > Services > Doris, click Configurations and All Configurations. In the navigation pane on the left, choose FE(Role) > Customization.
For details about how to log in to MRS Manager, see Accessing MRS Manager.
- Add the custom parameter enable_feature_binlog to the custom parameter file fe.conf and set the parameter value to true.
- In the navigation pane, choose BE(Role) > Customization. Add the custom parameter enable_feature_binlog to the custom parameter file be.conf and set the parameter value to true.
- Click Save to save the settings. Choose Dashboard, and click More > Service Rolling Restart in the upper right corner. Enter the password of the user and click OK to perform a rolling restart for the Doris service to make the settings take effect.
- Add the following content to the fe.conf and be.conf files in the source Doris cluster and save the files:
- Create a Linux ECS. The security group, VPC, and subnet of the ECS must be the same as those of the destination MRS cluster. For details, see Purchasing an ECS in Custom Config Mode.
Configure network connectivity between the ECS and the source Doris cluster according to your environment. Ensure that the glibc version on the ECS is 2.28 or later. You can verify it by running the following command:
ldd --version
- Download the Syncer package, for example, ccr-syncer-*-rc02-x64.tar.xz, from Cross Cluster Replication on the Doris official website, and upload it to a directory on the ECS created in 2.
- Log in to the ECS containing the uploaded Syncer package as user root and decompress the Syncer package.
- Navigate to the directory where the package is stored:
cd Package directory - Decompress the Syncer package.
tar -xvf ccr-syncer-*-rc02-x64.tar.xz
- Navigate to the bin directory.
cd ccr-syncer-*-rc02-x64/bin
- Enable binlogs for all tables in the specified database to be migrated.
bash enable_db_binlog.sh -h host -p port -u user -P password -d db
In the preceding command:
- host indicates the IP address of the server that connects to the source Doris FE node.
- port indicates the query port for connecting to the source Doris FE node. Port 9030 is used by default.
- db indicates the name of the specified source Doris database.
- user and password indicate the username and password for connecting to the source Doris.
- Navigate to the directory where the package is stored:
- Start Syncer.
bash start_syncer.sh –daemon
- Log in to the ECS node and run the following commands to perform full and incremental migration of metadata and data:
curl -X POST -H "Content-Type: application/json" -d '{
"name": "ccr_test",
"src": {
"host": "Source FE IP address",
"port": "9030",
"thrift_port": "9020",
"user": "root",
"password": "",
"database": "db_name",
"table": "table_name"
},
"dest": {
"host": "Destination FE IP address",
"port": "9030",
"thrift_port": "9020",
"user": "root",
"password": "",
"database": "db_name",
"table": "table_name"
}
}' http://127.0.0.1:9190/create_ccr;
For more information about the parameters, see Table 2.

- You do not need to manually create a database and table before the migration.
- After a CCR task begins, it continuously synchronizes incremental metadata and data. This process persists until the task is explicitly stopped.
Table 2 CCR migration task parameters Parameter
Description
Example Value
name
Indicates the name of the CCR synchronization task, which is user-defined and must be unique.
ccr_test
src
Indicates that the following information is the source information.
-
dest
Indicates that the following information is the destination information.
-
host
Indicates the IP address of the Master FE.
10.10.xxx.xxx
port
Indicates the query port for connecting to the Doris FE node.
9030
thrift_port
Indicates the RPC port for connecting to the Doris FE node.
9020
user
Indicates the username for accessing Doris.
root
password
Indicates the password for accessing Doris.
********
database
Indicates the database name.
db_name
table
Indicates the name of the table to be migrated. If it is a database-level synchronization, leave the table name empty.
table_01
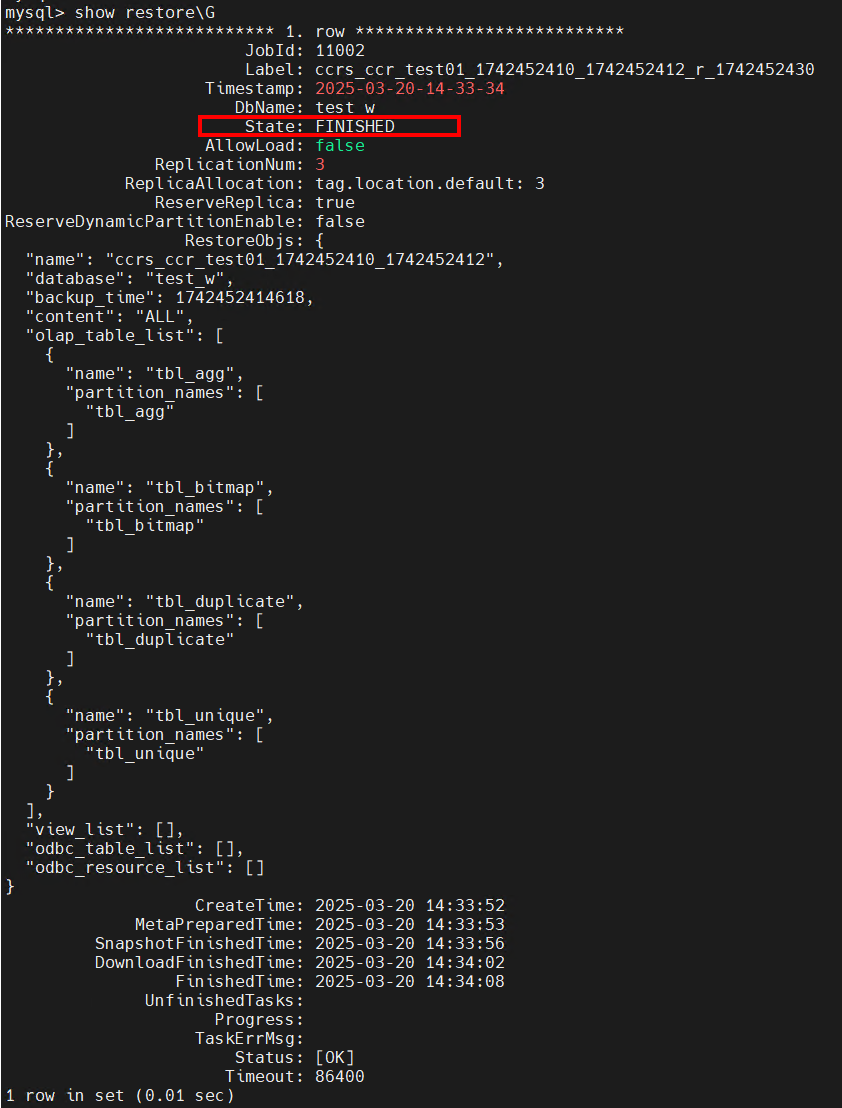
- Use the MySQL client to connect to the destination Doris cluster and run the following command to check the migration task status:
show restore\G
As shown in the following figure, if State is FINISHED, the migration task is successfully executed.

- After the data migration is complete, use the MgC Agent to verify the consistency of the migrated Doris data. For details, see Verifying Doris Data Migration.
Feedback
Was this page helpful?
Provide feedbackThank you very much for your feedback. We will continue working to improve the documentation.See the reply and handling status in My Cloud VOC.
For any further questions, feel free to contact us through the chatbot.
Chatbot


