
Compiling JMeter Scripts on Your Local PC
- Start the JMeter client.
- Create a thread group.
Right-click Test Plan in the upper left corner of the JMeter client and choose from the shortcut menu to create a thread group for the JMeter test plan. A thread group is the basic execution unit of a JMeter project.Figure 1 Creating a thread group

- Add a request.
Right-click Thread Group, choose , and add an HTTP request to the thread group.Figure 2 Adding an HTTP request

- Configure the HTTP request.
The configuration on the Basic tab page of the HTTP request is as follows:
- Protocol: The value can be HTTP or HTTPS.
- Server Name or IP: Enter a domain name or an IP address.
- Port Number: Enter the service port number. For HTTP, the default port number is 80. For HTTPS, the default port number is 443. You can also manually enter other ports.
- HTTP Request: Specify the method, such as GET, POST, PUT, and DELETE. If you select POST, add body parameters.
- Path: Enter the service request path.
Figure 3 Configurations on the Basic tab
On the Advanced tab page of the HTTP request, set the timeout period in Timeouts.
- Connect: timeout period for connecting the client to the tested service. The default value is 20 seconds. You can set it to 10 seconds.
- Response: response time of the tested service after the connection. By default, there is no limit.
Figure 4 Configurations on the Advanced tab
- Configure HTTP headers.
JMeter manages HTTP headers by thread group. Each thread group can be configured with an HTTP header manager. Right-click Thread Group and choose to add an HTTP header manager. In the right pane of the HTTP Header Manager, click Add to add an HTTP Header.Figure 5 Adding an HTTP header

- Configure View Results Tree.
To view the response result, add a listener. Right-click Thread Group, choose , and add the view result tree to the thread group.Figure 6 Adding a view results tree

- (Optional) Import file variables, if any.
CSV files are supported. In a CSV file, variable names are in the first row, and data is in other rows.
Figure 7 A CSV file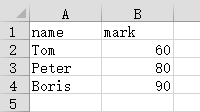
The following figure shows the variables in text format.
Figure 8 Variables in text format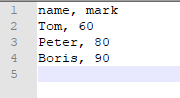
Right-click Thread Group and choose from the shortcut menu. Click Browse to select the target CSV file, and click Open to add the file.
Figure 9 Adding a variable file
To test the effect of referencing variables, you can introduce variables to the HTTP header. A file in ${variable name} format tells JMeter that the variables are read from external systems.
Figure 10 Introducing variables to the header
- Save the test plan file and debug the script.
Click
 on the top of the page, specify the save path and file name, save the test task as a JMX file, and store the project file (JMX) and variable file (CSV) in the same directory. The name of a JMX file contains only letters, digits, hyphens (-), underscores (_), and periods (.). A JMX file with an invalid name cannot be imported to CodeArts PerfTest.
Click the green triangle button
 on the top to execute the task. You can view the execution result in View Results Tree, including Request Body, Request Header, Response Body, and Response Header.
Feedback
Was this page helpful?
Provide feedbackThank you very much for your feedback. We will continue working to improve the documentation.See the reply and handling status in My Cloud VOC.
For any further questions, feel free to contact us through the chatbot.
Chatbot


