
Using the AI Assistant Widget to Build a Knowledge Base
Application Scenarios
If you have a large number of documents that are hard to use and query efficiency is low, you can use the AI assistant widget to call the foundation model API to get answers. Additionally, RAG technology works with the knowledge base to provide a more intelligent and natural dialog experience, improving the accuracy and relevance of information retrieval.
Constraints
- To enable the function of building a knowledge base, submit a service ticket.
- The knowledge base directory structure should be: knowledge base > folder > file. You can create multiple knowledge bases, each containing multiple folders with files of various types. For professional edition instances, each tenant can create up to 40 folders. Free and standard editions support only one folder. Single files must be under 6 MB, and folders cannot exceed 50 MB in total. Supported file formats are TXT, DOCX, PDF, MD, and CSV.
Procedure
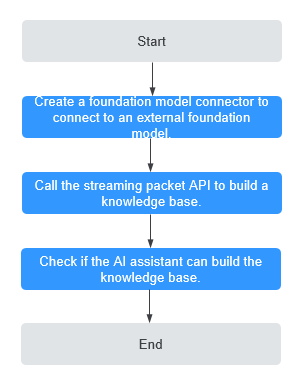
Figure 1 shows the process of building a knowledge base using the AI assistant widget.
Step 1: Create a Foundation Model Connector to Connect to an External Foundation Model
Create a connector to connect to the foundation model API.
- Create a low-code application.
- Apply for a free trial or purchase a commercial instance by referring to Authorization of Users for Huawei Cloud Astro Zero Usage and Instance Purchases.
- After you have an instance, click Access Homepage on Homepage. The application development page is displayed.
- In the navigation pane, choose Applications. On the displayed page, click Low-Code or
 .
. When you create an application for the first time, create a namespace as prompted. Once it is created, you cannot change or delete it, so check the details carefully. Use your company or team's abbreviation for the namespace.
- In the displayed dialog box, choose Standard Applications and click Confirm.
- Enter a label and name of the application, and click the confirm button. The application designer is displayed. Figure 2 Creating a blank application

- Create a foundation model connector.
- In the application designer, choose Integrations > Connector > Connector Instance.
- Choose Foundation Model > Custom Model and click +. The page for creating a custom foundation model connector is displayed. Figure 3 Creating a custom foundation model connector

- Enter and save the configuration information of the foundation model connector. Figure 4 Setting foundation model connector information

- Test the connectivity of the foundation model connector.
- On the custom foundation model details page, click Test. On the displayed dialog box, click Test. The foundation model connector test page is displayed.
- In the Input Content text box, enter the dialog content (for example, "Hello"), and click Test. Check whether the returned message is correct. If the returned message contains the streaming response packet, the foundation model connector is configured successfully. Otherwise, check whether the foundation model connector information is correct.Figure 5 Foundation model connector test page

Step 2: Call the Streaming Packet API to Build a Knowledge Base
Create a standard page, add an AI assistant widget, and use a script to call the streaming API to build a knowledge base.
- In the navigation pane, choose Page.
- Click + to create a blank standard page. Figure 6 Setting basic information about the standard page

- Drag the AI Assistant widget from Basic > Smart to the canvas. Figure 7 Adding an AI assistant widget

- Enable the knowledge base and bind the big data model to the AI assistant widget.
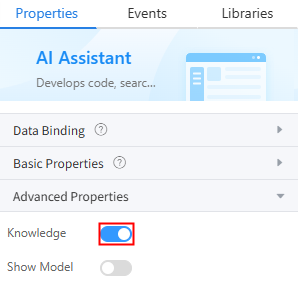
- Click the AI assistant widget and enable the knowledge base in Properties > Advanced Properties. Figure 8 Enabling the knowledge base
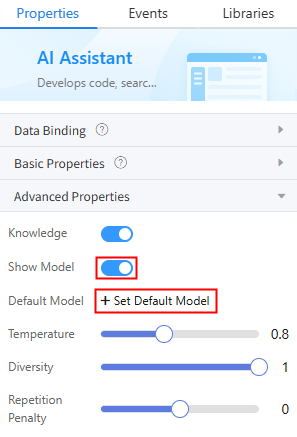
- Enable Show Model and click Set Default Model. Select the connector created in Step 1: Create a Foundation Model Connector to Connect to an External Foundation Model to bind the model to the widget. Figure 9 Binding a model to the widget
- Click the AI assistant widget and enable the knowledge base in Properties > Advanced Properties.
Step 3: Verify if the AI Assistant Widget Can Build a Knowledge Base
- On the created standard page, click
 . The preview page is displayed. You can view the button for adding a knowledge base and the bound big data model.
 - Click Add Knowledge Base. On the displayed page, click Manage.
Groups: A knowledge base that can be shared among group members. When you create a group knowledge base, if you set it to be visible only to a specific department, only users in that department can view and use the knowledge base.
Mine: An individual knowledge base is exclusive to a single user. Other users cannot access or use it.
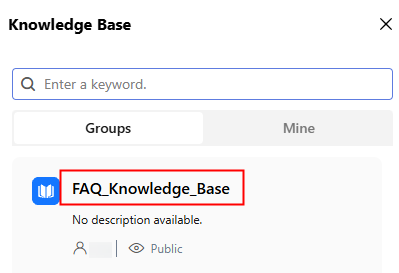
- Click New, set the knowledge base name and visibility scope, and click OK. The knowledge base page is displayed, on which you can view the created knowledge base. Figure 10 Creating a knowledge base

Table 4 Parameters for creating a knowledge base Parameter
Description
Example
Name
Name of the knowledge base to be created.
FAQ_Knowledge_Base
Visibility
Select the visibility scope of the knowledge base. The options are Group and Public.
- Group: Only users in the department can view and use the knowledge base.
- Public: All users of the tenant can view and use the knowledge base.
Public
- In the knowledge base list, click the knowledge base created in 3. On the knowledge base page that is displayed, click Create Folder. Figure 11 Clicking the button to create a folder

- Set the folder name, and select the knowledge base embedding model, splitter, and chunk length as required. Figure 12 Creating a folder

Table 5 Parameters for creating a folder Parameter
Description
Example
Name
Name of the folder to be created.
FAQs
Embedding Model
Select an embedding model as required.
- m3e-base: text embedding model: A general-purpose model with 768 dimensions for both Chinese and English.
- bge-large-zh-v1.5: text representation model: Better for retrieval, classification, clustering, and semantic matching tasks. Currently, this model is limited to Chinese text.
- paraphrase-multilingual-MiniLM-L12-v2: vector space model: Excellent text similarity measurement with 364 dimensions for both Chinese and English text.
- VESO-v1.3: Huawei's code model: Excellent code data vectorization and code search.
m3e-base: text embedding model
Splitter
Converts text into units that can be understood by the model. The following types are supported:
- By paragraph (default): Splits text by double line breaks (\n\n) or paragraph structure.
- By line: Splits text by single line breaks (\n).
- By sentence (English): Splits text by sentence boundaries.
- By character: Splits text into individual characters (including whitespace characters).
By paragraph
Chunk Length
Maximum length of a chunk. The value range is [50, 1200]. The default value is 1000.
1000
Chunk Overlap
Overlap between sequential chunks: 0 to chunk length (default: 0).
0
Child Splitter
Applied when a chunk exceeds the maximum allowed length. The following types are supported:
- By character (Default): Splits text into individual characters (including whitespace characters).
- By sentence (English): Splits text by sentence boundaries.
- By word (English): Splits text by whitespace characters.
By character
- After the setting is complete, click the confirm button to return to the knowledge base page.
- Click the created folder (for example, FAQs) and click Upload File.
In this practice, the FAQs in the Huawei Cloud Astro Zero help center are used as an example. You can click Common FAQs to download the document.
Figure 13 Clicking the button to upload a file Figure 14 Uploading an FAQ file
After the file is uploaded, the status of the file shows that it is being imported. Click
 to refresh the status. If the status changes to Successfully, the file is ready to be used.
 - Return to the knowledge base page and select one or more created knowledge bases. Figure 15 Selecting a knowledge base
- Ask the AI assistant questions about Huawei Cloud Astro Zero to locate the relevant documents.
Feedback
Was this page helpful?
Provide feedbackThank you very much for your feedback. We will continue working to improve the documentation.See the reply and handling status in My Cloud VOC.
For any further questions, feel free to contact us through the chatbot.
Chatbot


