
Using ROMA Connect for Data Integration
Overview
ROMA Connect supports access of multiple types of data sources and uses data integration tasks to integrate data from source to destination. Both homogeneous and heterogeneous data can be integrated.
This chapter provides an example for configuring data integration from API to MQS to help you get familiar with the data integration process.
The steps for integrating data with ROMA Connect are as follows:
Step 1: Prepare Data Sources
Before using ROMA Connect to integrate data, you need to prepare one API data source and one MQS data source as the source and destination, respectively.
- Create a function API.
Create a function API on the current ROMA Connect instance as API data source at the source. For details, see Preparing a Backend Service.
For simplicity, the function API does not require request authentication or carry request parameters. When the function API is called, the message "ROMA TEST!" is always returned.
After the function API is created, record the request URL and method of the API.
- Create a message topic.
Create a message topic on the current ROMA Connect instance as the topic of the MQS data source at the destination. For details, see Creating a Message Topic.
After the topic is created, record the topic name. On the Application Integrations page of the ROMA Connect console, click the name of the integration application to which the topic belongs to view and obtain the key and secret.
Step 2: Connect to Data Sources
Before creating a data integration task, separately connect the API and MQS data sources to ROMA Connect to ensure that data can be read from the source and written to the destination.
- Create an integration application.
- Log in to the ROMA Connect console. On the Instances page, click View Console next to a specific instance.
- In the navigation pane on the left, choose Integration Applications. In the upper right corner of the page, click Create Integration Application.
- In the dialog box displayed, set Name and click OK.
- Connect to the API data source.
- In the navigation pane on the left, choose Data Sources. In the upper right corner of the page, click Access Data Source.
- On the Default tab page, select API and click Next.
- Enter the configuration information about the API data source.
Table 1 API data source configuration Parameter
Description
Name
Enter an API data source name. It is recommended that you enter a name based on naming rules to facilitate search.
Integration Application
Select the integration application created in 1.
Description
Enter a brief description of the API data source.
Address
Enter the API request URL recorded in Step 1: Prepare Data Sources.
Request Method
Select the API request method recorded in Step 1: Prepare Data Sources.
Authentication Mode
Select None, indicating that no authentication is required for the API data source.
- After setting the parameters for the API data source, click Check Connectivity to test the data source connection.
- If the test result is Data source connected successfully, click Create.
- If the test result is Failed to connect to the data source, check and modify the connection parameters, and click Recheck until the connection is successful.
- Click Create.
- Connect to the MQS data source.
- On the Data Sources page, click Access Data Source in the upper right corner.
- On the Default tab page, select MQS and click Next.
- Enter the configuration information about the MQS data source.
Table 2 MQS data source configuration Parameter
Description
Name
Enter an MQS data source name. It is recommended that you enter a name based on naming rules to facilitate search.
Integration Application
Select the integration application created in 1.
Description
Enter a brief description of the MQS data source.
Connection Address
Select the MQS intranet address of the current ROMA Connect instance. You can view the MQS intranet address on the Instance Information page of the ROMA Connect console.
Enable SSL
Set this parameter to Yes if MQS SASL_SSL is enabled and Intra-VPC Plaintext Access is disabled for the ROMA Connect instance. In other cases, set this parameter to No.
SSL Username/Application Key
This parameter is mandatory only if Enable SSL is set to Yes.
Set this parameter to the key recorded in Step 1: Prepare Data Sources.
SSL Password/Application Secret
This parameter is mandatory only if Enable SSL is set to Yes.
Set this parameter to the secret recorded in Step 1: Prepare Data Sources.
- After setting the parameters for the MQS data source, click Check Connectivity to test the data source connection.
- If the test result is Data source connected successfully, click Create.
- If the test result is Failed to connect to the data source, check and modify the connection parameters, and click Recheck until the connection is successful.
- Click Create.
Step 3: Create a Data Integration Task
After configuring the API and MQS data sources, create a data integration task from the source to the destination.
- In the navigation pane on the left, choose Fast Data Integration > Task Management and click Create Common Task.
- On the Create Task page, set the parameters of the data integration task.
- Configure basic information about the task.
Table 3 Basic task information Parameter
Description
Task Name
Enter a task name. It is recommended that you enter a name based on naming rules to facilitate search.
Description
Enter a brief description of the task.
Integration Mode
Select Scheduled as the mode used for data integration. When API is used as the data source at the source, only scheduled tasks are supported.
Tag
Add a tag to classify tasks for quick search. You do not need to set this parameter.
- Configure a schedule for the task.
For simplicity, retain the default settings for the task schedule.
- Configure the API data source at the source.
Figure 1 Configuring source information
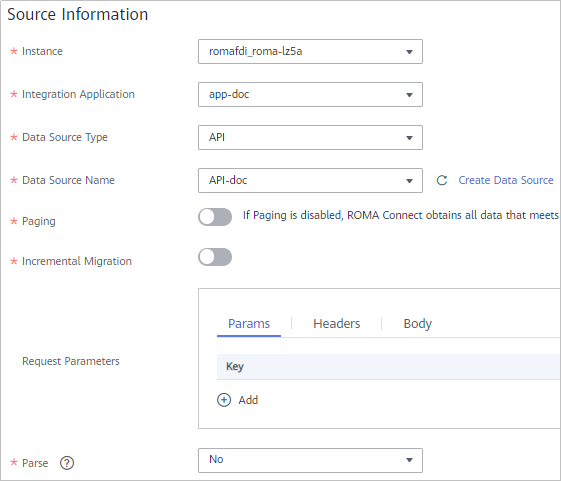
Table 4 Configuration information at the source Parameter
Description
Instance
Select the ROMA Connect instance that is being used.
Integration Application
Select the integration application created in Step 2: Connect to Data Sources.
Source Data Type
Select API.
Data Source Name
Select the API data source that you configured in Step 2: Connect to Data Sources.
Paging
You do not need to enable this option.
Incremental Migration
You do not need to enable this option.
Request Parameters
The API data source does not have request parameters. Therefore, you do not need to set this parameter.
Parse
Set this parameter to No.
- Configure the MQS data source at the destination.
Figure 2 Configuring destination information

Table 5 Configuration information at the destination Parameter
Description
Instance
Select the ROMA Connect instance that is being used.
Integration Application
Select the integration application created in Step 2: Connect to Data Sources.
Data Source Type
Select MQS.
Data Source Name
Select the MQS data source that you configured in Step 2: Connect to Data Sources.
Topic Name
Select the topic recorded in Step 1: Prepare Data Sources.
Key
You do not need to set this parameter.
- Retain the default settings for Post-Integration Operation.
- Configure basic information about the task.
- Click Create, and then click Back to Task List. The created data integration task is displayed in the task list.
Step 4: Start the Data Integration Task
After a data integration task is created, Task Status will be displayed as Stopped.
You can start the task by using either of the following methods:
- Creating schedule: The task is periodically executed according to the schedule created during task creation.
Select the task you want to start, click Start above the task list to start the task schedule, and wait until the task is executed as scheduled.
- Manual scheduling: The task is manually executed only once. Before manually executing a task, ensure that Task Status is Stopped.
Click Start Scheduling on the right of the data integration task you want to start. When Running Status of the task is displayed as Successful, the task is successfully executed.
To execute the data integration task immediately and view the task result, select the manual scheduling method to integrate data from the API data source to the MQS data source.
Step 5: View the Data Integration Result
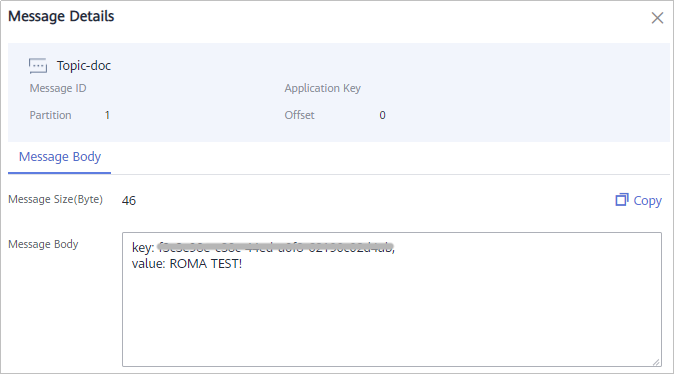
- In the navigation pane on the left, choose Message Queue Service > Message Query.
- Click Advanced Search to expand advanced search options.
- Enter the search criteria and click Search to query the messages sent by the client.
- Select the message topic created in Step 1: Prepare Data Sources for Topic Name.
- Select Creation time for Search By and select the time segment for the client to send messages to ROMA Connect.
- Click Message Body next to the message record and check whether the message content is the same as the response message of the API.
Figure 3 Viewing messages
Feedback
Was this page helpful?
Provide feedbackThank you very much for your feedback. We will continue working to improve the documentation.See the reply and handling status in My Cloud VOC.
For any further questions, feel free to contact us through the chatbot.
Chatbot


