

Configuring the Lite Server Network
Configure the network so that the Lite Server can access the internet. Network configuration involves the following two scenarios:
- Binding an EIP to a Single Lite Server: Bind an EIP to a single Lite Server. This Lite Server will have exclusive access to the network bandwidth.
- Binding an EIP to Multiple Lite Server: Configure an EIP for a VPC and share it across all Lite Servers within that VPC via a NAT Gateway. This allows all nodes in the VPC to access the internet using the same EIP through shared network resources.
Binding an EIP to a Single Lite Server
- Log in to the ModelArts console. In the navigation pane, choose Resource Management > Lite Servers.
- New console: In the navigation pane, choose Resource Management > Lite Compute Resources > Lite Servers.
- Old console: In the navigation pane, choose Resource Management > Lite Servers.
- In the Common node tab of the resource list page, click the name of the target Lite Server. The details page of the Lite Server is displayed. Figure 1 BMS

- Click the EIPs tab and then click Bind EIP. In the Bind EIP dialog box that appears, select the EIP to bind and click OK. Figure 2 Binding an EIP


Only one EIP can be bound to a NIC.
Binding an EIP to Multiple Lite Server
All Lite Servers must be deployed in the same VPC which does not have a NAT gateway or default route.
- Buy an EIP.
- Log in to the Huawei Cloud console.
- In the service list on the left, choose Networking > Elastic IP.
- In the upper right corner of the EIP page, click Buy EIP.
- Retain the default settings and click Next.
- Confirm the configurations and select "I have read and agree to the Elastic IP Service Statement".
- If you set Billing Mode to Pay-per-Use, click Submit.
- If you set Billing Mode to Yearly/Monthly, click Pay Now.
On the payment page, confirm the order information, and click Pay.
- Buy a public NAT gateway.
- Log in to the Huawei Cloud console.
- In the service list on the left, choose Network > NAT Gateway.
- In the upper right corner of the Public NAT Gateway page, click Buy Public NAT Gateway.
- Set VPC, Subnet, and Billing Mode. Retain the default settings for other parameters and click Next. Figure 3 Buying a public NAT gateway
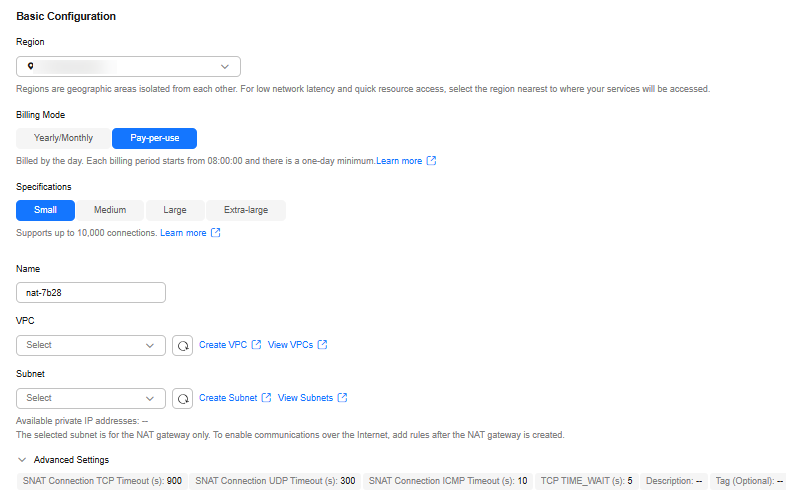
- On the displayed page, confirm the NAT gateway information.
- If you set Billing Mode to Pay-per-Use, click Submit.
- If you set Billing Mode to Yearly/Monthly, click Pay Now.
On the payment page, confirm the order information, and click Pay.
The VPC and subnet must be that of the Lite Server.
- Add an SNAT rule.
SNAT translates private IP addresses into EIPs, allowing servers in a VPC to share an EIP to access the Internet securely and efficiently.
- On the Public NAT Gateways page, click the name of the created NAT gateway.
- In the SNAT Rules tab, click Add SNAT Rule.
- In the displayed dialog box, configure the SNAT rule as follows:
- Scenario: Select VPC.
- Subnet: Choose an existing subnet.
- EIP: Select the created EIP.
- Click OK.
- Configure a DNAT rule.
By adding a DNAT rule, the Lite Servers in a VPC can access services using SSH. For each Lite Server, a port corresponds to a DNAT rule, and one port can be only mapped to one EIP.
- In the DNAT Rules tab, click Add DNAT Rule.
- In the displayed dialog box, configure the DNAT rule as follows:
- Scenario: Select VPC.
- Port Type: Select Specific port.
- Protocol: Select TCP.
- EIP: Select the created EIP.
- Outside Port: Ensure that the port number is unique. Recommended range: 20000–30000.
- Instance Type: Click Server and select a server.
- NIC: Select a NIC.
- Inside Port: Choose 22.
- Click OK.
What is your overall rating for this page?
Thank you very much for your feedback. We will continue working to improve the documentation.See the reply and handling status in My Cloud VOC.
For any further questions, feel free to contact us through the chatbot.
Chatbot


