Installing and Uninstalling an Extension on the RDS Console
Scenarios
RDS allows you to install and uninstall extensions on the console.
RDS for PostgreSQL extensions only take effect on the databases you created the extensions for. To use an extension on databases, it has to be created separately for each database.
Prerequisites
Before installing or uninstalling extensions, ensure that there are databases in your instance. For details about how to log in to a DB instance, see Connecting to an RDS for PostgreSQL Instance Through DAS (Recommended).
Precautions
- plpgsql is a built-in extension and cannot be uninstalled.
- Logical replication plugins, such as decoderbufs and wal2json, can be used as-is. There is no installation required.
- Some extensions depend on the shared_preload_libraries parameter. They can be installed only after related libraries are loaded.
- pg_cron is only available to RDS for PostgreSQL 12 (12.11.0 and later), 13, and later versions. Before using this extension, change the value of cron.database_name to the name of the database this extension is used for (only one database is supported), and change the value of cron.use_background_workers to on.
- pltcl is not supported for RDS for PostgreSQL 13.2. To use this extension, upgrade your instance to the latest minor version.
- Installing or uninstalling some extensions will cause their dependent extensions and tables to be installed or uninstalled synchronously. For example, when you install or uninstall postgis, postgis_sfcgal will be installed or uninstalled at the same time.
- Some extensions cannot be upgraded after a minor version upgrade. To upgrade them, uninstall them first and install them again.
Modifying the shared_preload_libraries Parameter
Some extensions require corresponding parameter values to be loaded before the extensions can be installed.
You can modify the shared_preload_libraries parameter to load parameter values in batches or load each required parameter value independently before installing an extension.
- Log in to the management console.
- Click
 in the upper left corner and select a region.
 - Click
 in the upper left corner of the page and choose Databases > Relational Database Service.
 - On the Instances page, click the instance name.
- In the navigation pane, choose Plugins.
- On the Plugins page, click
 next to Loaded shared_preload_libraries parameter values to view the loaded parameter values.
 - Click Modify Parameter Values.
Figure 1 Viewing loaded parameter values

- Select the parameter values to be loaded from the drop-down list box and click OK.
Figure 2 Selecting parameter values to be loaded

- In the displayed dialog box, click OK.

- The modified parameter values take effect only after the instance is rebooted. If your instance has read replicas, the parameter values for the read replicas are also modified. You also need to reboot the read replicas.
- To ensure security and O&M functions of RDS for PostgreSQL, the following parameter values are loaded by default and cannot be deleted:
- passwordcheck.so
- pg_stat_statements
- pg_sql_history
- pgaudit
- You can also load each parameter value independently before installing an extension.
Figure 3 Loading a parameter value

Installing and Uninstalling an Extension
- Log in to the management console.
- Click
 in the upper left corner and select a region.
 - Click
 in the upper left corner of the page and choose Databases > Relational Database Service.
 - On the Instances page, click the instance name.
- In the navigation pane, choose Plugins.
- In the Database drop-down list above the extension list, select the database where the extension is to be installed.
- Locate the extension to be installed and click Install in the Operation column.
Figure 4 Installing an extension

- After a minor version upgrade, click Update next to the extension to be updated.
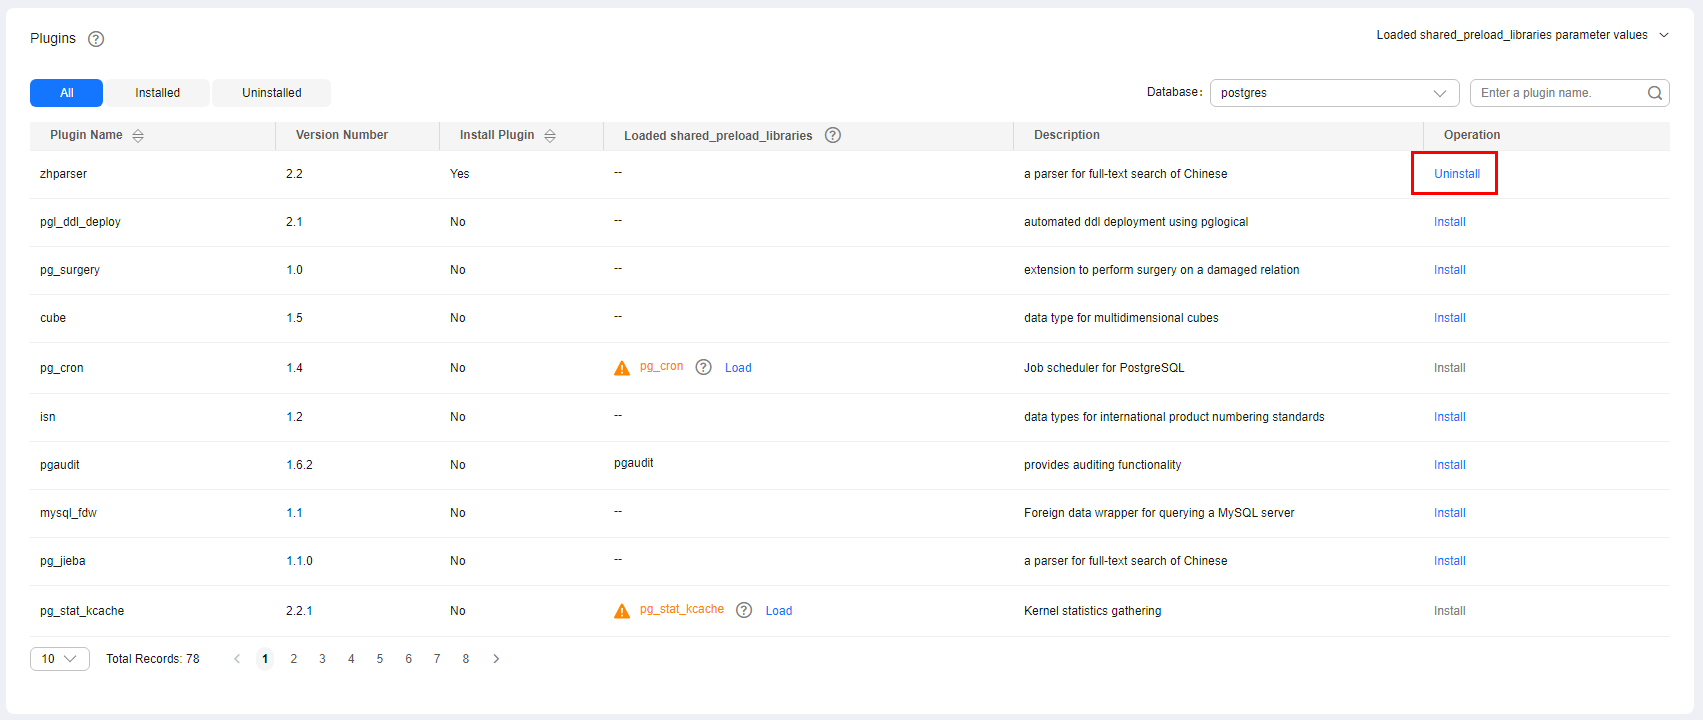
- To uninstall an extension, click Uninstall.
Figure 5 Uninstalling an extension

Feedback
Was this page helpful?
Provide feedbackThank you very much for your feedback. We will continue working to improve the documentation.See the reply and handling status in My Cloud VOC.
For any further questions, feel free to contact us through the chatbot.
Chatbot


