Creating a Custom Identity Policy
If system-defined identity policies cannot meet your requirements, you can create custom identity policies based on the actions supported by each cloud service for more refined access control.
You can use the visual editor or JSON editor to create custom identity policies for more refined access control.
- Visual editor: Simply select cloud services, actions, resources, and conditions to create identity policies without using JSON.
- JSON editor: Create a JSON identity policy or edit an existing one.
Creating a Custom Identity Policy in the Visual Editor
- Log in to the new IAM console.
- In the navigation pane, click Identity Policies. In the upper right corner, click Create Identity Policy.
Figure 1 Creating a custom identity policy

- Enter an identity policy name.
Figure 2 Entering an identity policy name

- Select Visual editor for Policy View.
- Configure the identity policy content.
- Select Allow or Deny.
- Select a cloud service.

Only one cloud service can be selected. To configure permissions for multiple cloud services, click Add Permissions, or switch to the JSON view (see Creating a Custom Identity Policy in JSON View).
- Select actions.
- (Optional) Select all resources, or select specific resources by specifying their paths.
Table 1 Resource types Resource Type
Description
Specific resources
Permissions for specific resources. For example, to define permissions for buckets whose names start with TestBucket, specify the bucket resource path as OBS:*:*:bucket:TestBucket*.
NOTE:- Specifying bucket resources
Format: "OBS:*:*:bucket:Bucket name".
For bucket resources, IAM automatically generates the prefix of the resource path: obs:*:*:bucket:. For the path of a specific bucket, add the bucket name to the end. You can also use a wildcard character (*) to indicate any bucket. For example, obs:*:*:bucket:* indicates any OBS bucket.
- Specifying object resources
Format: "OBS:*:*:object:Bucket name/object name".
For object resources, IAM automatically generates the prefix of the resource path: obs:*:*:object:. For the path of a specific object, add the bucket name/object name to the end of the resource path. You can also use a wildcard character (*) to indicate any object in a bucket. For example, obs:*:*:object:my-bucket/my-object/* indicates any object in the my-object directory of the my-bucket bucket.
All resources
Permissions for all resources.
- (Optional) Add conditions by specifying condition keys, operators, and values. For details about the parameters and examples, see Elements of an Identity Policy.
Table 2 Condition parameters Parameter
Description
Condition keys
A key in the Condition element of a statement. There are global and service-specific condition keys. Global condition keys (starting with g:) are available for operations of all services. Service-specific condition keys (starting with an abbreviated name of a cloud service such as obs:) are available only for operations of the corresponding service. For details, see "Actions Supported by Identity Policy-based Authorization" in the API Reference of the corresponding cloud service.
Operators
Used together with a condition key and condition value to form a complete condition statement.
Qualifiers
Used together with a condition key and an operator that requires a qualifier, to form a complete condition statement.
- (Optional) Switch to the JSON view and modify the identity policy content in JSON format.

If the JSON syntax is incorrect, check and modify it so that an identity policy cannot be created.
- (Optional) To add another permission block for the identity policy, click Add Permissions. Alternatively, click the plus (+) icon on the right of an existing permission block to clone its permissions.
- (Optional) Enter a brief description for the identity policy.
- Click OK.
- Grant the identity policy's permissions or directly attach the identity policy to a principal so that the principal has the specified permissions.

Due to system, cache, and other reasons, the identity policies will be applied several minutes after the authorization is complete.
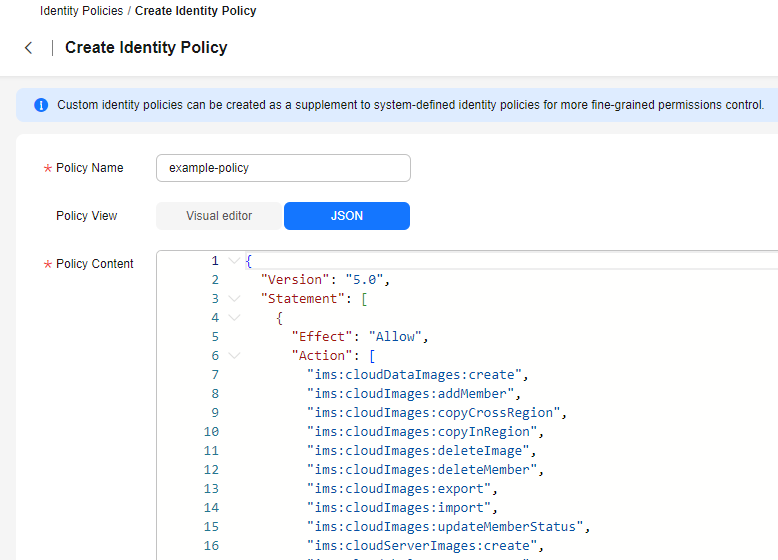
Creating a Custom Identity Policy in JSON View
- Log in to the new IAM console.
- In the navigation pane, click Identity Policies. In the upper right corner, click Create Identity Policy.
Figure 3 Creating a custom identity policy

- Enter an identity policy name.
Figure 4 Entering an identity policy name

- Select JSON for Policy View.
- (Optional) Click Select Existing Policy and select identity policies to use them as a template. For example, select CBRReadOnlyPolicy as a template.
- Click OK.
- Modify the statements of the identity policy.
- Effect: Set it to Allow or Deny.
- Action: Enter the actions provided in the API actions table of the corresponding services.

- The Version is 5.0 and cannot be modified.
- For details about the actions supported by each service in the API reference, see Actions Supported by Identity Policy-based Authorization.
- (Optional) Enter a brief description for the identity policy.
- Click OK. If the identity policy list is displayed, the identity policy is created successfully. If a message indicating incorrect identity policy content is displayed, modify the identity policy.
- Grant the identity policy's permissions or directly attach the identity policy to a principal so that the principal has the specified permissions.

Due to system, cache, and other reasons, the identity policies will be applied several minutes after the authorization is complete.
Feedback
Was this page helpful?
Provide feedbackThank you very much for your feedback. We will continue working to improve the documentation.See the reply and handling status in My Cloud VOC.
For any further questions, feel free to contact us through the chatbot.
Chatbot


